Replace that sink

If there is anything that I can say that will enhance your TAB 400: Replace that Dometic compact sink!
I mentioned earlier in another post about sinks, that I would create a post with my sink evolution. This morning while away with my wife in our cozy EPOD somewhere in the wild… I just glanced at our new sink….. Time to post something.
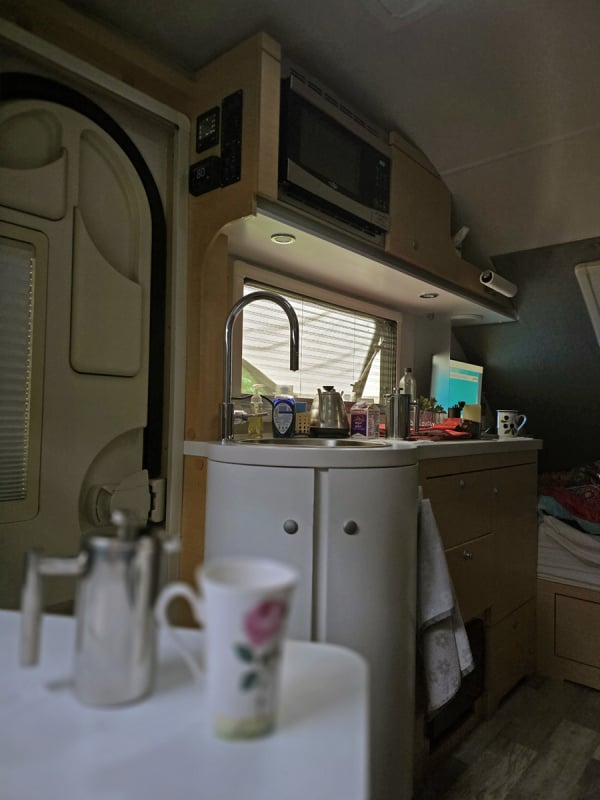
Just moments after I posted this image my wife got up, walked over to the sink and started cleaning the cups and things putting them in the sink and said "I love this sink".
And I thought… Happy Life
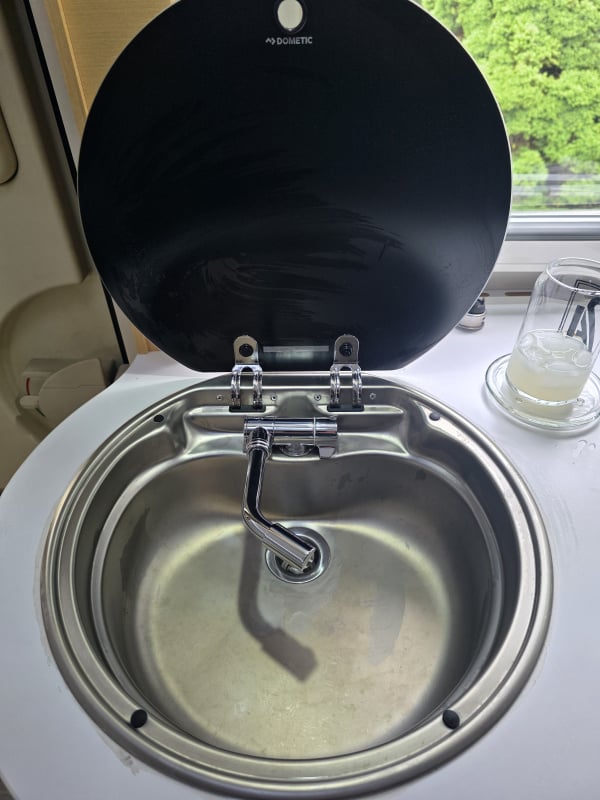
Previously, what I thought was a smart fix for the broken plastic faucet that comes with the original TAB 400 sink, and after much work to make that new folding chrome plated brass faucet that I searched high and low for fit with the glass lid closed… I ripped the whole sink out.
Unfortunately I just got the "Get off the computer' notice from my other half so I will continue this thread later.
Comments
-
With the new metal faucet, besides the way it was so hard to get to the valve, I figured it was only a matter of time the spring loaded top would slam the glass down on the partially folded metal faucet and shatter the glass. It was at that moment I realized why the original is plastic and also realized the whole thing had to go.
So I researched and found the links on this site along with a YouTube video of TAB 400 sink replacement.TAB sink
The you tube was excellent along with the posts on this site, however I used them as a guide, not a set of build instructions. The key take away was the sink that fits and I chose the one in the YouTube video since it is nearly a drop-in and it remarkably does not significantly interfere with under cabinet space.
I bought the sink from Direct Sinks: Dawn round drop-in SS Sink
The first thing to do was pull the old sink out. The plumbing for the water supply is obvious and typical of a domestic kitchen faucet. I made some modifications starting with isolation valves at the low point in the cabinet with purchased brass valves with drain caps.
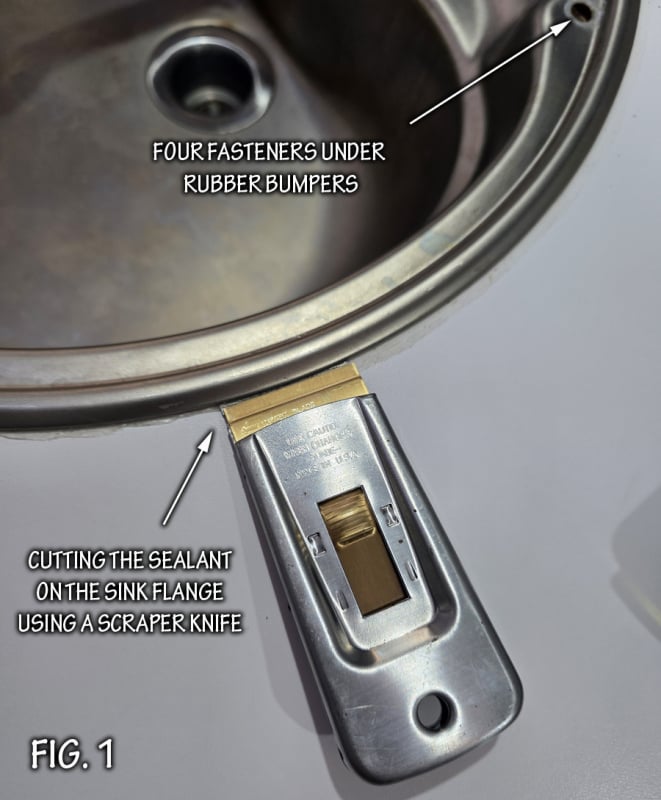
Removing the sink from the counter top is the easiest part. I recommend watching the YouTube video that I have inserted in the link above as a guide, but just to add something I will post some details.
The sink comes with a template and it is easiest to drop that over the hole and trim the opening to fit.
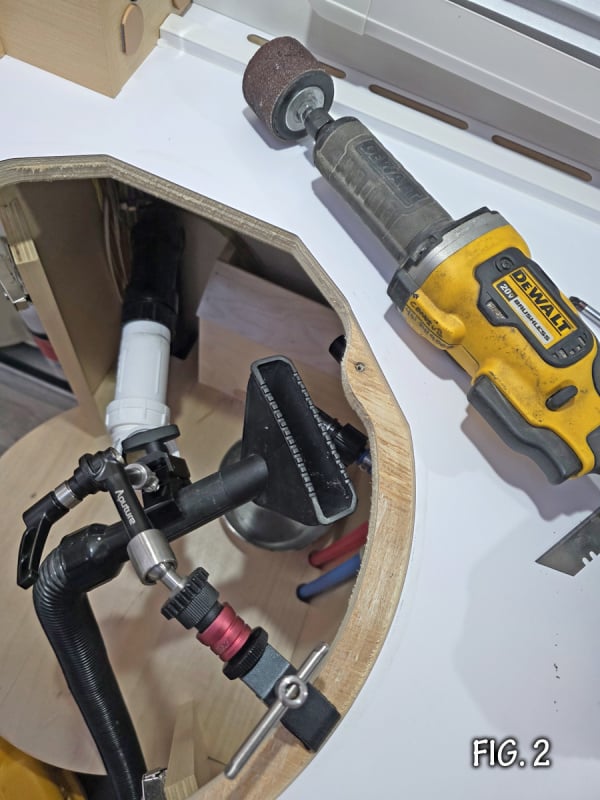
I used a drum sander to shape the hole, trying to remove as little material as possible in the event I wanted to put the old sink back in for selling the trailer to someone who might want that option? Most likely not going to happen… I attached a vacuum to the areas being worked to keep the dust down.
As with everything, when a project gets started there are things that you find the moment you start to pull things apart. The best time to address the new findings is while you have the patient opened up.
At this point it is time for me to sign off and make breakfast. I will post more tomorrow….
0 -
I replaced the sink in our '23 Tab 400 and we just got back from a 2 week jaunt out West. This is by far one of the best modifications that I have made. Makes after dinner clean up a breeze.
_____________________________________________________
Ken / 2023 Tab 400 “La Bolita” (39,000+ miles) / 2024 Toyota Sequoia0 -
elbolillo, just like you said, it makes clean up a breeze. Plates, glasses, pots and pans fit and the faucet is now high enough…. what a game changer.
I figured if I was going to do this, I wanted it to look great as well so I spent the extra on a great faucet with a pull-out spray head.
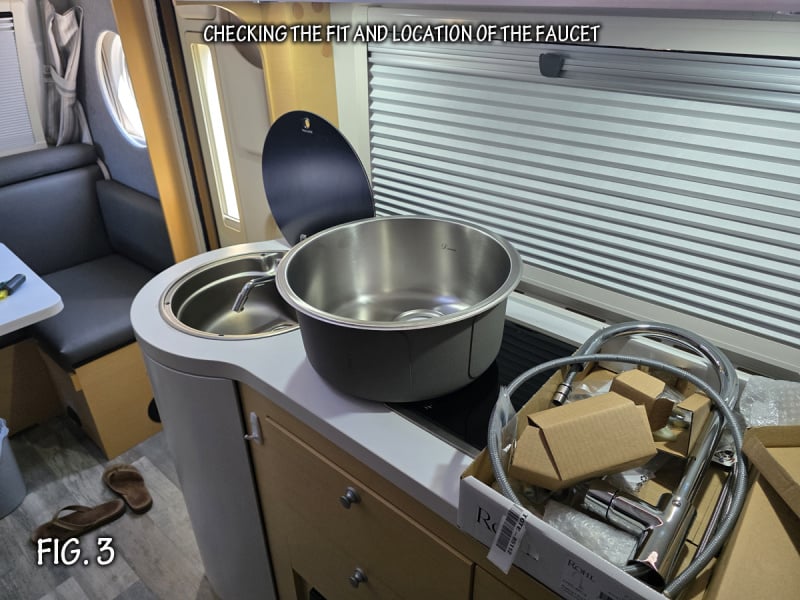
Looking at how everything fits and what interference you might have is important. Also coming up with the best place to mount the faucet, such as a spot where you never go or utilize and one that works for ease of use. Consider the outlet behind the faucet and give that area plenty of space when mounting the faucet.
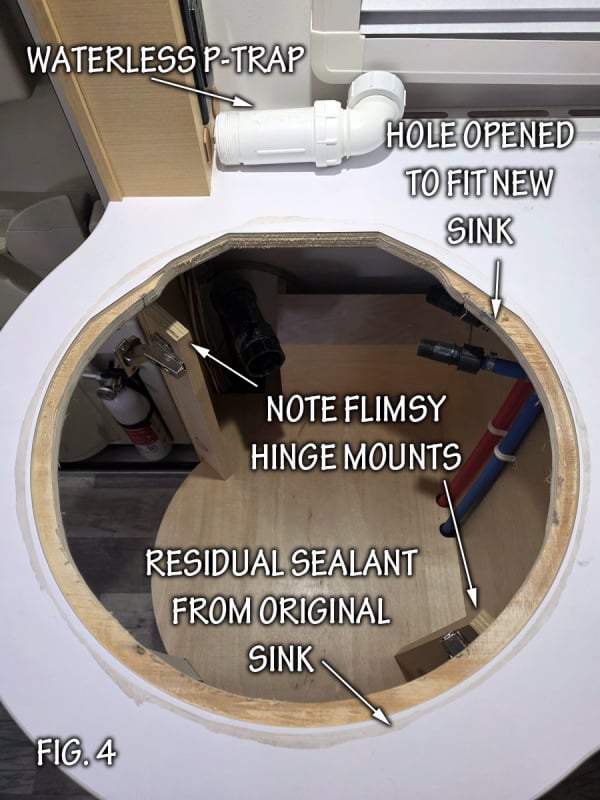
After removing the old sink and trimming the hole for the the sink to be dead center (concentric) of the radius of the counter top. Removing the RTV sealant that was used on the original sink is fairly easy with the razor scraper and then followed up with Goo Gone.
What happened next after I pulled the sink was classic for me, and that is all of the things that bother me about design are exposed and I realize the best time to change that is now. One major thing is the hinge plates that are attached with pocket hole fasteners (With those ugly plastic covers). By the way I have to ask myself is this really Amish workmanship? Anyway I had to fix that and not worry about exposed fastener heads. Also the waterless P-trap is a nasty thing that must go as well. I had added a hot and cold water shut-off at the base of the cabinet and while I did that I oriented the 90 degree hot and cold connection at the top before crimping the PEX.
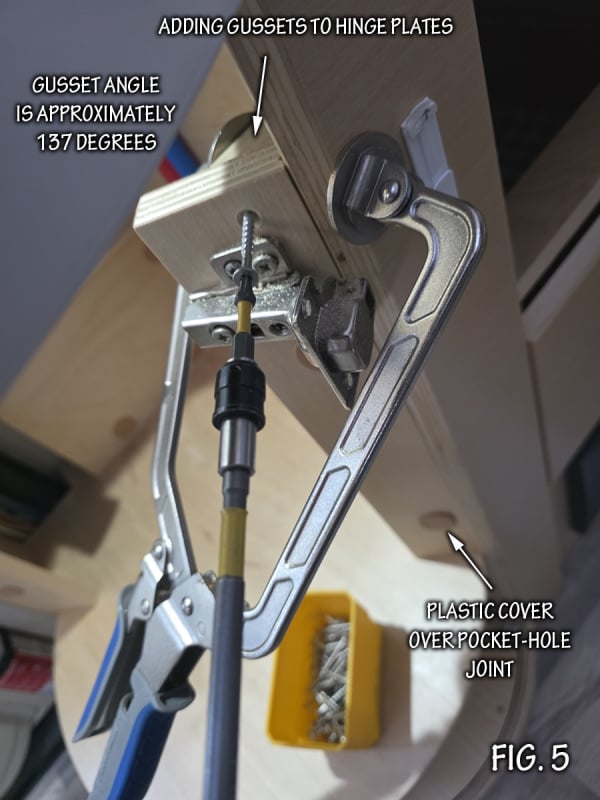
The fix on the hinge plates was easy after I found the angle of the plate, which is approximately 137 degrees. I installed gussets at four places, one near each hinge and now the cabinet doors are more solid and I have that peace of mind that they would not be working their way to falling off. I didn't include a photo but the pushbutton door catch is also short so the doors could fly open when you travel. I added a 0.20" shim under the fixed catch on both sides and gave the catch a little bend to match the radius of the cabinet (perhaps another day I will detail this fix). For now we need to get back to the sink. …more to come…
0 -
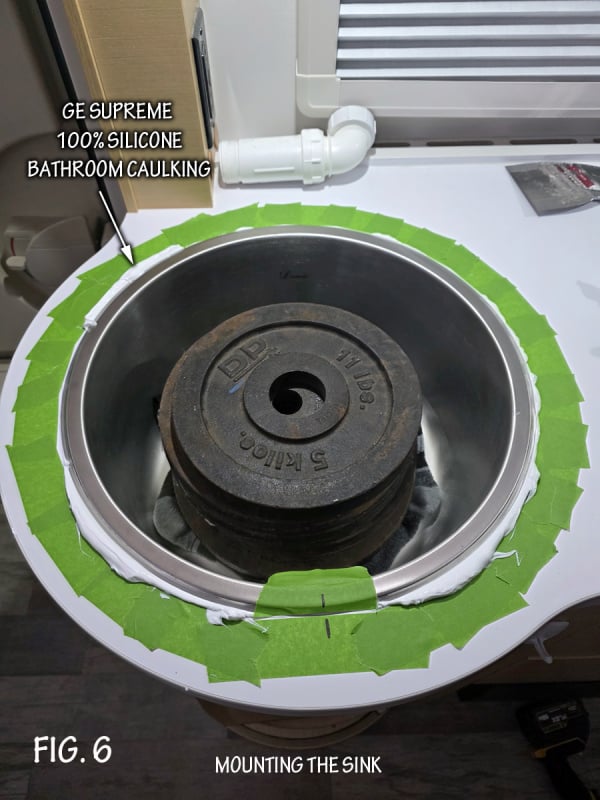
With the location of the sink set and the surrounding surfaces cleaned of residual adhesive/sealant, the new sink was set in place using a GE brand 100% silicone sealant. The perimeter was trimmed with masking tape to minimize clean-up. After setting the sink in place the bowl was filled with iron weights to keep pressure on the sink to counter joint for 24 hours.
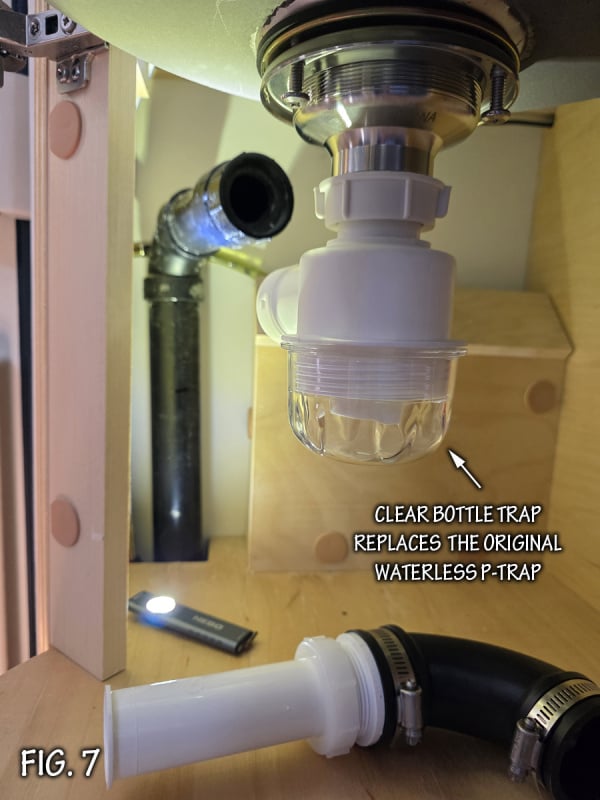
With the sink mounted the drain was then plumbed. I did not care for the waterless P-trap since when it was removed and what I found inside made it easy to make that decision. I made the choice of using a bottle trap when I found a clear one, with an easy clean bowl. Bottle traps are more of a European item but I see them on ships all the time, and if you know it's there and what it is you clean it as needed, and can also see your winterized antifreeze fill when the time comes.
The bottle trap that I used has a small pitch on the outlet so a flexible 1.5" 90 worked perfect to plumb it to the grey water tank. I liked the fact that I didn't have to glue anything here and cutting the pipe against the bulkhead was easy using a wire saw.
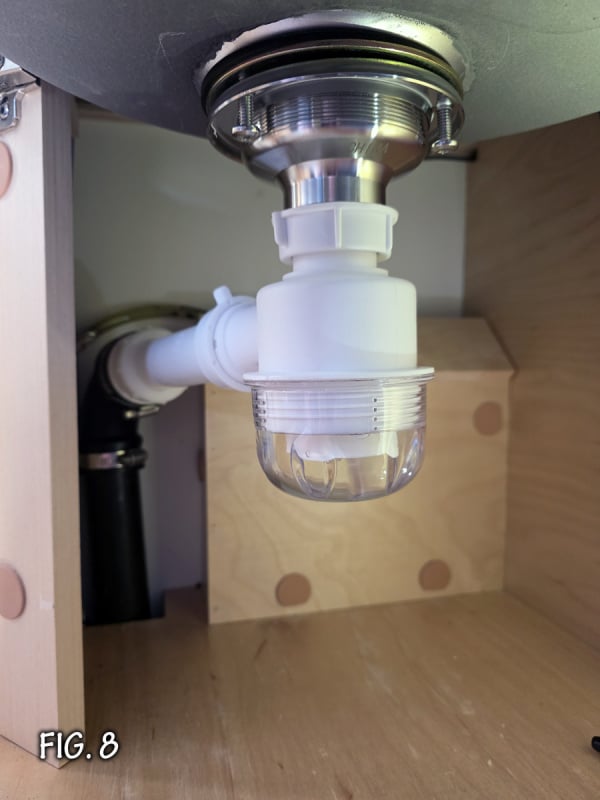
When it all was done I still found plenty of room below the sink for storage. I might add a photo with this space populated with the under sink containers.
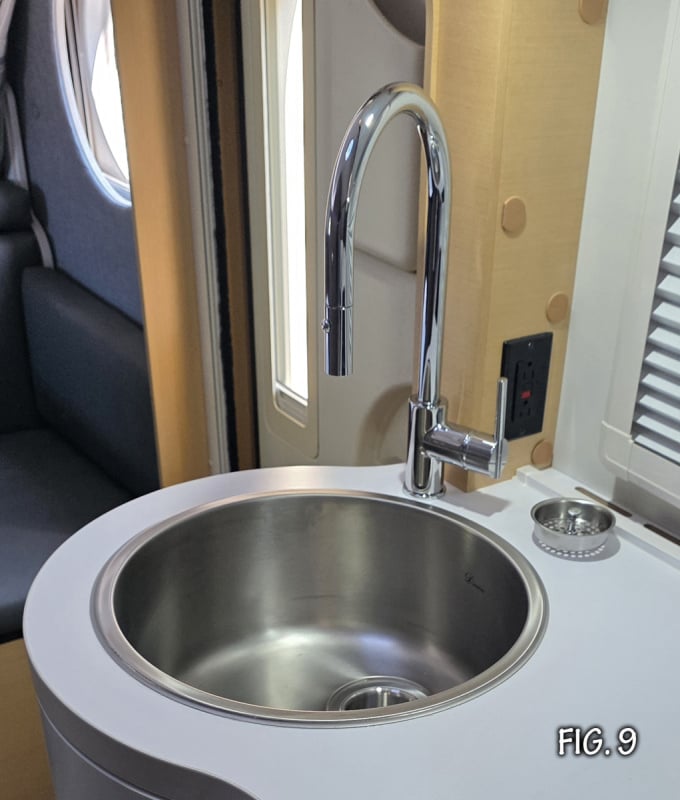
The finished sink…. and the true happiness that follows. I have some white cutting board material and might mill a round insert for the sink to add some space but during the last trip away it was best to just have the sink open and ready all the time.
You won't know what you are missing until you "Replace that sink"
2
Categories
- All Categories
- 12 Cirrus Truck Campers
- 128 Dutchman and Vintage TaB Archives
- 3 Forum Rules
- 3 nüCamp & Forum Contacts
- 969 Air Conditioning & Refrigeration
- 2.7K Battery/Electrical & Solar
- 1.2K Camping & Travel
- 145 Events & News
- 220 Factory Comments
- 27 "FOR SALE" - New/Used Trailers
- 15 “FOR SALE" - Camping & Trailer Gear
- 2.4K Heating/Plumbing & Winterizing
- 138 Help - Computer & System
- 925 Introductions
- 408 Looking to purchase a trailer?
- 2.2K Modifications & Upgrades
- 1.4K Products and Accessories
- 423 Service/Maintenance & Recall Notices
- 37 Solo Travelers Hints & Tips
- 1 T@G Forum
- 78 Teardrop Groups & Links
- 78 Testimonials
- 922 Tips & Tricks
- 1.5K Trailer & Towing
- 27 Owners Manuals/PDF Files/Videos & Resources
- 56 üCamp Rally - News & Information