Dale Helman? Extendable arm extension for lagun table?

2016 Nissan Frontier SV 4x4 Crew Cab
Comments
-
So I deleted my first copied reply. Here’s the thread. More info. And do not know what’s happening with that Npsb thing, but it’s happened before.
https://tab-rv.vanillacommunity.com/discussion/2288/lagun-style-table-mount-with-table-for-under-75-00/p1John, Judi, Guinness & OD in PDX
T@Bit@t 2015 S Max Outback, ‘18 V6 4Runner0 -
This was not an original idea of mine. It done by a Tab’er I named PopTab. It is quite involved and he did a very detailed and complete write up on it. It’s been about five years ago. He is no longer a Tab’er. He went to the dark side and bought an Airstream. I will try a search to find it.


- Hash T@B Fun
0 -
why are the members names I am selecting now have this " " after the name?
2018 Tab 400
2016 Nissan Frontier SV 4x4 Crew Cab0 -
Here are the original instructions fromPop-T@b
I have had quite a few requests for the install instructions. I did not post them the first time, because they are a very long read and I didn't know if anyone would be interested in doing this. So here they are, please let me know if you have any questions and thanks for your interest.
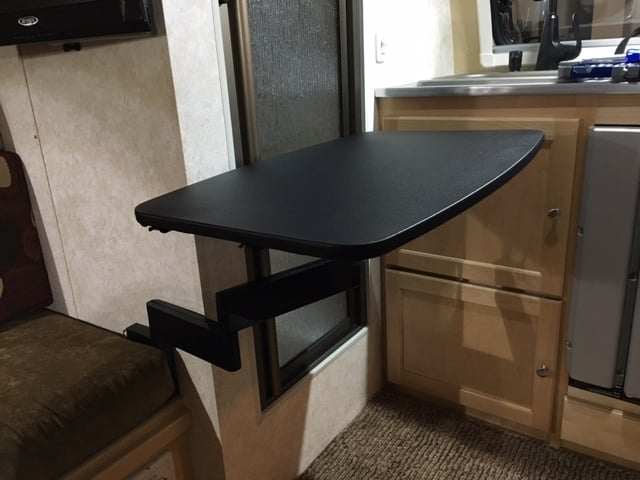
I like the new Lagun table mounting system, except for two things, the high price just for the mount, with no table and you still have a post in the middle of your bench. We have been using a fold up table and it works fine, but I wanted something that was there when you need it and out of the way when you don’t. So here is what I did in my T@B Max S. I used a Barkan Flat panel TV mount model #34F which can support 77lbs ($50.00) and the top from a Mainstay folding table I was using from Walmart ($15.00), and some hardware ( under $10.00).The hardest part to this whole process is you will need to reinforce the wall below the TV, there is a piece of ½” plywood in the wall at the bottom of the hole where the TV mounts and behind the support rail for the bench at the bottom of the wall. The wall between the two is just paneling. Here’s how I did it, I removed the TV and mount so I could get into the wall at the top, then I removed the seat cushion and the plywood panel under it. I cut the hole below the support rail bigger to gain more access into the wall at the bottom. I cut a ½” piece of plywood 8” x 10” slid it down the wall thru the TV mounting hole, then cut a ¾” x 4”x 30” long board to back the plywood piece. This board is very hard to get in and down the wall, you will need to bow the wall out and tap the board down in. It will go, but it is a struggle. Once you have the two pieces in the wall, reach in from the bottom and set the ½” x 8”x 10” piece of plywood on top of the ½” piece of plywood that is already there supporting the bench rail, then take the 30” long board and put a 1 5/8” wood screw in it at the top, to hide this screw I put it between the bungee cord plastic loop below the TV mount ( see picture ), then at the bottom reach in and angle the board over towards the entrance door, you will need 2 ½ ” long wood screws, I put the 2 ½” screws thru the bench rail, the ½” plywood for the support rail and the bottom of the new 30” board, I put in 3 screws. Then back at the top, I used longer screws to reinstall the plastic bungee loop, so they would reach thru the plywood and into the new 30” board which also gave me 3 screws in the top. So what you get is a board mounted solid at the top and bottom to the existing wall with a filler board (the ½” x 8” x10”) setting on top of the plywood for the bench support rail. When I mounted the TV wall mount I used 5- 1 5/8” wood screws, make sure the screws go thru the wall, the new ½” piece of plywood and the new 30” long board. I put in one screw, then pulled the TV mounting arm out to make sure it was level and then I installed the rest of the screws, then installed the cover. You will need to notch out the plywood for the seat base to accommodate the new mount. Now for the modifications to the TV mounting arm is you will need to take off the mounting post on the end of the arm. ** Please note if you want the table height at 28” from the floor you will need to cut 3” out of the center of the post and weld the post top back on, if not the table height will be 31”** and reinstall it on the top side of the arm, remove the two metal brackets that limit the tilt, I installed a ¼” x 4” turnbuckle in their place with a removable pin on the bottom hole. This will allow you to tilt the table 90 degrees. Now onto the table, I removed the legs, mounted the TV mounting bracket to the bottom of it, the outer rim of the table has a metal rail molded into it, be sure you get your mounting screws into the metal. Then install the table to the TV mounting arm, tilt the table flat, install the pin thru the turnbuckle, then thru the hole in the TV mounting post. Use the turnbuckle to level the table. To store the table remove the pin, tilt the table , swing around under the TV pull out the TV and while pushing the table back under the TV, tilt it vertical and push flat against the wall, push the TV back and the table is stored out of the way.
- Hash T@B Fun
1 -
Hi @Dalehelman,
Hehe, he may have gone bigger with an Airstream, but his T@B is still here. Only now it's been ours for a couple of years.
We love this table set up. I did reposition the top on the mount a little and shortened of couple of the four arm supports by an inch or so. They no longer stick out past the table edge any more. Also noticed from your pics, that on ours the base is mounted to the wall a bit more toward the center of the T@B almost even with the front of the cushion. Very functional.
2016 T@B 320 Max S "T@BsentMinded"
2009 Subaru Outback R 3.0
2022 Ford Ranger XLT Super Cab 3
3 -
Thank you all! That’s the thread!
2018 Tab 400
2016 Nissan Frontier SV 4x4 Crew Cab0 -
@Dalehelman @JanandDave Does anyone have a close up pic of the hardware used on the underside of the table to attach it to the extension arm? I can't quite make out all the hardware in the pictures--it is a kind of a dark pic and can only see part of the hardware. Thank you2018 Tab 400
2016 Nissan Frontier SV 4x4 Crew Cab0 -
This may help.Pop-T@BI like the Lagun table mounting system, except for two things, the high price just for the mount with no table and you still have a post in the middle of your bench. We have been using a fold up table and it works fine, but I wanted something that was there when you need it and out of the way when you don’t. So here is what I did in my T@B Max S. I used a Barkan Flat panel TV mount model #34F which can support 77lbs ($50.00) and the top from a Mainstay folding table I was using from Walmart ($15.00), and some hardware ( under $10.00).The hardest part to this whole process is you will need to reinforce the wall below the TV, there is a piece of ½” plywood in the wall at the bottom of the hole where the TV mounts and behind the support rail for the bench at the bottom of the wall. The wall between the two is just paneling. If you like this idea and need more detail on how I did the install send me an email for more information.
Thanks, Shawn


- Hash T@B Fun
0 -
A few updates to the original design:
Being a German engineer") I made a more solid mechanism to lock the table in the horizontal position.
I made a more solid mechanism to lock the table in the horizontal position. 

Then, I replaced the plastic table top with a more stylish wooden one. This top is also a little smaller so it fits perfectly in the space under the TV. And yes, the table top started its life as a carving board....


Finally I added two loops to hold the table firmly in place when driving along rough roads. Still need to find a less obnoxiously colored strap.
2 -
@Grumpy_G… and the mods continue!
") I replaced the clunky gray and tabletop with a much nicer bamboo cutting board. I prefer the wood over the laminate and I love the smaller footprint.
I replaced the clunky gray and tabletop with a much nicer bamboo cutting board. I prefer the wood over the laminate and I love the smaller footprint.  2017 T@B 320 Max S silver and cherry red, L@dybug ("Bug" aka my esc@pe pod), TV 2015 Toyota Highlander aka Big Red1


Categories
- All Categories
- 10 Cirrus Truck Campers
- 121 Dutchman and Vintage TaB Archives
- 3 Forum Rules
- 3 nüCamp & Forum Contacts
- 954 Air Conditioning & Refrigeration
- 2.6K Battery/Electrical & Solar
- 1.2K Camping & Travel
- 142 Events & News
- 219 Factory Comments
- 20 "FOR SALE" - New/Used Trailers
- 14 “FOR SALE" - Camping & Trailer Gear
- 2.4K Heating/Plumbing & Winterizing
- 140 Help - Computer & System
- 920 Introductions
- 407 Looking to purchase a trailer?
- 2.1K Modifications & Upgrades
- 1.4K Products and Accessories
- 408 Service/Maintenance & Recall Notices
- 37 Solo Travelers Hints & Tips
- 1 T@G Forum
- 75 Teardrop Groups & Links
- 77 Testimonials
- 916 Tips & Tricks
- 1.5K Trailer & Towing
- 27 Owners Manuals/PDF Files/Videos & Resources
- 54 üCamp Rally - News & Information