Reinforced toilet flange

Hello,
I found out on our last traveling adventure that the right hand side of our toilet flange broke rendering our toilet wobbly. I have since returned and removed the toilet and flange and set out to find a new one.
I know I can get threaded flanges online (no local plumbing supply houses seem to have them), but all the threaded flanges seem to be only for RV's and trailers, which IMO are cheaply made plastic. I'd love to find a metal reinforced threaded flange like they sell in Lowe's that would thread in the tank, but the only metal reinforced flanges are the glue on style.
If these things just don't exist, I even entertained the idea of modifying my replacement flange with an aftermarket "repair ring" that you can get at Lowes. I'm just trying to come up with a long term solution here. We've only had the camper for just under a year and we've already broke the flange, I'm not trying to make replacement of a toilet flange an annual ritual.
Thoughts and advice are appreciated.
2025 T@B 400 (original owner)
2013 Silverado 1500 (T.V.)
Stanwood Washington
Comments
-
I found a solution.
I'm certain it's not manufacturer approved, but it should hold and IMO should be more durable than the factory fitting. The slight modification is completely discreet, you'd never even be able to tell unless you removed the toilet.
2025 T@B 400 (original owner)
2013 Silverado 1500 (T.V.)Stanwood Washington
-
@AndreaPalumbo . . . I don't recall many folks reporting flange failure, perhaps your rig had a poor install or defective part.
A basic summary of how you completed the repair could be of future help to others.
Any pictures or parts list would be a plus.Now this is a bit late . . . found this youtube video doing a repair by placing/mounting a Metal Repair Flange Ring on top of the standard RV Plastic flange.
Toilet Flange Repair Option'18 320 S, pitched axle, 3020HE; PNW basedTV: '17 Colorado V6 Z71 4x4, Tow Package, GM Brake Controller
TV: '25 Canyon AT4
Adventures: 58 Nights: 405 Towing Miles 50,180 -
Thanks for your tip, and a good video! Good to know… Where did you get the metal “OT” flange and exactly what was it called?
2026 T@B400 Black Canyon
2008 Nissan Titan 4x4 Crew Cab
Jonesborough, TN
-
Sounds great. Please tell us about the solution!
2015 T@B Max S (320)
2015 Nissan Frontier SV V6 4x4 -
Can do!
A quick note however, I would imagine this fix is not manufacturer approved, and it also involves modifying purchased fittings. Thus, if the project gets sideways, you won't be able to return the parts to the store, and if you further damage the trailer in the process of repair, of course NuBrite likely won't cover it via warranty.
For me the project was a complete success, however it is understood that you do this at your own risk. I resisted sharing my procedure as I figured it was one of those things that might make some people cringe… lol. What can I say… I'm an old Appalachian hillbilly at heart. We have a knack for rigging just about anything. 😏
Now that the lawyerly stuff is out of the way… he's what I did: (photos are below)
I went to the Home Depot (the Bellingham Washington location had what I needed, though I imagine stock is similar in other stores… FYI, Lowes didn't have what I was looking for).
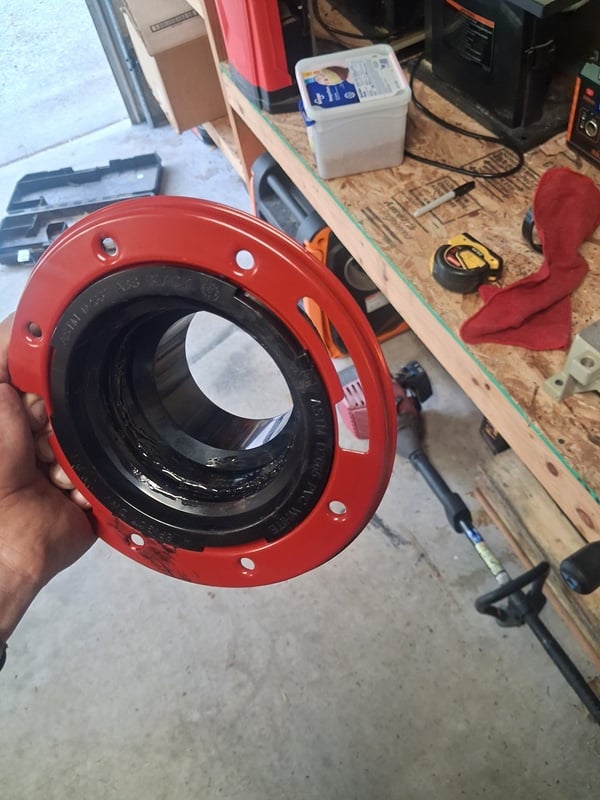
I purchased a red metal reinforced 4" toilet flange.
I also purchased a 3" threaded ABS adapter coupling.
Also a can of ABS cement. I already had teflon tape.
***
- Test fit the parts in the store before purchase. The threaded adapter should fit neatly into the female end of the toilet flange. NOTE: These parts are NOT made to be joined in this manner. They just so happened to fit just right. There was a SMALL amount of play in the fitting (about the thickness of a sheet of paper)** I'll cover what to do about this shortly.
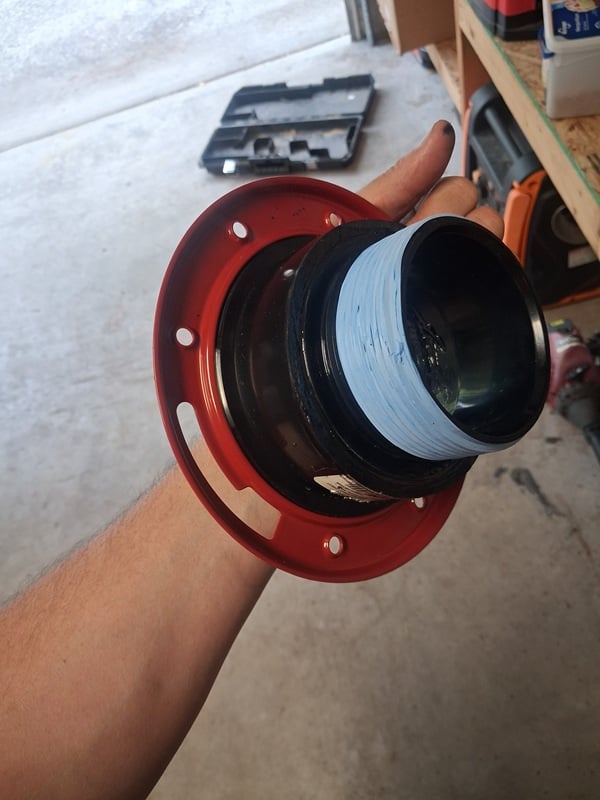
- As it is, if you assemble the pieces as they are purchased you will find that the finished part is way too long. You will need to take careful measurements and cut the female part of the flange as well as the threaded fitting (where they glue together). I found it to be about half of the length glued male/female parts on both pieces. Measure several times and endeavor to leave as much surface as possible for the best possible weld. I cut the threaded coupler with an electric chop (miter) saw. I cut the flange by carefully clamping the metal flange part in a vice and carefully cutting the pipe part with a sawsall.
- Prior to gluing the pieces together, you may want to test fit it in the RV itself. Once you're satisfied of the fit, glue the two pieces together. Use a VERY liberal amount of glue. (this will help bind the two pieces together better.) I let my fitting sit for a few days prior to installing it.
- Back in the camper, the hole in the plywood base was slightly off center to the threaded opening in the black tank. A small jig saw was employed to saw out the excess to make a proper hole to accommodate the new fitting.
- Apply Teflon tape to the threads, I found that I had to thread the fitting very far down into the tank, the threads were generally easy, however I put most of my Teflon towards the back part of the threads to help get it down further.
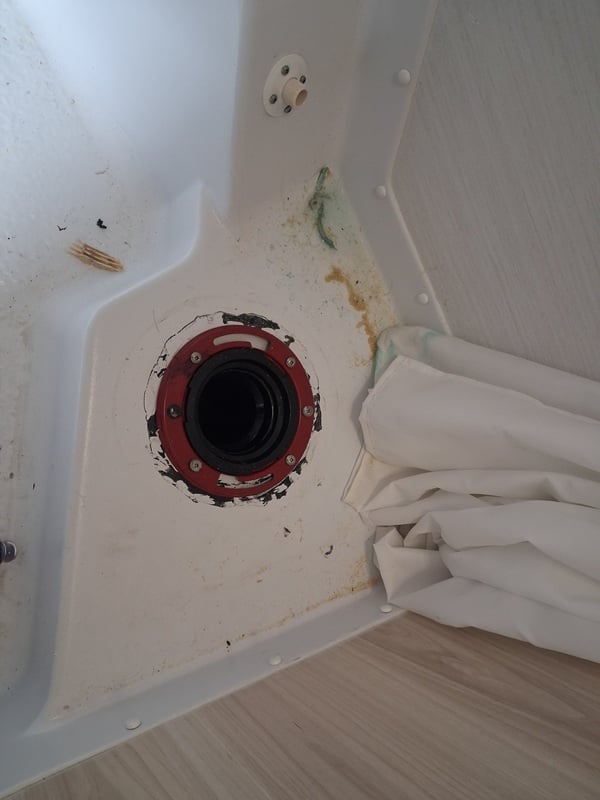
- Now the tricky (unexpected part). Because the red metal ring spins freely on the flange, it has the advantage of being able to be adjusted for the desired alignment of the toilet flange, however the disadvantage of not having a practical means of grabbing this thing with a tool to help thread it into the black tank tightly. Whereas a punch or something similar might have been used to help thread in a solid flange piece, this wasn't an option with a moveable ring. The solution turned out to be a pair of good work gloves and as tight of a grip as you can muster, with your hand down in the hole, turning it in with all your might. Once the red ring is seated to the base you're almost done.
- Line up the six screw holes and fasten the flange in the same manner as the old one.
- Apply silicone as desired, install the rubber sealant for the toilet, and mount the toilet on the flange.
- NOTE: The right side of the toilet (where the flusher pedal is at) I found to be very difficult to start the nut. You literally can't see it, and have to "see with your fingers". Patience is a requirement.
- Since this is a wet bath, I applied a bead of silicone around the base of the toilet to help keep any stray water out from under the unit.
And there you have it… this was probably not a project for a beginner. It required some creative thinking as the project progressed, and was met with various challenges. I doubt you'd ever get a professional to do this… this is strictly DIY. But when we sit on the toilet now, it feels VERY solid and doesn't budge a lick. I've been banging around old houses for 30 years and work as commercial service technician by trade, so I'm somewhat accustomed to "making things work".
Is it overkill? Probably. But I estimate the work should last the lifetime of the trailer.
2025 T@B 400 (original owner)
2013 Silverado 1500 (T.V.)Stanwood Washington
-
There have been a couple of threads about this broken toilet flange over on the FB pages. This week, there was another report, and the owner says the dealer has no idea if the part exists. Another owner says it does, and the part number is "68-50-4838", which apparently is a NuCamp part number. Some owners report that NuCamp has shipped that part to them.
The flanges you can find online all look quite a bit like the ones we see are cracking, but….apparently NuCamp "designed their own toilet flange" and the things you can find online will not work. (As we see in this thread, also).
This is another hidden plumbing/parts issue that will come back to haunt some owners. Those of us with the unobtainable Norcold vents that Nucamp used from a local vendor, or the "flapper" type water fill devices that break and cannot be found, will know how this feels. But, if my flapper breaks or the vent flies away, that is not the same thing as "my toilet doesn't work".
So, thank you @andreapalumbo!
2017 Outback
Towed by 2014 Touareg TDi -
@AndreaPalumbo I'm so glad you fixed our toilet so we can continue to enjoy our camper. Thank you for providing us with the insight in what you did. Always comes in handy for other Nucamp owners. - ❤️Bean


 2017 Outback
Categories
- All Categories
- 10 Cirrus Truck Campers
- 119 Dutchman and Vintage TaB Archives
- 3 Forum Rules
- 3 nüCamp & Forum Contacts
- 954 Air Conditioning & Refrigeration
- 2.6K Battery/Electrical & Solar
- 1.2K Camping & Travel
- 142 Events & News
- 219 Factory Comments
- 20 "FOR SALE" - New/Used Trailers
- 14 “FOR SALE" - Camping & Trailer Gear
- 2.4K Heating/Plumbing & Winterizing
- 140 Help - Computer & System
- 920 Introductions
- 407 Looking to purchase a trailer?
- 2.1K Modifications & Upgrades
- 1.4K Products and Accessories
- 408 Service/Maintenance & Recall Notices
- 37 Solo Travelers Hints & Tips
- 1 T@G Forum
- 74 Teardrop Groups & Links
- 77 Testimonials
- 915 Tips & Tricks
- 1.5K Trailer & Towing
- 27 Owners Manuals/PDF Files/Videos & Resources
- 62 üCamp Rally - News & Information