Options

Pushbutton Stove Igniter Installation

BrianZBrianZ Member Posts: 1,763
edited August 2021 in Modifications & Upgrades
You may have seen the video on this project for adding a pair of Piezo electric igniters to your T@B's propane stove to replace your handheld butane lighter or matches.  If not, here is the link which provides a good overview..
(Thanks, @Freespirit for bringing this guy's series of T@B videos to my attention.)
The igniters do not require any power source and are supposed to last for 30,000 uses, so I was surprised that I hadn't heard of this mod before.  I found a package of 4 on Amazon for about $12, so I have spares.  As I began thinking about doing this myself, I realized that there were some "how to" details missing from the video that I thought I could fill in and describe here.  Hopefully, my photos will help remove any remaining mystery.

The most essential piece of information missing from the video is the need to add a ground wire to complete the circuit between the base of the pushbutton and the stainless steel base of the stove.  Normally, this pushbutton would be installed directly on the metal base of a grill, etc, but installing it on a wood cabinet, as done here, does not provide the ground contact between the button & the stove burner.  So, I will show & describe how I did this.  After I completed this project, I was pleased to discover that the author of the video added a text comment under his YouTube video noting this requirement.  I liked the looks of his aluminum faceplate for the buttons, so I did the same thing, and found that it also provides a means to share the same ground connection between both buttons.

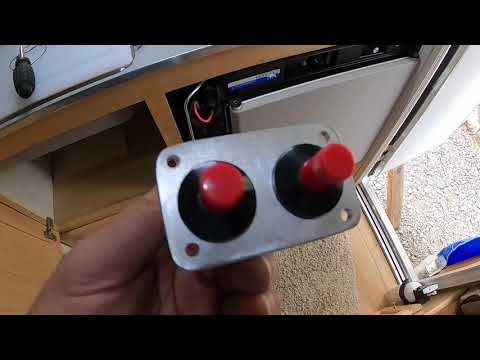
Here's my finished project..

And a closer view of the sparkers, with tips bent to within about 3/16 inch of the burner..

Below is a closer view of the mounted pushbuttons which are fastened to the aluminum plate, then the plate is fastened to the cabinet with stainless wood screws.  First, I made the faceplate out of a piece of 1-3/4"x3"x1/4" aluminum & drilled 3/4" holes using a spade bit with the plate clamped in a vice (from one side halfway through & then from the other side using the same hole) to fit the pushbuttons, plus holes for the screws, trimmed corners with a hacksaw & filed edges with a flat metal file. 

Below is a close up view of a pushbutton, where the green arrow shows the ground wire embedded in the plastic shaft, such that when the metal nut is screwed on, it makes contact with both the wire & the metal plate, which then shares contact with the second pushbutton.   The red arrow is the hot lead where the wire for the sparker plugs in.

The next photo shows how the above described ground contacts in the buttons are connected back to the steel stove base via the green ground wire..

I soldered the green ground wire to the hollow inside of the nut, then fed it through the same hole in the cabinet in which the button is mounted, for connecting to the underside of the metal stove. 
At first, the only convenient place I found to connect the ground wire using the small crimp connectors I had on hand was the end of a small bolt on the stove hinge, where I added the eye-connector of the ground wire, with a lock washer & nut to fasten it.  Once I found a ring connector to fit the 3/8" diameter of the threaded sparker base, I connected the ground there..


Here are the holes I drilled using two spade bits in the face of the cabinet for the buttons & screws..

Note that it is critical to use the larger 1-1/8" spade bit first, and only drill about 3/16" deep, just enough to fit the silver nut inside below the surface of the wood.  Second, drill in the exact same spot using the 3/4" spade bit to go all the way through the wood to fit the pushbutton.  Repeat for the second hole.  Check spacing for the holes using the aluminum faceplate as a template.
Here are the drill bits I used..

Next, I drilled the 3/8" holes shown below through the steel stove top..  

This was not easy, even using bits designed for use with metal, but I went slowly and used three bits of increasing sizes, starting with a 1/4" bit with an extra starter tip on it designed for use on metal.  I held the drill tightly and tried not to use excessive downward force as the bits were about to break through.  I had to clean up the ragged edges of the holes with a file afterwards.
I took the following precaution to avoid damaging components below the stove..

I placed a small board (red arrow) below the stove with blocks at the ends to hold it above components to be protected.  I positioned the board carefully to line it up underneath the two hole locations, and after the first holes were drilled, I re-checked alignment by sticking a thin tool through the hole to check that the board was in the right place.  This proved worth the effort, as there were two occasions when I punched through & hit the board underneath.
The green arrow in the photo above points to the hinge for the lid where I had temporarily used the one on the right to attach the green ground wire before I moved it to the base of the sparker, so there are some options for grounding.  I believe the sparker base location works better for the ground connection (a shorter route, electrically).
And finally, yes, we have a spark!..

(I used my phone camera's "burst" mode just before pressing the igniter button to capture this one spark out of a dozen or more photos).
Now, for me, this means no more contortions reaching back behind the stove into the far corner to retrieve the butane lighter & without knocking everything over on the counter.  And no issues with ever running out of fuel in the butane lighter.

PS:  If you enjoy using a drill, then this is your project!  Using a spade bit can be a "bit" of a challenge sometimes, and it takes a strong grip; so if you have any doubts, try practicing on a scrap board first, as the T@B's hardwood is tough, but it's clean & cuts well if your bits are sharp.  The aluminum is tougher though, so if you can drill through that with a 3/4" spade bit, the wood shouldn't be any problem.

-Brian in Chester, Virginia
TV: 2005 Toyota Sienna LE (3.3L V6)
RV: 2018 T@B 320S, >100 mods 

Comments

  • Options
    georgianwindsgeorgianwinds Member Posts: 41
    Nicely done, Brian. Might just make this mod the next on my list.
    Camper - 2019 T@B 320 CS, TV - 2021 GMC Canyon Diesel
    Scott & the S.S. PorT@Bella

    My Teardrop Mods  https://georgianwinds.wixsite.com/teardropmods 
  • Options
    Tabaz Tabaz Member Posts: 2,357
    Is it possible to have both sparkers connected to just one push button ignitor?  If so, then the push button looks like it could be mounted in the stove between the two flame adjustment knobs.
    2016 Outback 320 with a 2010 Ford Expedition.
  • Options
    BrianZBrianZ Member Posts: 1,763
    Great question & idea, @Tabaz .
    The sparker button generates a surge of high voltage which jumps the air gap, so adding a second sparker would divide that voltage in two.  However, the distance the spark has to jump is adjustable, so could be compensated for, by moving the sparkers a bit closer to the burners, if needed, or to balance the resistance in the two branches of the circuit due to different distances in the ground path through the metal stove between sparkers & button.  I would bet that your idea would work, though it's possible that it might need adjusting or cleaning of the sparker tips to keep both working & avoid having all the current taking one path.  I guess there's only one way to find out, and one could probably test it without drilling any holes.
    -Brian in Chester, Virginia
    TV: 2005 Toyota Sienna LE (3.3L V6)
    RV: 2018 T@B 320S, >100 mods 
  • Options
    TabulatingTabulating Member Posts: 84
    Thanks for the great write up.  

    You do mention that this idea came from a guy with a series of videos.

    Is there a way you could provide a link or a clue on how to find them.

    Thanks,

    Bill
    2018 T@b 400  towed by a 2012 JKU
  • Options
    BrianZBrianZ Member Posts: 1,763
    @Tabulating, here's a link to his YouTube channel with all his T@B videos..

    https://youtube.com/channel/UCRdKCLh2lKFl_dNBNaLTnWw

    -Brian in Chester, Virginia
    TV: 2005 Toyota Sienna LE (3.3L V6)
    RV: 2018 T@B 320S, >100 mods 
  • Options
    BrianZBrianZ Member Posts: 1,763
    edited August 2021
    @Tabaz , I tested your idea using a spare pushbutton.  It worked, sort of, but not predictably.  It did not fire both at the same time, but one or the other always fired.  Which one fired seemed to be a random event - at times it seemed to alternate, or one or the other could fire several times in a row.  I'm not sure I would do this if I often had to often snap the button multiple times.  My current setup works first time, every time.
    In any case, here's how I set up the test..
    I mounted an extra button inside a scrap piece of a 3/4" threaded PVC pipe adapter so I'd have a way to hold it for testing without getting shocked.. 

    I attached a forked wire connector to the hot lead on the button for attaching the wires from my installed sparkers.

    Next, I ran an alligator clip ground wire between the silver ground nut on the pushbutton to the screw hole at the front right corner of the stove top, which is about the same distance to each mounted sparker.
    So, I'm not sure if this helps, but I also noted how there is a possibility for mounting the button in one of two positions shown.  Position 1 seems questionable to me, because the rigid metal gas line would likely interfere & also be very close to the hot lead.  Position 2 doesn't have that interference, but would face the opposite (forward) direction, which might be awkward and may interfere with the counter & prevent lifting up the stove from the front first.
    That's about all I got for now.
    -Brian in Chester, Virginia
    TV: 2005 Toyota Sienna LE (3.3L V6)
    RV: 2018 T@B 320S, >100 mods 
  • Options
    Tabaz Tabaz Member Posts: 2,357
    Wow Brian - thanks so much for doing that experiment!!  You just saved me a bunch of time and frustration.  I did notice a "dual" ignitor available, but it had aluminum shrouds around each sparker.  Not sure if those would fit the Dometic stove.  Will keep looking.  Thanks again.
    2016 Outback 320 with a 2010 Ford Expedition.
  • Options
    TabulatingTabulating Member Posts: 84
    Maybe there is a way to put a piece of dielectric material (like a thin tile or some such) in the space between the sparker and the gas ring to increase the resistance. This may allow the other sparker to fire reliably.

    But, then you would have to keep track of that piece and it might just be better to have two buttons.
    2018 T@b 400  towed by a 2012 JKU
  • Options
    BrianZBrianZ Member Posts: 1,763
    @Tabulating, I don't think you'd need to do that; just adjust the sparker distance from the burner to fine tune the balance of resistance between the two.  I didn't try that, but I'm not sure you'd ever get the perfect position that would always let both fire simultaneously, as opposed to one path of least resistance.  And if you did, it may change over time.  That's just my guess though.
    -Brian in Chester, Virginia
    TV: 2005 Toyota Sienna LE (3.3L V6)
    RV: 2018 T@B 320S, >100 mods 
  • Options
    tybladesmithtybladesmith Member Posts: 178
    @BrianZ, Thanks for the inspiration to do this mod. Great writeup.
     I would mention a slightly different path. I used a 1" hole saw for the retaining nut clearance and then a 7/8" hole saw to drill through the cabinet face. I also was comfortable with disconnecting the gas hose to do the drilling of the stove pan, out on the front platform using a 2" block underneath to make a flat support for drilling.
    Kay and Tom - SW Wisconsin - Silver T@bernacle - 2018 T@B 320S Boondock Silver/Black trim TV, 2018 Chevy Colorado, Silver/Black trim, Duramax, TowHaul, IntelliHaul
  • Options
    ChanWChanW Member Posts: 3,158
    That's great @BrianZ, thanks for writing that up!

    Might be a winter project!
    Chan  -  near Buffalo NY
    2014 S Maxx
    2011 Tacoma 4cyl ... edit: 2022 Tacoma 6cyl - oh yeah! 

     A_Little_T@b'll_Do_Ya
Sign In or Register to comment.