T@B 400 bathroom folding sink removal; add panels and shelf

qhumberd
Administrator, Moderator Posts: 855
Just thought I would share this modification, which was prompted by the drain in our round folding sink pulling away from the corrugated drain tubing, never to be seen again. Thinking we needed to repair it I looked for options but when I mentioned those to the wife she said "We barely use that sink as it is. Can we get rid of it?". So after seeing some other conversions to wall mount sinks or to just a bare panel, I decided to try for a panel with a small shelf beneath that might be useful. I will walk thru the removal and the installation. I like to see the insides and behinds of stuff, so apologize for the multiple views.
The folding sink has two long screws near the middle and 6 smaller screws around the edges and comes off pretty easily. The plumbing shown below was connected to sink via hand tightened sink risers for 1/2 inch supply lines and attached to the sink with a PEX fitting. The drain (which was pretty slow as many know) is attached to the corrugated drain via a 3/4 inch T connector. One comes from the sink basin and the other from the cistern basin behind and below the sink. So now that its out of the way, things are pretty easy to see.


First step in the remodel was determining secure plywood mounts. The cabinets above are 1/2 inch plywood and the wall to L is 3/4 inch plywood. The plywood mount mid way down for the vent plumbing is also 3/4 inch and is secured to wall on L and a plastic composite board on R. The wall behind is the Azdel exterior wall.


There are two large vent pipes, one from black tank on R and one from grey tank on L and they combine and exit up a chase to the roof. The hose lines here are the black tank flush system, which flows up through a check valve and then back down to spray in the black tank. Seems to work fine and no issues.

Oh and you need to plug the corrugated drain to grey tank and both the hot and cold inlets to the old sink. They are 1/2 inch PEX NPT connectors. That is about all the plumbing I could handle. And don't forget to pressure test before you cover up the wall!
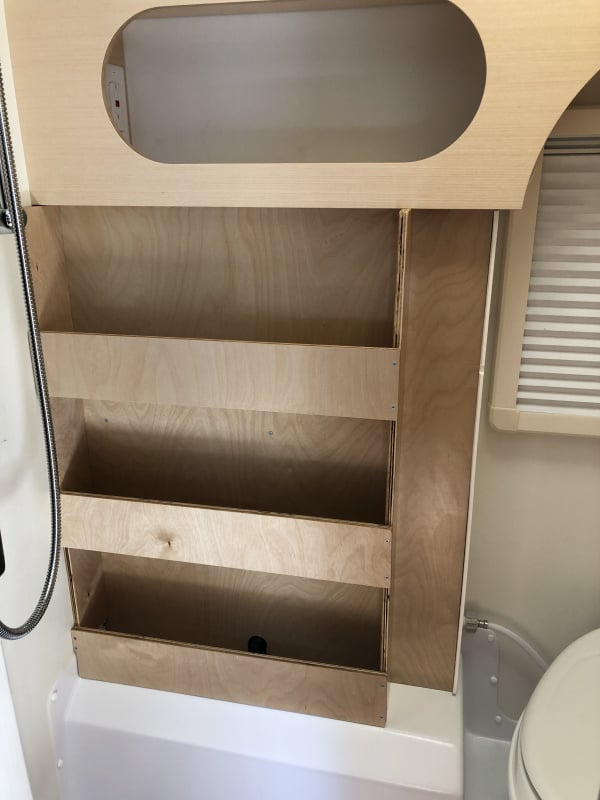
I used a 1 inch by 3/4 inch block 25 inches long under the upper cabinet as a point to secure the panels at the top (shown below) . The plywood was what I had available and so there are 2 panels with a vertical seam. You will likely want to use a single piece of plywood. I had a leftover piece of furniture grade here and if birch plywood sheets ever drop in price I can easily swap this out. I used #8 pocket screws 1" and 1 1/14" depending on thickness and they work very well.

The next photo below shows a practice fitting of the support for the shelf, which is 4 3/4 inches deep and supported by this partial box that is 8 1/4 inches high and rests on the plastic tank cover shown. The shelf overhangs about an inch. Will place blocks to secure to make this easy to remove for access.

So here is what the construction of the partial box and shelf looks like. Just simple joinery with some easing of the areas the bath is not quite even. Not too much for a novice.


So this is what it will look like in the bath. Will put urethane sealer and caulk the joints. I noted I now have a place to sit something down when on the throne. We are deciding on towel racks for the panel and still considering.


The ideas for this came from several upgrades on the forum. An outstanding one was done by @Kevin@7 who installed a wall sink and replumbed the 3/4 corrugated drain system. Well beyond my ability but I liked the shelf idea and just made it lower. @Tabfortwo did a similar install with a wall sink that was also replumbed and looked great. And @jimcenname who uses his T@B400 all the time provided the impetus to just get rid of the sink and put in a panel, where we can put towel rods or whatever. @Denny16 helped as well with his assurance that he has never needed his sink and had it delivered without one in the bathroom. He also posted pictures behind the sink to assure me there were not too many scary things back there for me to break.
Any ideas for towel rods or other accessories that might work on the the panel? Here is one we are considering:

Hope this helps someone and thanks all
QH
The folding sink has two long screws near the middle and 6 smaller screws around the edges and comes off pretty easily. The plumbing shown below was connected to sink via hand tightened sink risers for 1/2 inch supply lines and attached to the sink with a PEX fitting. The drain (which was pretty slow as many know) is attached to the corrugated drain via a 3/4 inch T connector. One comes from the sink basin and the other from the cistern basin behind and below the sink. So now that its out of the way, things are pretty easy to see.
First step in the remodel was determining secure plywood mounts. The cabinets above are 1/2 inch plywood and the wall to L is 3/4 inch plywood. The plywood mount mid way down for the vent plumbing is also 3/4 inch and is secured to wall on L and a plastic composite board on R. The wall behind is the Azdel exterior wall.
There are two large vent pipes, one from black tank on R and one from grey tank on L and they combine and exit up a chase to the roof. The hose lines here are the black tank flush system, which flows up through a check valve and then back down to spray in the black tank. Seems to work fine and no issues.
Oh and you need to plug the corrugated drain to grey tank and both the hot and cold inlets to the old sink. They are 1/2 inch PEX NPT connectors. That is about all the plumbing I could handle. And don't forget to pressure test before you cover up the wall!
I used a 1 inch by 3/4 inch block 25 inches long under the upper cabinet as a point to secure the panels at the top (shown below) . The plywood was what I had available and so there are 2 panels with a vertical seam. You will likely want to use a single piece of plywood. I had a leftover piece of furniture grade here and if birch plywood sheets ever drop in price I can easily swap this out. I used #8 pocket screws 1" and 1 1/14" depending on thickness and they work very well.
The next photo below shows a practice fitting of the support for the shelf, which is 4 3/4 inches deep and supported by this partial box that is 8 1/4 inches high and rests on the plastic tank cover shown. The shelf overhangs about an inch. Will place blocks to secure to make this easy to remove for access.
So here is what the construction of the partial box and shelf looks like. Just simple joinery with some easing of the areas the bath is not quite even. Not too much for a novice.
So this is what it will look like in the bath. Will put urethane sealer and caulk the joints. I noted I now have a place to sit something down when on the throne. We are deciding on towel racks for the panel and still considering.
The ideas for this came from several upgrades on the forum. An outstanding one was done by @Kevin@7 who installed a wall sink and replumbed the 3/4 corrugated drain system. Well beyond my ability but I liked the shelf idea and just made it lower. @Tabfortwo did a similar install with a wall sink that was also replumbed and looked great. And @jimcenname who uses his T@B400 all the time provided the impetus to just get rid of the sink and put in a panel, where we can put towel rods or whatever. @Denny16 helped as well with his assurance that he has never needed his sink and had it delivered without one in the bathroom. He also posted pictures behind the sink to assure me there were not too many scary things back there for me to break.
Any ideas for towel rods or other accessories that might work on the the panel? Here is one we are considering:
Hope this helps someone and thanks all
QH
2019 T@B 400 Boondock Lite towed by 2016 5.7L Toyota Tundra
2
Comments
-
@qhumberd Looks great, nice woodworking!2019 T@B400
TV: 2017 Nissan Frontier SV 4X4
Southern California
Full-timer since 20190 -
Nice! I did a similar mod early in the pandemic.

Rich2019 T@b 400
2025 Toyota Highlander 2.4L TurboBellingham WA2 -
@qhumberd, looks very nice, I like the lower shelf also. Do make sure you seal the edges (endgrain) of all the plywood bits, both visible and those hidden, as this is a potentially damp space, and water moisture could seep into the edges of the ply.
Cheers2018 TaB400 Custom Boondock, Jeep Gladiator truck, Northern California Coast.2 -
Thanks for the feedback! Don’t know how I missed the mod from @Horigan. It looks nice but unless my perspective is off did you work around all the existing plumbing, or move it? Thanks for the sealing reminder @Denny16; I put in the post to check the caps on the plumbing (to myself) before I closed it all up for a reason. I appreciate reminders. I am using a urethane based spar varnish and will put on a couple of coats to get a good seal.
2019 T@B 400 Boondock Lite towed by 2016 5.7L Toyota Tundra
0 -
Nice Mod, will have to think about it.
I don’t use the shower and have thought about capping off the shower fixture in some way to avoid the occasional surprise shower when I bump the faucet.
I removed the microwave opting for more storage. At this rate I’ll have a complete remodel in no time!2021 Tab 400 Boondock, 2021 Toyota Tacoma, Juno Beach Florida0 -
@qhumberd, I just capped off my plumbing. My main vertical sheet is in the same location as yours. Rather than add the bump out at the bottom, I just cut a little notch at the bottom for the flex drain, which you can see at the bottom of my lower shelf.qhumberd said:Thanks for the feedback! Don’t know how I missed the mod from @Horigan. It looks nice but unless my perspective is off did you work around all the existing plumbing, or move it? Thanks for the sealing reminder @Denny16; I put in the post to check the caps on the plumbing (to myself) before I closed it all up for a reason. I appreciate reminders. I am using a urethane based spar varnish and will put on a couple of coats to get a good seal.
Good tip @Denny16 on sealing the edges. We don't use the shower, at least not yet, but I'll do that any way.
Rich2019 T@b 400
2025 Toyota Highlander 2.4L TurboBellingham WA0 -
With a slight delay due to our bath fan failing, we finally got back to finishing off the bath sink removal project. We like where the shelf ended up as it is protected behind the shower curtain but still accessible. The multiple towel rack worked best for us as we like to camp with our grandkids and there are now 6 of them so lots of clothes to dry out. We sealed it with multiple coats of marine varnish per the recommendations of @Denny16 and though not as good a joinery as NuCamp, it will work for our needs. Like that the racks swing out of the way flat against the panel when not in use, and they are stiff enough to not move around when in motion.
Thanks all for the inspirations!


2019 T@B 400 Boondock Lite towed by 2016 5.7L Toyota Tundra
2 -
Looks like a grand job to me…
cheers2018 TaB400 Custom Boondock, Jeep Gladiator truck, Northern California Coast.0 -
 Thanks to all the pics! I decided to change mine out too. So far it is working great. Sink is small, but fine for washing your hands. It is about 11 lbs. so far it is holding on fine and feels solid. I decided to add a shelf and leave the black pipe exposed. I used 3/4 inch plywood and attached to the 3/4 inch brace that was the support for the fold down sink. It seems to have more room than before. 1
 -
I like that you provided for a little shelf above the sink. Looks well done. Did you plumb into the little corrugated drain hose or did you change all that? Seems like the plumbing on different years varies somewhat.
2019 T@B 400 Boondock Lite towed by 2016 5.7L Toyota Tundra
0 -
Nice! Here's mine from many years ago.
Rich2019 T@b 400
2025 Toyota Highlander 2.4L TurboBellingham WA2 -
I took the corrugated out and plumbed to the drain opening that is accessible through the outside shower unit. I found a thread that showed how that was put together and copied it. It used parts I found at Home Depot.1


Categories
- All Categories
- 10 Cirrus Truck Campers
- 122 Dutchman and Vintage TaB Archives
- 3 Forum Rules
- 3 nüCamp & Forum Contacts
- 958 Air Conditioning & Refrigeration
- 2.6K Battery/Electrical & Solar
- 1.2K Camping & Travel
- 143 Events & News
- 219 Factory Comments
- 20 "FOR SALE" - New/Used Trailers
- 14 “FOR SALE" - Camping & Trailer Gear
- 2.4K Heating/Plumbing & Winterizing
- 141 Help - Computer & System
- 922 Introductions
- 408 Looking to purchase a trailer?
- 2.1K Modifications & Upgrades
- 1.4K Products and Accessories
- 412 Service/Maintenance & Recall Notices
- 37 Solo Travelers Hints & Tips
- 1 T@G Forum
- 75 Teardrop Groups & Links
- 78 Testimonials
- 918 Tips & Tricks
- 1.5K Trailer & Towing
- 27 Owners Manuals/PDF Files/Videos & Resources
- 55 üCamp Rally - News & Information