How to Repair Corrosion on Aluminum Convectors

Many of us have made repairs to the aluminum convector in the Alde heating system. Since this is an ongoing issue facing many owners, I thought I would summarize what I “think” I know about the available methods to deal with the issue other than just buying new components. Hopefully this will help others starting out with a concise description of the options available to them.
Please if
anything I write is wrong, don’t hesitate to call me out. Everything I am writing is true to the best
of my current knowledge but if I am wrong on anything, I would like to know.

To mitigate this type of corrosion beneath the EPDM rubber connections, providing a barrier seems to be the best practice so far. Some have applied this barrier to the cleaned up corroded ends if the end was considered serviceable or where the end was not considered serviceable, a few fins are removed exposing un-corroded aluminum and the corroded end cut off.


With a fresh un-corroded end, the convector could be reinstalled with or without a protective barrier.
The two types of barriers I’m familiar with are heat shrink sleeves which apparently have some sort of adhesive underneath or a type of coating that bonds to the aluminum.
In either case, the aluminum should be properly cleaned to remove any residual corrosion or in the case of a cut back end to be coated (not a heat shrink sleeve), cleaned to prepare the aluminum for proper bonding of the coating. This can best be performed using sandblasting (or glass beading) or with chemicals like phosphoric acid. Phosphoric acid is used to etch new metals prior to the application of paint primers and in other cases to remove corrosion from metals prior to painting. It can be found in many familiar products like Naval Jelly, etc. It is nothing like other acids that will attack the base metal and destroy the part while removing corrosion too. There may be other chemical methods that I am not aware of also.
Using an abrasive to clean a corroded convector end that is considered serviceable likely would not get corrosion in microscopic pits which may or may not cause a problem depending on what it is covered with. There are many products used in auto restoration for encapsulating corrosion, usually rust on steel since most autos are made with steel but I believe removing all the corrosion is a best practice.
Whatever method is used, if applying a bonded type of coating, the aluminum should be coated as soon as the cleaning process is complete before the aluminum surface oxidizes which it does within an hour or so if I remember correctly. There are primers specifically made to pre-etch aluminum before applying a primer coating that deals with this oxidized surface which would otherwise negatively affect the coating bond. This is the normal practice in the marine industry working on aluminum yachts where a large area is prepared before applying a 2 part epoxy primer. Since the time between preparing the large surface is too long before coating, the pre-etch coating is applied first to deal with the aluminum oxidation then the two part epoxy primer is applied. Typically 2 coats of epoxy primer are used to achieve a 15 mil coating epoxy primer dry film thickness to provide a barrier coating.
I used a 2 part epoxy primer an applied two coats soon after glass beading the area to be coated.

I saw where others used a 2 part Defcon Product or maybe it was a 2 part JB Weld product, not sure. These other products likely will work just a good but application would be slightly more difficult since Defcon is thicker, like a putty and JB Weld is somewhere in between from my experience with them. The least expensive I believe would be the JB Weld then the Devcon followed by the epoxy primer. Note single part epoxy is not the same as a 2 part epoxy. For a small area like dealing with convector ends, if you wanted to use a 2 part epoxy, there are special aerosol cans that mix the 2 part epoxy when sprayed which can be purchased from The Eastwood and other companies catering to the auto restoration market. Also POR is another product which is a single part paint used to encapsulate corrosion used widely on auto restoration. Rust-O-lum makes a self etching primer in aerosol cans I have used extensively on steel and aluminum that may perform well also. Whatever product used remember, preparation is the key to success because the bond in most impacted by the quality of the preparation.
The aluminum connectors and the check valve are usually just as corroded as the convectors (check valve shown below):

There are two solutions:
1. Buy the new plastic connectors but if any of the EPDM rubber hose ends are damaged from the corrosion and bulging, new hoses would need to be purchased also since cutting off the damaged end may cause the connector to be too short
2. Use marine stainless steel 7/8” railing to cut new connectors to any length needed to account for the reduced hose length after cutting off the damage ends.
In fact, I managed to salvage the plastic check valve from the corroded one shown above and installed it in a piece of the same stainless steel used for the connectors.

The only issue is crimping the downstream end slightly to keep the plastic valve from being pushed out of the tube or making a circular indentation like in the original check valve. I actually did the later using the tubing cut off tool by replacing the cutter with a steel wheel (required some lathe work – not for the average person).
Some of this information can be found spread through the various forum topics but I hope this can be a single place to find information on this specific issue without having to read all the threads. If anyone else has specific information on this topic, chime in too.Comments
-
What I find most interesting about the detailed photos is how the corrosion is all on the exterior of the aluminum tubing. I would bet this has been discussed already somewhere. Why is this?
It is a night and day difference on the interior compared to the area trapped under the rubber hose. So which of these is the reason?
1) A reaction between the rubber, the aluminum, and the transfer fluid?
2) The trapped transfer fluid loses its anti-corrosion properties (changes alkalinity) over time and corrosion occurs at an accelerated rate? There is no exchange of fresh fluid in this area. It is stagnant. In the rest of the system there is a large volume of fluid which exchanges at least periodically.
3) Something else??
Is there some industry analysis of this effect? I would be surprised if there was not.
EDIT: It did not take too much searching to find this.
https://www.boydcorp.com/blog/avoiding-galvanic-corrosion.html"In general, corrosion can be reduced through pH control and corrosion inhibitor use. The inhibitors attach to metal surfaces to passivate them and prevent corrosion. It is also important to maintain a stable water flow to avoid stagnant zones inside the cooling system, which can cause corrosion."This sounds like it supports protecting the surface under the hose connection from exposure to transfer fluid, and changing the fluid occasionally.73 es God Bless de KK1L, Ron <><
2023 T@B 400 Boondock "Running up a T@B"
Jericho, VT0 -
Why is the corrosion only on the od of the aluminum under the EPDM hoses?KK1L said:What I find most interesting about the detailed photos is how the corrosion is all on the exterior of the aluminum tubing. I would bet this has been discussed already somewhere. Why is this?
It is a night and day difference on the interior compared to the area trapped under the rubber hose. So which of these is the reason?
1) A reaction between the rubber, the aluminum, and the transfer fluid?
2) The trapped transfer fluid loses its anti-corrosion properties (changes alkalinity) over time and corrosion occurs at an accelerated rate? There is no exchange of fresh fluid in this area. It is stagnant. In the rest of the system there is a large volume of fluid which exchanges at least periodically.
3) Something else??
Is there some industry analysis of this effect? I would be surprised if there was not.
EDIT: It did not take too much searching to find this.
https://www.boydcorp.com/blog/avoiding-galvanic-corrosion.html"In general, corrosion can be reduced through pH control and corrosion inhibitor use. The inhibitors attach to metal surfaces to passivate them and prevent corrosion. It is also important to maintain a stable water flow to avoid stagnant zones inside the cooling system, which can cause corrosion."This sounds like it supports protecting the surface under the hose connection from exposure to transfer fluid, and changing the fluid occasionally.
I haven't seen any definitive reason other than educated guesses. My guess, it is in an area deprived of a continued supply of corrosion inhibitor in the glycol since it is a stagnant crevice that glycol seeps into but once the corrosion inhibitor is consumed, it is unprotected to corrosion. This same method would suggest the glycol in the craves would become oxygen deprived also. I read an article that states this area deprived of oxygen next to the oxygen rich glycol can lead to the pitting potential like we are seeing.
So which one is the reason?
I think it is your #2 which is what I described above also, but just a guess but apparently Alde has not given one.
That is a very good article you found and referenced, and your conclusion about coating the ends and glycol changes seems to be the best approach at this time in my mind.
The glycol change every two year is the recommended practice along with the use of Rhomar glycol but recent information has shown a trailer with the Rhomar glycol change 2 years ago plus all new convectors and connectors had been found with corrosion on the inside of the aluminum pieces in the bottom of the glycol tank plus some pin holes in the new convectors.
As soon as you think you understand what's going on, something else pops up.
2019 T@B 320S3 -
Thank you so much @grassgd for your description and clear visuals of the problem. I have some minor comments on questions raised here- as well as questions of my own. I learned a lot from your description and have also learned by watching on Youtube a series by Mark, an engineer who has looked into this problem in great depth. Search for this YT video if interested.
Alde Convector Connection Corrosion - Part Two - 2015 Tab Max-s Trailer (Four videos total)
His conclusion was that the corrosion occurs where the space tapers down between the hose end and alum tube, and its non-zero narrowness of that space allows in small water molecules but prevents the larger size molecules of corrosion inhibiting fluid to flow.
He proposes cleaning the ends with a scotch-bright maroon colored pad, not sandpaper, and then coating the ends with Miracle Paint that he says is used in the auto industry to deal with the same problem. He leaves a link of where to buy it.
In essence, you and he come to the same conclusion as to what needs to be done- perhaps different products-but ultimately the same concept. Clean it, coat it, and stick it back in.
My Questions:
I did a partial dive yesterday into My 2020 Tab 320S. After removing the mattress, and cushions and plywood tops, I could see the Alde itself, a convector near the front, running parallel to the axis of the trailer, on the passenger side. From there, the hoses run rearward to back passenger corner, and come out on the driver side rear corner and run into the Alde.
I know that there is a convector right behind the bed, ie below the hinged shelf, running perpendicular to the axis of the trailer. I have felt its wonderful warmth at nights.
Q1. Are the hose connections to this rear convector accessible and serviceable if I lift off the hinged top and work from above? Or is more disassembly required. (Mine is covered with my DIY electronics shelf, so this is not easy for me to just peak in myself.
Q2 Are there only two convectors in 2020 Tab320S, the ones noted above, or is there another one somewhere that I'm not seeing.
Q3 Does anyone have a link to the exact hose that I should be buying to replace any damaged hoses.
Thanks again for all your insights and help on this issue.
MarvinD- Newton, MA, USA 2020 T@B 320S Boondock Lite/ TV: 2026 Tacoma Ltd. Hybrid
1 -
@SolidCamper the Forums has extensive, ongoing discussions about the "Corrosion of the Alde Convectors" since around 2020. Many owners have disassembled their Aldes, took their convectors out, cleaned them, and coated them in various ways. The Mark Turney video you posted is an excellent summary of the entire issue, with the bonus of being very specific about what exactly the "anti corrosion" chemicals do inside the Alde itself. The "Magic Paint" he shows is one very good way to "coat" the convector ends, but other owners have used different approaches. (See grassgd's method).
The Alde design and convector setup changed around the 2020 year, since Alde introduced a new model of the unit (the Alde 3020) and there were some changes in the convector and hose designs. This is hard to explain without photos, however. In my 2017 320, the glycol "loop" runs from the Alde, under the back bench, to the passenger side of the trailer, and under the bench there. It then goes back to the expansion tank. To get to and remove my rear convectors behind the bed/back bench, I had to remove some of the shelf sections.
The hoses, convector "stubs" and various fittings are "22mm". The hoses are usually in good shape, even on badly corroded stubs. Since I found a couple of spots with hoses that were badly placed onto the stub ends, or were pulling in ways that seemed wrong to me, I did replace several sections of hose to make things fit better. The glycol "loop" is not under pressure, so simple "EPDM" heater hose works just fine.
Some photos of your trailer hoses, etc, will help a bit to identify what Alde setup you have.
If you want some deep reading on this subject, here is the entire "Corrosion of the Alde Convector" thread. If you page backward through it, you will see various photos and discussions from owners who have cleaned the convectors and the various parts used. If you read this over from the start, there is a lot of discussion of "why" this happened, with lots of teachable moments. The Mark Turney video helped put a lot of this knowledge together in one package.
Towed by 2014 Touareg TDi0 -
Very much a professional repair and IMHO they way to go. However, discussion about ph levels, regular fluid changes are fine but has Alde/Truma ever gotten on board with this flaw ? Have they corrected the cause(s) of this problem ? What is most frustrating is heat exchanger designs have around for decades, included automotive designs, and they all work. So why cannot Alde/Truma fix this ? To simply say to change the fluid every 2 years is like the dentist telling you to brush your teeth and you won’t get cavities.
400 - 2019
St Catharines, ON0 -
Pthomas 745
here are some photos of present conditions of my 2020 Tab320S boondock lite.
RCB- I’m not sure why you say it’s a pros job. I can see that it’s a pain, but not brain surgery. Anyway- who will actually do this work better than you
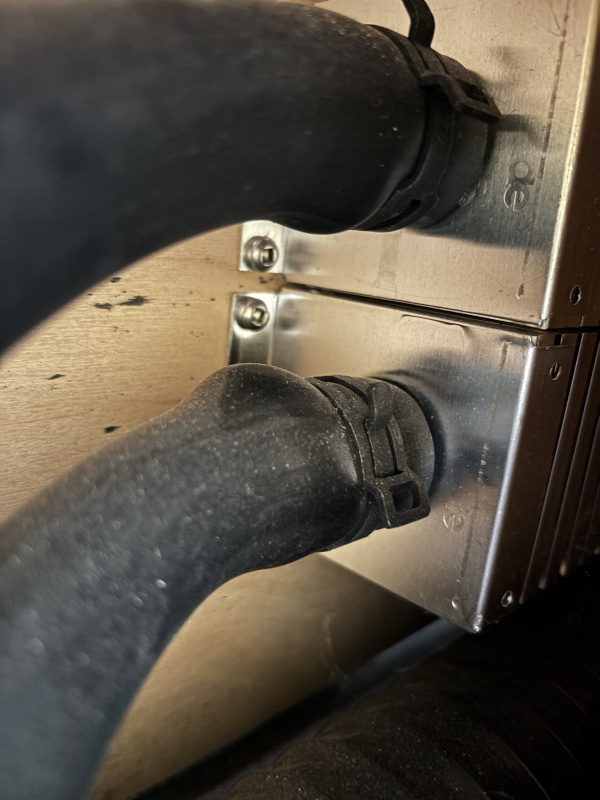
from the topP1: convector stubs front passenger side.
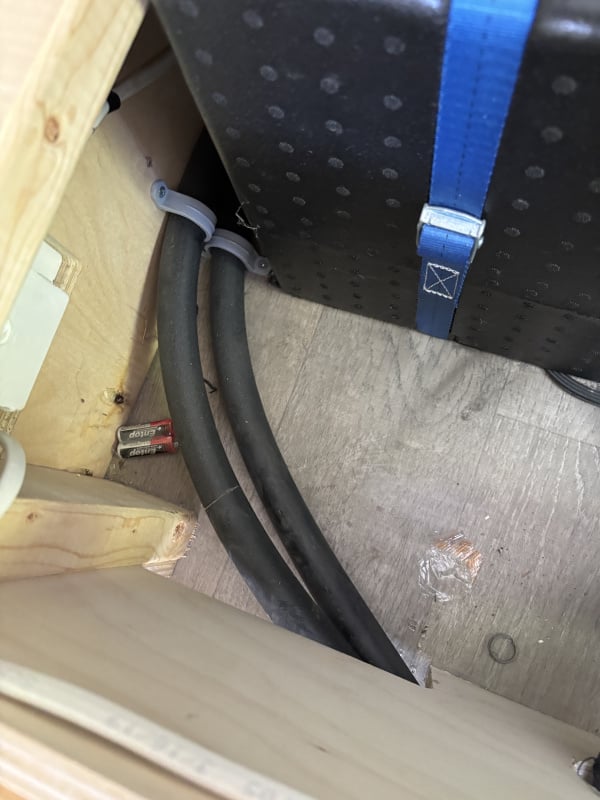
P2 : hoses heading rearward from convector shown in P1. My proposed drainage location per Marks videos.
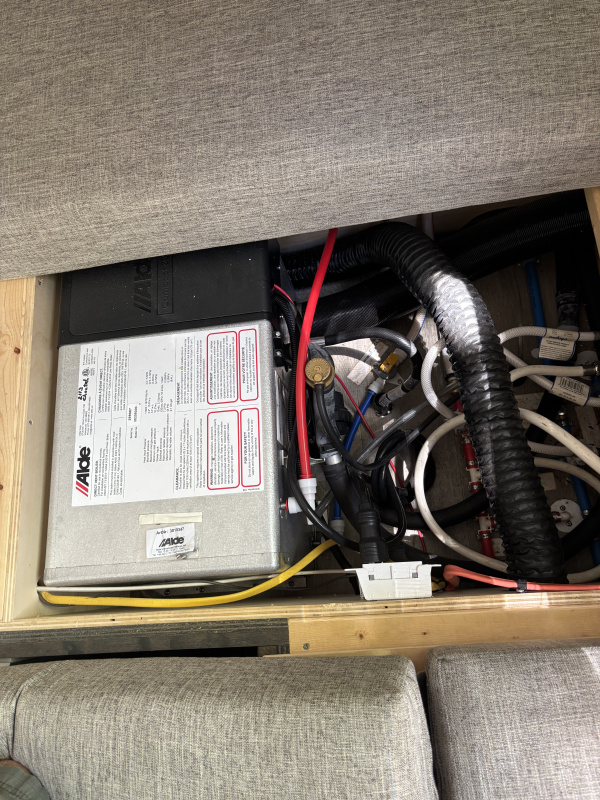
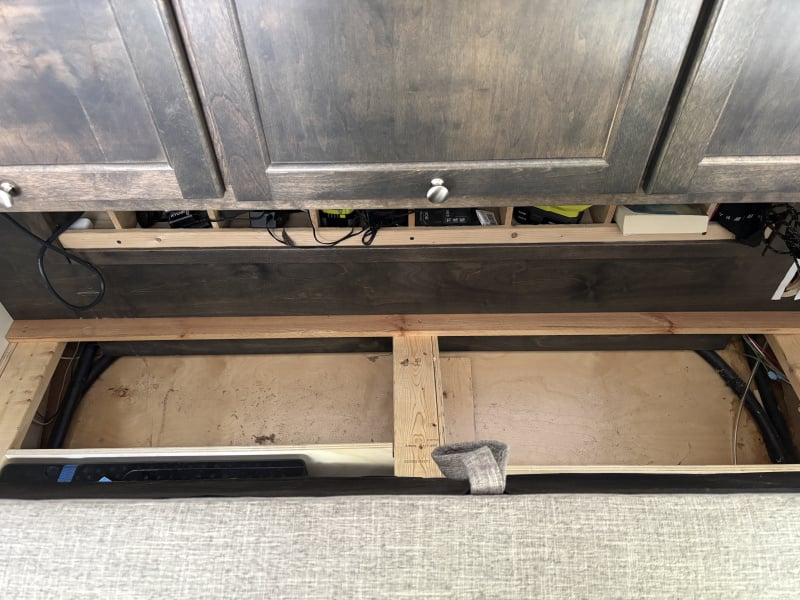
P3:Alde 3020 mish-mash in driver side rear.P4: rear headboard looking down. I see see hoses in and out, but what does it take to access the convection stubs?
MarvinD- Newton, MA, USA 2020 T@B 320S Boondock Lite/ TV: 2026 Tacoma Ltd. Hybrid
0 -
Word smithing - a professional looking repair, and meant as a compliment.
400 - 2019
St Catharines, ON2 -
@SolidCamper The very first photo…both of those bulges are absolute signs of corrosion.
In the photo looking directly down into the Alde compartment: see where the brass fitting is on the side of the Alde? Directly next to the fitting, there is a small section of aluminum tube showing. That "tube" is a check valve. Look closely at that area where the check valve is clamped. This would be another common spot for corrosion. In my trailer, there was no "bulging", but there was corrosion on the valve when I disassembled it.
I would have to dig deeper to sort out exactly where the convectors are in your 2017. I see the hoses disappearing behind the back bench, but how exactly to access that area in your trailer. In my 2017, parts of the back shelf can be removed to get back there.
Look over this comment from Brian Z where he describes how to lift the back shelf out. (Yours may be configured differently, so some pictures might help)
Have you opened the passenger bench? The convectors are covered by a wood "shield". You can see the hoses running under the shield. Take out the 6 pocket screws that hold the shield and you can find that convector.
Towed by 2014 Touareg TDi1 -
Pthomas945 - thx for the comments. The first photo IS of that passenger side bench convector which the vertical board with the 6 pocket screws.
You mentioned a 2017 tab, which I think yours is - mine is a 2020 T@B320s.
Thx for the references of where to see how BrianZ dealt with the dismantling of the rear area. Once I get my lower back back to a reasonable state, I will attack this job and explore where I’ve never gone before.
so for now, I think that I have the answers that I need. Thanks for all your helpful input.MarvinD- Newton, MA, USA 2020 T@B 320S Boondock Lite/ TV: 2026 Tacoma Ltd. Hybrid
0

 73 es God Bless de KK1L, Ron <><

Categories
- All Categories
- 10 Cirrus Truck Campers
- 122 Dutchman and Vintage TaB Archives
- 3 Forum Rules
- 3 nüCamp & Forum Contacts
- 958 Air Conditioning & Refrigeration
- 2.6K Battery/Electrical & Solar
- 1.2K Camping & Travel
- 143 Events & News
- 219 Factory Comments
- 20 "FOR SALE" - New/Used Trailers
- 12 “FOR SALE" - Camping & Trailer Gear
- 2.4K Heating/Plumbing & Winterizing
- 141 Help - Computer & System
- 922 Introductions
- 408 Looking to purchase a trailer?
- 2.1K Modifications & Upgrades
- 1.4K Products and Accessories
- 411 Service/Maintenance & Recall Notices
- 37 Solo Travelers Hints & Tips
- 1 T@G Forum
- 75 Teardrop Groups & Links
- 78 Testimonials
- 918 Tips & Tricks
- 1.5K Trailer & Towing
- 27 Owners Manuals/PDF Files/Videos & Resources
- 55 üCamp Rally - News & Information