Adding 12v Connection for Starlink Mini: which side of trailer? (need opinions)

For a 2025 tab 320 BD
I'm going to add a 12v connection for my starlink mini. I am waffling on which side of the trailer to add it on. Let me know if you see me doing anything stupid…
Passenger side: I can wire directly to battery/bus with inline fuse, run line to rocker switch mounted near battery cutoff (or anywhere along bottom of dinette seat base), then drill hole in side of trailer for bulkhead port. Sounds easy, shorter wire runs, port located next to outdoor power outlet.
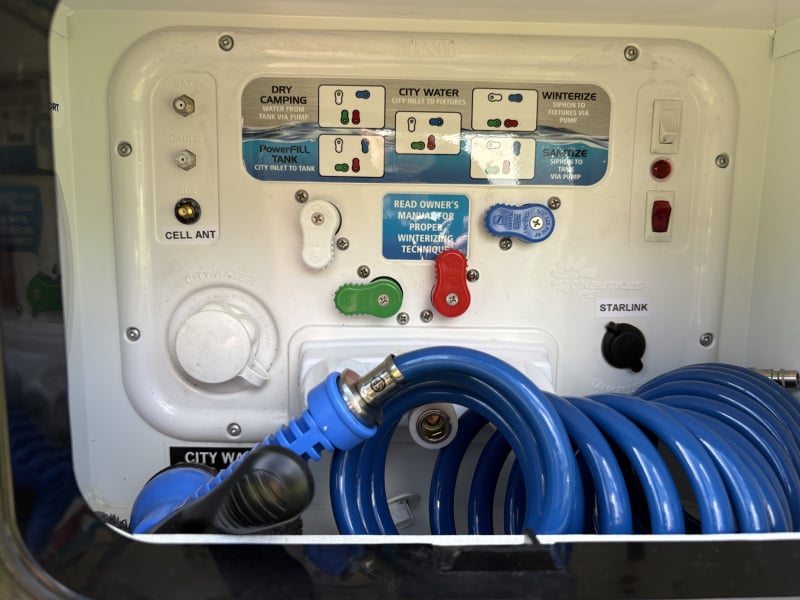
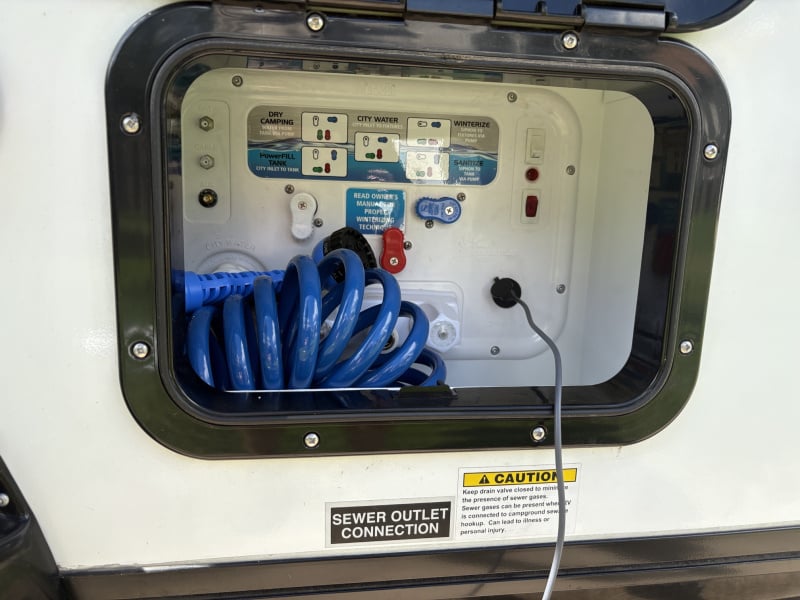
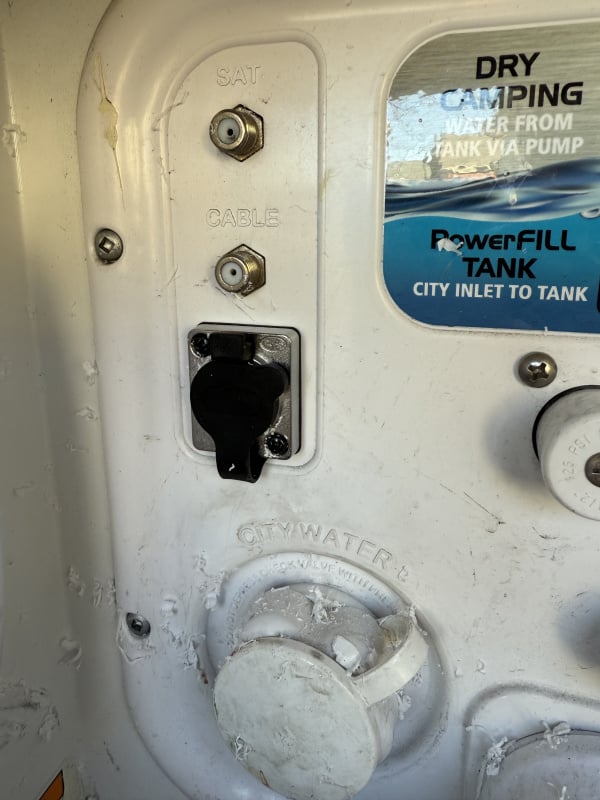
Driver's side: Wire into fuse box, mount rocker switch some where along base of dinette (would love to mount it up near stereo, actually) and have bulkhead connection located in the Nautilus (P3) compartment (where coax, etc. already are). I am thinking I'd use the hole for the black tank flush since I don't have a black tank and there's just a dummy plug there now.
If I decide to tie into fuse panel it'd much easier to use a piggy-back fuse, but that seems a little too DIY to me, any thoughts on this? If I splice in from the back does anybody have any pics of what they've done in the past? (I am more of a visual learner.) I don't think the fuse panel has any spare slots does it.
So here's what I am looking at getting (any input on this is welcome too):
Comments
-
So, I finally got around to working on this project….
I decided to install it on the driver's side. I liked the idea of having the bulkhead pass through port mounted in the Nautilus where it'd be more protected from the weather, and I wouldn't have to drill a hole in the body of the 320. I popped out the dummy plug for the black tank flush connection and and clipped off the plastic retaining clips located on the back side of the Nautilus. Then I only had to do a minimal amount of filing to enlarge the existing hole enough for the port to fit. A dremel tool made short work of it.
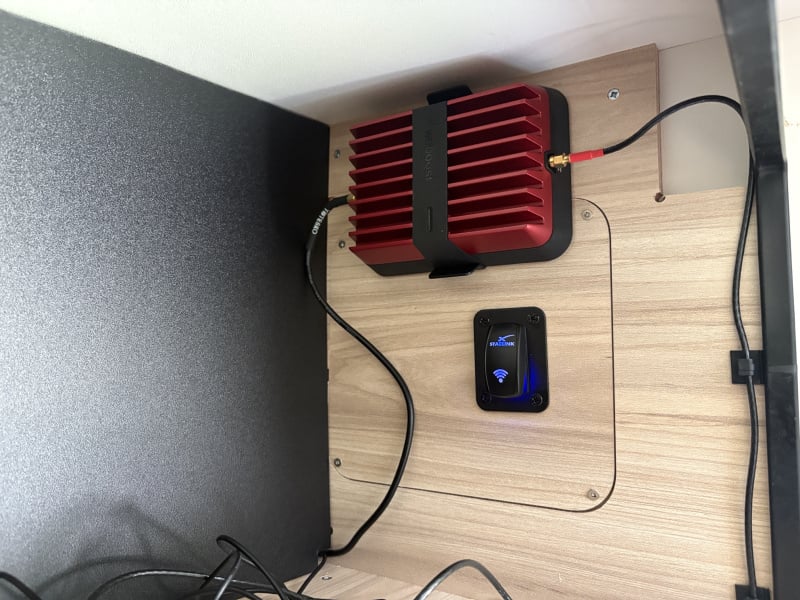
I got a rocker switch so I can control the power to the dish from inside the camper without having to unplug anything. I wanted to mount the switch up next to the radio, but that would have involved more logistics than I was willing to deal with (ie, too much dismantling other unrelated stuff just to make it happen). I though about mounting it down low next to the power converter/fuse box, but I didn't want to be on my hands and knees trying to cut out an opening for the switch while dripping sweat everywhere. And I'm glad I didn't because once I lowered the dinette seat I realized the seat legs (that pull out when you make it into a bed) would have covered up/interfered with the switch.
Instead, I ended up mounting the switch in the microwave cubby which I use as an open overhead storage compartment. I chose this location because that's where my cell booster is mounted, the switch will be less prominent in there (I like the cool blue light, but probably not at night though) and there's an access hatch I could take off for easy access to run the wiring down to the electrical area. This also meant I could take the access hatch over to a workbench and take my time getting a square cut into it for the switch that would be, well, square (straight, level).
After the switch was all "squared away" I ran a fish tape down the space in the bathroom wall and it came out under the wall in the electrical area under the dinette seat. I taped the three wires needed to operate the switch to the fish tape and pulled them up through the wall and was able to plug them into the switch.
I was originally going to get power by using a piggy back fuse (kind of like an extension cord for fuses) but after taking the face plate off of the converter (or is it inverter?) I realized there was no way to get the wire to the back side without more dismantling of things. So I found a wire for an acceptable circuit (I chose the fan and toilet circuit) and traced it to the spot where it splits off to the different devices.
NuCamp uses a lever-style quick connect housing for their wire junctions, and I noticed that this circuit had an open bay on it's connector. I simply had to lift the lever up on the open bay, insert the end of the "hot wire" and close the lever back down. Then I loosened one of the screws on the ground bus bar and inserted two ground wires into it and tightened it back down. There was a ground wire for the step up converter for the mini and another ground wire for the switch. All that was left was to connect the power wire (accessory wire) from the switch to the step up converter for the mini and then plug everything in.
I was definitely on high alert when I switched the battery back on, but no sparks or melting wires occurred and I had power to the dish. This literally took me all day to accomplish. The majority of it was consulting the all knowing google to verify that I was doing it correctly. I think my biggest source of doubt was getting the rocker switch wired since the directions were nonexistent.
Now I can plug the starlink cable into a power port in the Nautilus when I get to camp, and control the power from inside the Tab via a switch. I like being able to turn the dish on/off without having to run around unplugging things.
The wiring for the system is connected like this: power from battery positive to switch, power from switch to the mini, ground from mini to battery negative, ground from switch to battery negative. I seems really simple once you've done it, but there was a lot of doubt on my end until I got finished.
Anyway, just following up on the above post in case anyone else is considering something similar and hoping it helps.
2025 Tab 320 S BD2024 Nissan Frontier -
I used the nautilus hatch for my Starlink connection. I installed a 12v converter in order to power my articulating Starlink.
_____________________________________________________
Ken / 2023 Tab 400 “La Bolita” (39,000+ miles) / 2024 Toyota Sequoia -
I am thinking of using the existing 12v wires that ran to the step light - which I disconnected before even camping once - to install a 12v adapter somewhere there on the passenger/camp site side of things.
But I could also throw a 12v in the nautilus I guess.
I do already have the solar connector there in the Nautilus - with the (debatable) backwards SAE connector - which I think runs directly to the battery?
-
I made a small lead/adapter with a switch and a 7.5a fuse, which connected to the solar port in the nautilus and has a cigarette-lighter style 12v plug.
I’ve got the parts coming for the same style plug and fuse to wire in on that step light wiring, and will also use a 7.5a in line fuse - since the lighting circuit is a 7.5a fuse in the main panel…
I bought a 30v step-up Starlink power adapter which uses that cigarette-lighters style plug - that I can also use in vehicles or wherever, and it is only 3.5a so should work well.
-
Good information to know… I wasn't sure about which one to use so I went with a circuit with a 15 amp fuse, but I was totally guessing at it.
2025 Tab 320 S BD2024 Nissan Frontier


Categories
- All Categories
- 10 Cirrus Truck Campers
- 119 Dutchman and Vintage TaB Archives
- 3 Forum Rules
- 3 nüCamp & Forum Contacts
- 954 Air Conditioning & Refrigeration
- 2.6K Battery/Electrical & Solar
- 1.2K Camping & Travel
- 142 Events & News
- 219 Factory Comments
- 20 "FOR SALE" - New/Used Trailers
- 14 “FOR SALE" - Camping & Trailer Gear
- 2.4K Heating/Plumbing & Winterizing
- 140 Help - Computer & System
- 920 Introductions
- 407 Looking to purchase a trailer?
- 2.1K Modifications & Upgrades
- 1.4K Products and Accessories
- 408 Service/Maintenance & Recall Notices
- 37 Solo Travelers Hints & Tips
- 1 T@G Forum
- 74 Teardrop Groups & Links
- 77 Testimonials
- 915 Tips & Tricks
- 1.5K Trailer & Towing
- 27 Owners Manuals/PDF Files/Videos & Resources
- 62 üCamp Rally - News & Information