Frame Support Bracket for Rear Scissor Jack Levelers Mod

BrianZ
Member Posts: 1,770
I have finished my modification to add a supporting bracket that secures Dale Helman's scissor jack mounting adapter plate to the full length of the trailer frame extensions by bolting directly to the frame using all three mounting bolts, as provided by NuCamp.
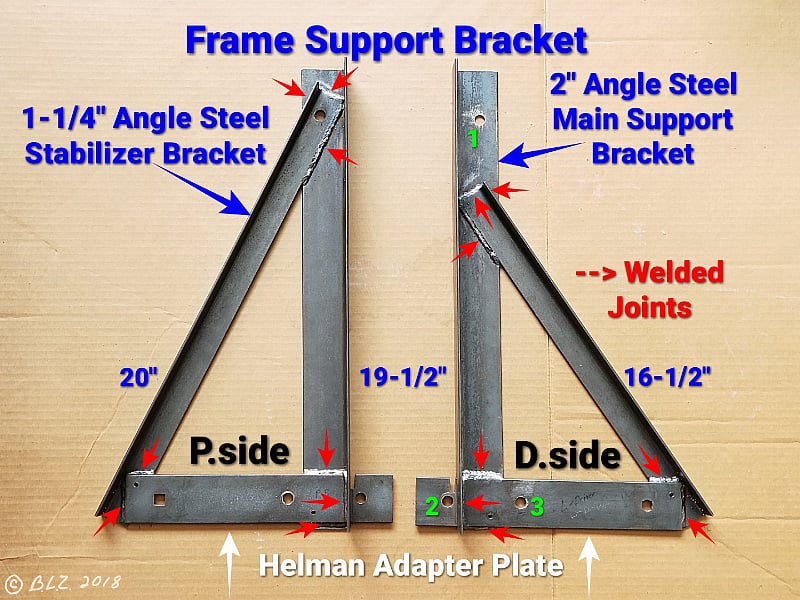
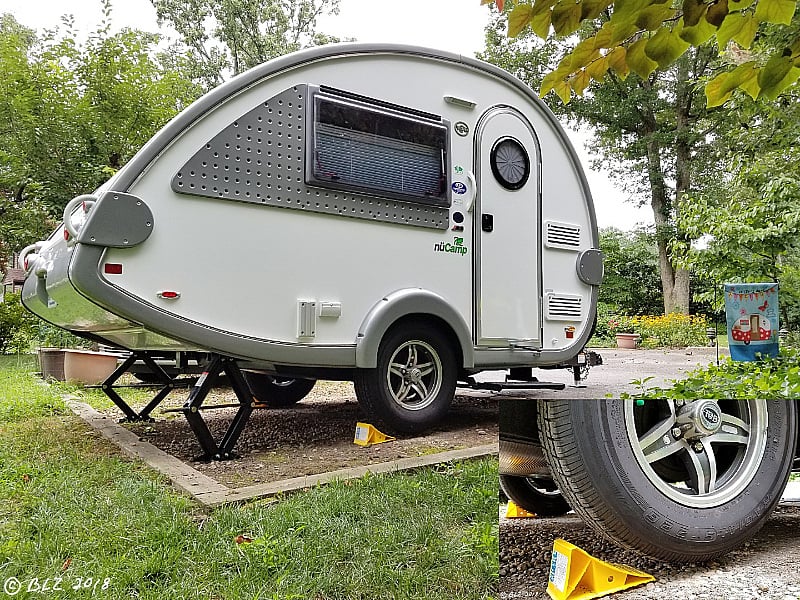
Here's a view of both right & left brackets made by adding two angled structural steel pieces to the adapter plate and welding all three together where they overlap, to create a single rigid triangular bracket. The main 2x19.5" piece is drilled for bolting directly onto the angle trailer frame extension using the existing stud mount plus the other two existing studs going through the adapter plate which holds it tight against the frame over its entire length. The two brackets are made different, as explained further in a photo below.
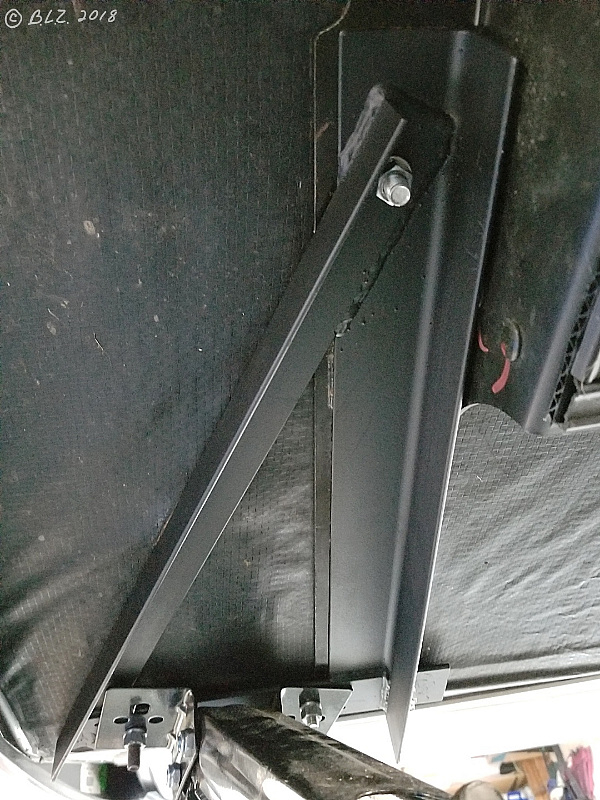
Above is the installed bracket, after painting, plus jack. Note how the main support piece bolts directly over the trailer frame, while the angled piece adds support & rigidity to the previously floating end of the adapter plate, transferring its load back to the trailer frame.
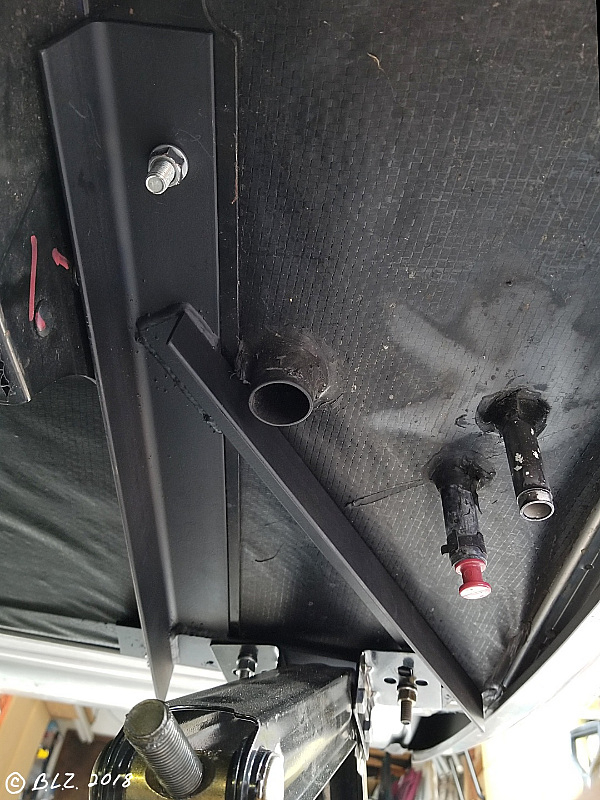
Because of the drainage tubes exiting through the drivers side floor nearby, it was necessary to shorten the angled piece rather than bolting it to the forward end. This is no problem though, because it is firmly welded to the main support.
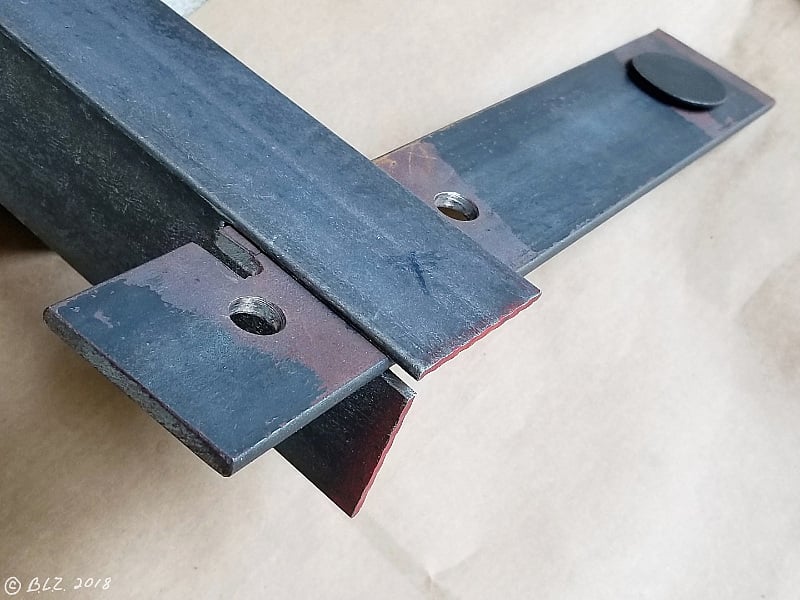
This shows how the adapter plate fits into a slot cut into the main angle support. This slot lends additional support to the adapter plate by resisting potential tilting from the leverage created when the jack pushes up on the opposite end.
It was a bit challenging, but necessary, to keep the hacksaw blade flat against the inside surface of the angle steel while making the first cut for this slot, in order to leave a flat inner surface without a lump so the adapter would lay flat. I tried, for a snug fit & greater strength, to make an accurate second cut without leaving too wide of a gap in the slot; but again, this joint will be welded on three sides anyway, including over the length of the slot.

This shows how the parts all fit together before being welded. It was remarkably strong even before welding, so we actually used it like this for leveling while camping before actually getting any of the pieces welded.
Here you can see the passenger side jack using the new frame support bracket for leveling while camping (before welded together).
As a final test for strength of the newly welded brackets, I dropped the tongue down (slightly uphill at tongue), raised the rear jacks a bit higher than needed for leveling (a bit more on passenger side which is slightly downhill) , then raised the tongue jack until the passenger side wheel was about an inch or more off the ground to simulate conditions for changing a tire. It remained very stable, and the bracket was still very solid with no observed changes.
I now feel confident in using these jacks for both leveling and wheel or tire maintenace & repair.
Use this idea at your own risk, of course, and sorry, but no, I would not want to make any more of these. 😉 Probably best to test fit everything to the trailer as you go anyway, so you can mark exact final positions of the overlapping frame members. I would also suggest doing what I did before welding..
I got mine welded at a local shop for $20, but first I drilled a small hole (1/8"?) in each of the three overlapping corners & used 3 small bolts to hold it all securely together temporarily until welded, so as to maintain the exact position of each piece. You can see some of those holes in the first photo.
Here's a view of both right & left brackets made by adding two angled structural steel pieces to the adapter plate and welding all three together where they overlap, to create a single rigid triangular bracket. The main 2x19.5" piece is drilled for bolting directly onto the angle trailer frame extension using the existing stud mount plus the other two existing studs going through the adapter plate which holds it tight against the frame over its entire length. The two brackets are made different, as explained further in a photo below.
Above is the installed bracket, after painting, plus jack. Note how the main support piece bolts directly over the trailer frame, while the angled piece adds support & rigidity to the previously floating end of the adapter plate, transferring its load back to the trailer frame.
Because of the drainage tubes exiting through the drivers side floor nearby, it was necessary to shorten the angled piece rather than bolting it to the forward end. This is no problem though, because it is firmly welded to the main support.
This shows how the adapter plate fits into a slot cut into the main angle support. This slot lends additional support to the adapter plate by resisting potential tilting from the leverage created when the jack pushes up on the opposite end.
It was a bit challenging, but necessary, to keep the hacksaw blade flat against the inside surface of the angle steel while making the first cut for this slot, in order to leave a flat inner surface without a lump so the adapter would lay flat. I tried, for a snug fit & greater strength, to make an accurate second cut without leaving too wide of a gap in the slot; but again, this joint will be welded on three sides anyway, including over the length of the slot.
This shows how the parts all fit together before being welded. It was remarkably strong even before welding, so we actually used it like this for leveling while camping before actually getting any of the pieces welded.
Here you can see the passenger side jack using the new frame support bracket for leveling while camping (before welded together).
As a final test for strength of the newly welded brackets, I dropped the tongue down (slightly uphill at tongue), raised the rear jacks a bit higher than needed for leveling (a bit more on passenger side which is slightly downhill) , then raised the tongue jack until the passenger side wheel was about an inch or more off the ground to simulate conditions for changing a tire. It remained very stable, and the bracket was still very solid with no observed changes.
I now feel confident in using these jacks for both leveling and wheel or tire maintenace & repair.
Use this idea at your own risk, of course, and sorry, but no, I would not want to make any more of these. 😉 Probably best to test fit everything to the trailer as you go anyway, so you can mark exact final positions of the overlapping frame members. I would also suggest doing what I did before welding..
I got mine welded at a local shop for $20, but first I drilled a small hole (1/8"?) in each of the three overlapping corners & used 3 small bolts to hold it all securely together temporarily until welded, so as to maintain the exact position of each piece. You can see some of those holes in the first photo.
-Brian in Chester, Virginia
TV: 2005 Toyota Sienna LE (3.3L V6)
RV: 2018 T@B 320S, >100 mods
TV: 2005 Toyota Sienna LE (3.3L V6)
RV: 2018 T@B 320S, >100 mods
3
Comments
-
Good work and an interesting concept, but I am really struggling to figure out how this adds additional strength over the plate @dalehelman created? This bracket has a long strut that runs parallel to the jack, but the mounting bolts that secure the jack to the frame are still perpendicular to the load and provide very little torsion resistance. Unless I'm looking at this wrong (a definite possibility
") )
)
Wouldn't it be easier to simply move the jack inboard until it is directly underneath the corner of the frame?Jon & Angela | Florissant Colorado | 2017 Outback S0 -
What's under this corner (red arrow)? It seems that given where the jack is mounted around half the load will be transferred to this point. (With the other half being completely transferred via the bracket back to the existing frame extension.)Regardless, I do see where this bracket will help distribute the point load from the jacks over a larger area.

2015 T@B Max S (320)
2015 Nissan Frontier SV V6 4x40 -
Ahh... this is further out beyond the main trailer frame. I get it now.Jon & Angela | Florissant Colorado | 2017 Outback S0
-
You make a good point, @ColoradoJon , about centering the jack over the frame. That would be ideal, but the rear pair of mounting studs are too close to fit these jacks, so that would require a different approach. Their offset mount does make them more accessible, but for strength alone, putting them over the frame would be preferred. Having already made the adapter plate, I wanted to find a way to make it stronger, rather than start over from scratch.I can give a few reasons why I believe my bracket is stronger than the plate alone..First, only a half inch of the rear edge of the frame is supported directly over the plate when it is used alone, and only one of the two mounting bolts is acting to counter the torsion effect of the offset jack force. Neither bolt is anchored into the steel frame, but in the wooden crossmember inside the rear edge of the floor, and the outside end of the plate is not anchored to anything, but rests on floor structures.By comparison, my main support bracket rests nearly entirely under the trailer frame, and also crosses over and supports the entire 2-inch width of plate, not just a half inch. It is also bolted directly to the frame at the forward end, providing one additional bolt to counter the torsion, and it's anchored in steel. Moreover, the added L-shaped brackets are structurally much more rigid & less susceptible to twisting & bending than a flat plate. And if this isn't enough, all three pieces are solidly welded together as one rigid unit, so each piece benefits from the strength of the others.@ScottG , I'm not sure I totally understand your question, but I believe that significantly more than half of the total load is transferred back to the frame, mainly because the bracket is rigidly welded together as one piece. If you're asking about the outside end of the Helman plate, it now rests under & is welded to the lateral support bracket, which in turn is welded to the main support bracket. This arrangement doesn't depend on the floor for the majority of its strength, but transfers most of that lateral load back to the main frame.Note also that there is one less layer of steel under that outside end of the plate versus the other end, so it doesn't rest on the floor above, which would also allow for a small amount of flex in the frame before any load would transfer to the floor structure. I believe the lateral load against the floor structure is far less than with the plate alone, and that overall a significantly greater amount of total load is distributed along the trailer frame than with the plate alone, and significantly less to the floor structure.I guess the only way to really know how the two methods really compare would be to try overloading trailers with each mounting & see which one breaks first, but I'm not volunteering for that! I have tested jacking one wheel off the ground with no ill effects. I can try both wheels next, but I feel confident that wouldn't be a problem either.-Brian in Chester, Virginia
TV: 2005 Toyota Sienna LE (3.3L V6)
RV: 2018 T@B 320S, >100 mods0 -
@BrianZ Seem like a pretty well thought out solution. As our three year old granddaughter says "I like it"2017 Tab Basic S Silver on Silver with Sofitel Cushions....upgraded from 2013 LG 5W....Towed by a 2016 Sorento V6 AWD w/5000lb tow capacity. Dave S. married to Jen aka SanDiegoGal We pull a Tab but live in a 2014 Airstream International Signature 27 FBQ...Talk about embracing a trailer lifestyle.0
-
Thanks, @dsatwork.
I was really just wanting to have the ability to do a bit more than just minor leveling of the trailer, while still maintaining a certain level of personal comfort, and to be able to lift the wheels off the ground if ever needed without having to use a separate jack.
I also hope that I'm not causing any worry for anyone already using @Dalehelman's adapter plate, as it seems to have already proven itself for what he intended to use it for. I do still appreciate the way it puts the jacks closer to the side & angled outwards so they are easier to reach than the original stabilizers were in back.-Brian in Chester, Virginia
TV: 2005 Toyota Sienna LE (3.3L V6)
RV: 2018 T@B 320S, >100 mods1 -
Ahhh, it was unclear to me that the corner in question does not contact the floor of the trailer. In effect, you have built a cantilevered support off the frame extension. If the bracket and its connecting points are stiff enough to not flex and rest against the floor, then I agree the load will be carried entirely by the frame extension--although some of that load will be rotational as the cantilevered bracket will torque the frame a bit
2015 T@B Max S (320)
2015 Nissan Frontier SV V6 4x40 -
I think the torque on the outer corner of the bracket may cause a bit of flex while under load. I'm just not totally sure how much of the load could transfer to the floor, but I feel it's got to be much less. Maybe I'll try sticking something thin like a sheet of aluminum flashing under there and see if/how easily it can be pulled out while under load. That might give me a better idea of what's happening.
Update:
After probing both sides of the jack mounts on the currently leveled & stabilized trailer, here's what I found.. There is space above the corners (Scott's arrow) of both outer angle brackets, between them and the trailer floor; however, after probing further that appears to be because the tops of the two elevator bolts used to mount the jacks are slightly thicker above the plate than the angle bracket, because they appear to be tight against the wood beam inside the floor. So, clearly, the outer corners are not suspended as far as supporting all the weight under load, but how much of the load is redistributed by the bracket versus resting on the wood crossmember is still unknown at this point.-Brian in Chester, Virginia
TV: 2005 Toyota Sienna LE (3.3L V6)
RV: 2018 T@B 320S, >100 mods1 -
Noticed your Andersen levelers on the drivers side. Wonder if the rear (larger one) is upside down or you found a better way to use it?
2018 T@B 400, 2017 Nissan Titan Crew cab0 -
I have installed the Daleman design plates on my 2018 320 Boondock using the 30" 6500# jacks. My approach was to mount the jacks straight in line with the frame with slight offset to the outside. Camping this week I have been evaluating the longer lever arm of the 30" jacks compared to a 24" set. I find the top side plates of the jacks flex side to side when trying to rock the T@B side to side. I see no frame torsional flex.
BrianZ, I like your triangle arrangement.
I am thinking of building some stouter jack top side plate angles that will be stiffer and allow new choice of bolt hole locations. I am concerned with the jacks all the way up, the back of the jacks stick out and hang down reducing ground clearance substantially. Keeping the jack lift centered over the frame but forward of the rear bolt locations, and angled to the outside at the rear may improve ground clearance. More research is indicated.
Kay and Tom - SW Wisconsin - Silver T@bernacle - 2018 T@B 320S Boondock Silver/Black trim TV, 2018 Chevy Colorado, Silver/Black trim, Duramax, TowHaul, IntelliHaul1 -
That's interesting, @tybladesmith. I'm wondering how you managed to mount the jacks in line with the frame using Helman plates. Can you post some photos? Interesting idea about replacing the jack mounting plates to get more convenient bolt hole locations. I would think that the longer jack arms would make them easier to reach if mounted over the frame, especially if angled towards the corner. With the boondock's elevated frame, I'm surprised clearance is an issue. My 24" jacks are not any lower when fully retracted than the bolts on the empty tire mount.-Brian in Chester, Virginia
TV: 2005 Toyota Sienna LE (3.3L V6)
RV: 2018 T@B 320S, >100 mods0 -
@BrianZ I was giving Dale credit for the design. My bolt locations were different possibly due to a different manufacturer. When I get home I will post some pictures. I like your idea of the triangle frame and will pursue angling the jacks toward the corners. Also the possibility of extra iron to tie both frame members together to limit torque and not rely on the 2x4 cross member much like you and others have been wondering about. Just musing.
Clearance may not be a real issue but the originals were tucked in soo nice.Kay and Tom - SW Wisconsin - Silver T@bernacle - 2018 T@B 320S Boondock Silver/Black trim TV, 2018 Chevy Colorado, Silver/Black trim, Duramax, TowHaul, IntelliHaul0


Categories
- All Categories
- 10 Cirrus Truck Campers
- 122 Dutchman and Vintage TaB Archives
- 3 Forum Rules
- 3 nüCamp & Forum Contacts
- 957 Air Conditioning & Refrigeration
- 2.6K Battery/Electrical & Solar
- 1.2K Camping & Travel
- 142 Events & News
- 219 Factory Comments
- 21 "FOR SALE" - New/Used Trailers
- 14 “FOR SALE" - Camping & Trailer Gear
- 2.4K Heating/Plumbing & Winterizing
- 141 Help - Computer & System
- 922 Introductions
- 408 Looking to purchase a trailer?
- 2.1K Modifications & Upgrades
- 1.4K Products and Accessories
- 411 Service/Maintenance & Recall Notices
- 37 Solo Travelers Hints & Tips
- 1 T@G Forum
- 75 Teardrop Groups & Links
- 78 Testimonials
- 918 Tips & Tricks
- 1.5K Trailer & Towing
- 27 Owners Manuals/PDF Files/Videos & Resources
- 55 üCamp Rally - News & Information