Categories
- All Categories
- 6 Cirrus Truck Campers
- 115 Dutchman and Vintage TaB Archives
- 5 Forum Rules
- 3 nüCamp & Forum Contacts
- 942 Air Conditioning & Refrigeration
- 2.6K Battery/Electrical & Solar
- 1.2K Camping & Travel
- 142 Events & News
- 219 Factory Comments
- 12 "FOR SALE" - New/Used Trailers
- 10 “FOR SALE" - Camping & Trailer Gear
- 2.3K Heating/Plumbing & Winterizing
- 133 Help - Computer & System
- 912 Introductions
- 406 Looking to purchase a trailer?
- 2.1K Modifications & Upgrades
- 1.4K Products and Accessories
- 393 Service/Maintenance & Recall Notices
- 37 Solo Travelers Hints & Tips
- 1 T@G Forum
- 71 Teardrop Groups & Links
- 72 Testimonials
- 909 Tips & Tricks
- 1.5K Trailer & Towing
- 27 Owners Manuals/PDF Files/Videos & Resources
- 62 üCamp Rally - News & Information
Switch for Jensen Radio
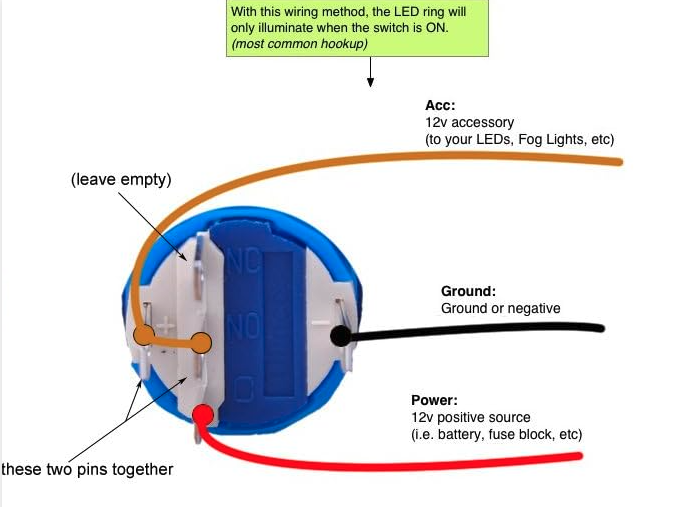
I am trying my first wiring project on our 2025 TAB 320 CS. I'd like to add a switch to the radio to kill the lights and reduce the phantom draw. I purchased the recommended switch from a previous thread, but I've realized that the tabs are too close together to use blade connectors without touching. I believe I need to add a jumper to connect the "+" to power the light, the accessory wire, and then add a ground. I am unable to add the jumper without impacting the accessory tab/blade.
First, am I correct that this is the correct configuration? I've added the wiring diagram from the switch's vendor. Is the jumper required?
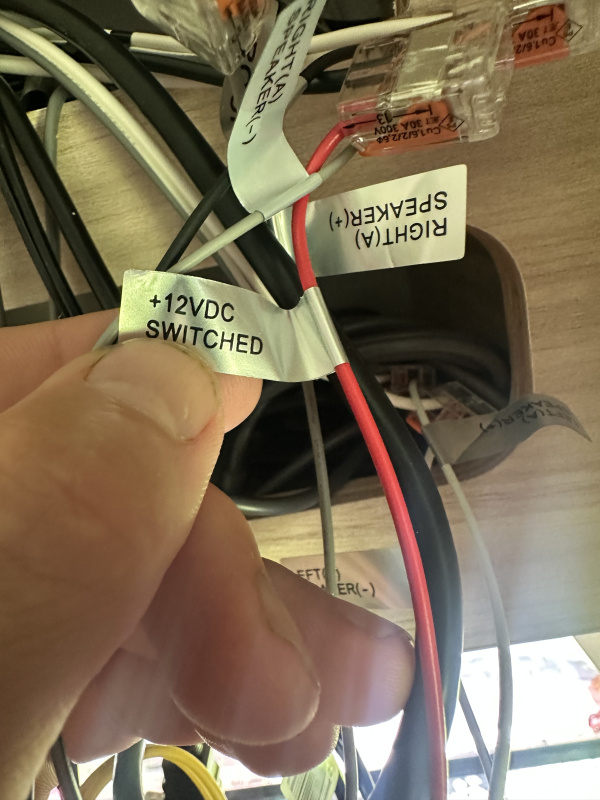
Am I right that I need to cut the red wire shown in this photo? I need to create a jumper without a blade connector on one side. Is this something I can teach myself? I do have a simple soldering iron, but have never attempted to use it.

Can someone tell me the best place to run a new ground from the switch? Or should I give up?
First, am I correct that this is the correct configuration? I've added the wiring diagram from the switch's vendor. Is the jumper required?

Am I right that I need to cut the red wire shown in this photo? I need to create a jumper without a blade connector on one side. Is this something I can teach myself? I do have a simple soldering iron, but have never attempted to use it.

Can someone tell me the best place to run a new ground from the switch? Or should I give up?

Comments
https://tab-rv.vanillacommunity.com/discussion/2979/jensen-on-off-switch/p1
https://tab-rv.vanillacommunity.com/discussion/5577/jensen-radio-disconnect/p1
https://tab-rv.vanillacommunity.com/discussion/18995/added-a-disconnect-switch-for-the-radio-t-b-360#latest
(Alde: 3020; Refrig: Isotherm Cruise 65 Eleg; Battery: BB 100Ah LiFePO4; Solar: Renogy 220W Portable Suitcase w/ Victron SmartSolar MPPT 75/15 Controller; Victron BMV-712 Battery Monitor w/ Shunt; Pwr Cntr: PD-4135KW2B; EMS: PI-HW30C)
Greg & Marlene (Tucson, AZ)
These WAGO connectors are reuseable by simply slipping a correctly stripped wire back in and closing the tab. You can find the WAGO connectors at Home Depot or Amazon in various connector styles. You don't need to solder anything anymore or use wire nuts or crimp connectors.
Relentlessly Pursuing a Silverado EV
'Racing the Wind and Chasing the Sun'
Virginia Beach, VA
I def have a lot of respect for the collective wisdom of this group so if I am off my rocker on this, please let me know.
Can I suggest a different switch that I used (if you can return the one above). I bought this switch and connected in between the red +12 V wire to break power.
Amazon.com: JIANFA Car Push Button Switch DIY Switch Off/ON Universal DC12V Switch for Fog Driving Lights neon Lights LED Light bar etc. : Automotive
Remove the red wire from the WAGO and connect to one end of the switch using another WAGO or "butt" connector. Connect the second wire on the switch to the place you removed the red wire from the OEM WAGO. The ON/OFF switch will break power to the Jenson.
2021 TAB 320 BD (w/new owner having fun)
2021 Jeep Grand Cherokee
Southern Maryland
https://www.amazon.com/dp/B07W8SXSBW?ref_=ppx_hzsearch_conn_dt_b_fed_asin_title_28&th=1
Note: Since there were 8 in the package I added one to kill power to the step light
As mentioned above, the Wago connectors make life simple.
You can get "kits" with a variety of Wagos, very handy to have.
https://www.amazon.com/dp/B08W3QXN9B?ref_=ppx_hzsearch_conn_dt_b_fed_asin_title_1
1. Remove the red +12VDC Switched wire in your pic above (simply lift Wago lever and pull out wire) and connect it into a new 2-pin Wago from you kit. Then take the switch wire +Load and connect it to the other port on this same 2-pin Wago.
2. From the switch, take the wire labeled as +Power, strip the end using the strip length conveniently marked on the side of the Wago. Then insert this wire into the now open port where the original +12VDC Switched wire was.
3. For the ground, there is a white wire labeled GROUND going to a Wago. If there is a spare port on that Wago, just insert the black wire GROUND from the switch into that open GROUND port. IF there are no spare/open GROUND ports, then go back to you kit and get a Wago with at least 1 more port that the existing. For exampl, if the white GROUND wire went to a 2-port, change it to a 3-port. If it was a 3-port, change it to a 5-port (4-ports are scarce as hen's teeth).
I would suggest that all this should be done with power removed to prevent inadvertent shorts causing fusing issues. And easy way is to just pull the radio fuse from the power center while you wire it up.
2015 RAM 1500 Outdoorsman Quad Cab
South Jersey
The diagram provided by the vendor shows a ground/negative connection is needed. I would look for the WAGO that is used in connecting the Radio to the ground. It probably has two connection points (tabs for wires). Replace it with a WAGO with three connection points and add your switch ground wire to that.
Most of all, enjoy the learning and be proud of what you're accomplishing!
Relentlessly Pursuing a Silverado EV
'Racing the Wind and Chasing the Sun'
Virginia Beach, VA
2021 TAB 320 BD (w/new owner having fun)
2021 Jeep Grand Cherokee
Southern Maryland
2025 KZ Sportsmen 130RD
2023 Ford Maverick XLT
The Finger Lakes of New York
Forgot to mention, you will (of course) need to drill a hole for the switch. If you went with the link I provided it is a 0.8" hole diameter. I had a 3/4" bit laying around, I used that and finished with a rat tail file to get it to fit.
2015 RAM 1500 Outdoorsman Quad Cab
South Jersey
Similar on/off toggle switch installed for my Victron Phoenix 12|1200 inverter.
Love simplicity...
Camper: nuCamp T@B 320S BBC | 12V 2x100Ah LiFePO4 | 600W Solar
Tow Vehicle: Jeep JLU Rubicon | 12V 100Ah LiFePO4 | 200W Solar
https://revkit.com/donmontalvo/ | https://donmontalvo.com