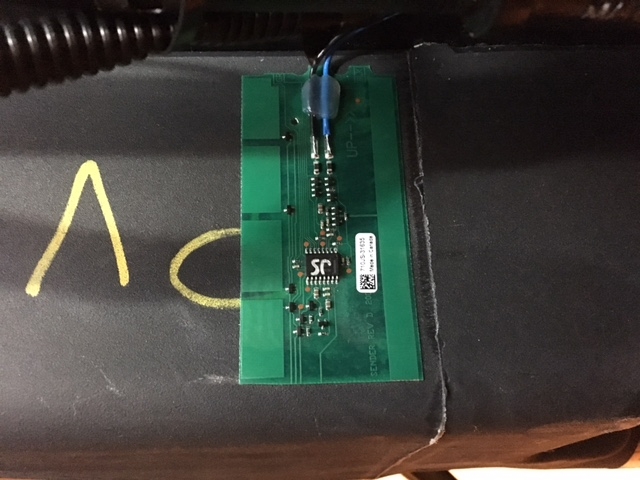
The SeeLevel II kit was $210.00 with shipping. You will get the 709-P3 monitor, 3-710JS senders and a wiring pig tail. You will need extra wire to run the ground wire and the wire down the wall to the senders on the tanks.
This is how I started, I first removed the fuse for the pump and the old pump switch and disconnected the wires, I then laid out and cut the hole for the Monitor. Cutting the hole was tricky, there is a bundle of wires behind the wall. You need to make sure to keep them out of the way when you are cutting the hole. I carefully drilled holes in the corners of the layout lines for the monitor, I pushed the wires back and used a pencil to hold the wires out of the way while I cut the hole with a hand saw. I won’t go into details on the complete wiring, if you go to Garnet Instruments website you can download the complete install manual. 
Pencil is used above to hold bundled wires inside wall safely to one side while cutting hole.

Use test light to find "12 volt hot wire" and mark the hot wire with a felt tip marking pen.
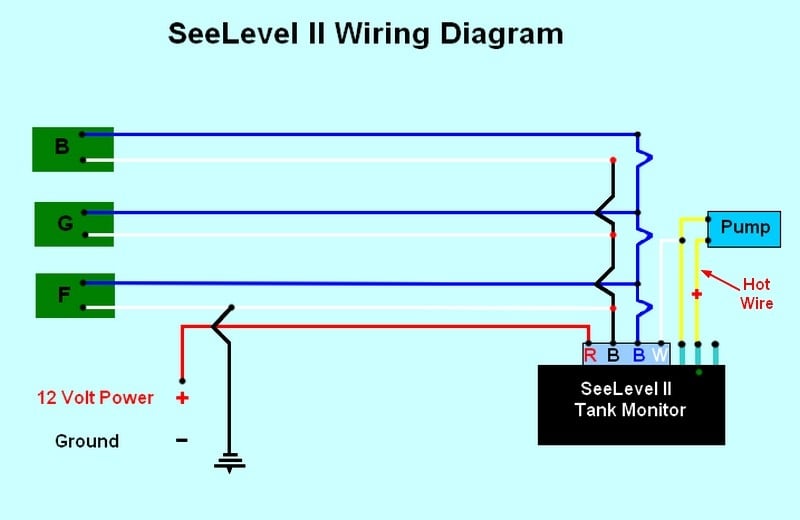
Water Pump Switch Information
I will cover one thing, they do not give any
information on how to wire up the pump switch and the indicator light for the
pump.
The wires on my old pump switch were both yellow in color. You will need
a 12v test light. Hook one end of your test light up to a ground make sure the
two wires you took off the old pump switch are not touching, reinstall the pump
fuse. Use your test light to find out which wire is the +12v hot lead, mark the
wire, I used a red Sharpie marker. The other wire is the feed line to the water
pump. I also used this +12v hot wire for the +12v feed to the SeeLevel monitor.
The pump switch on the SeeLevel monitor has three terminals on it, you will use
the bottom two, put the +12v hot wire you marked on the bottom terminal, the
pump feed wire goes on the middle terminal and so does the white pump indicator
wire from the SeeLevel monitor pigtail. This setup will turn the pump and
indicator light on when the switch is up. Remove the pump fuse to finish the
rest of the wiring.
SeeLevel II Installation Info - Fresh & Gray Water Tank Monitor Install/Wiring
Now back to the
install... Follow the instruction in the manual on how the mounting, placement, and cutting
of the senders for each tank. I will tell you I had to cut both of the senders
for the gray and fresh tanks to the 4” minimum length. The gray tank is easy,
the fresh tank is hard, the fresh tank is shorter by about 3/8” than the strip,
I had to move it up and down to get the placement correct. I ran the wires up
thru the floor next to the gas line for the stove, then under the cabinet over
to the access hole in the side of the lower cabinet under the sink. This is
also were you will find the side of the black tank, it will use a full length
sender. It’s not too bad to get to. This is also where I hooked all of the
wiring together. Please read the manual for complete details on install, wiring
and setup. I tested the accuracy of the senders the fresh is not perfect it is
off about 3%, the gray and black seem to be dead on. It was a challenge, it
took me almost 5 hours start to finish, a lot of up and down under the T@B, all
in all it was worth it and I am happy with the install.

To get the Fresh and gray water tanks, I raised the trailer tongue all the way up.

To get up inside the underbelly of the trailer I removed all of the front metal strip and first piece of the metal strip on each side.
Then you can just roll the plastic covering down and back out of your way. This will give you just enough room to do what you need to do.


")


")


")
