Lund Box install

Estancio
Member Posts: 243
After my 6 weeks trip this past summer, I decided to upgrade my gas/battery box. Opted for the Lund box which many others are using. Here are the photos of my install.
First - strip off old plastic box and all associated framing. Then added 3 steel angles (2x2) to support the new box. These are welded to the tongue channels - one to each edge of the Lund box and one in the middle. This provides great support!

Next was roughly fitting the new Lund box and drilling four mounting holes - two front and two back - where the angles overlap the channel.

Then I added a wooden floor since I thought the Lund aluminum was rather thin for supporting the weight of the battery. This did help distribute the weight well.

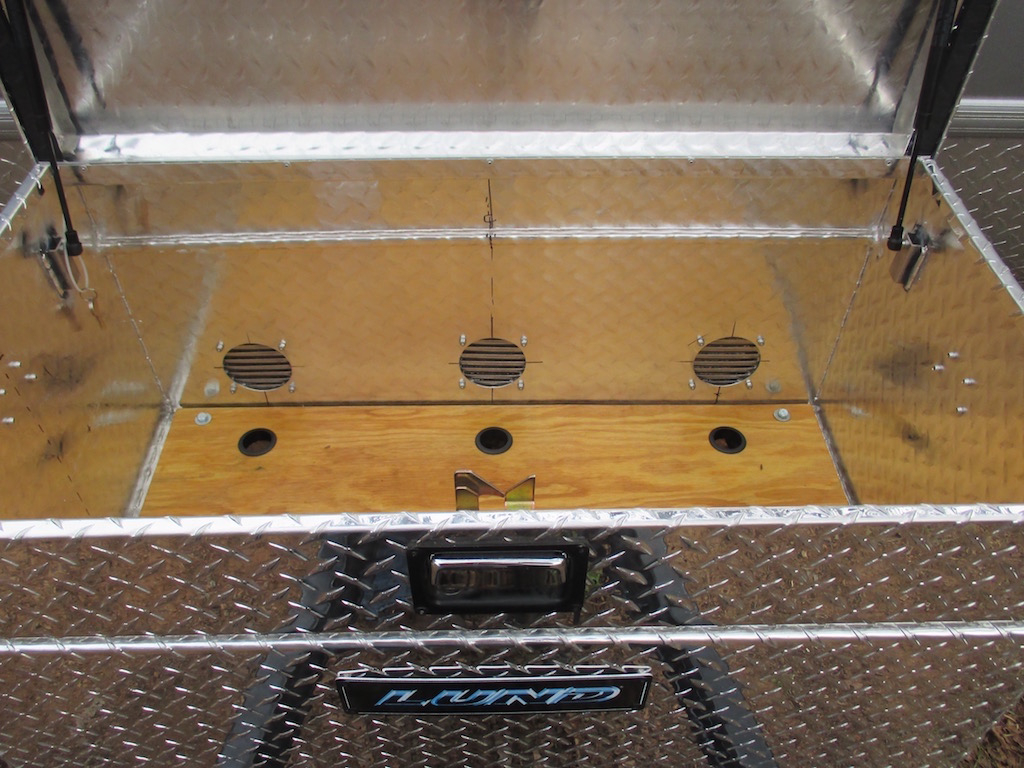
Next I drilled 6 holes in the Lund box. Three in the floor that are 2" diameter. These allow for wires and gas line to come in from below and also allow venting. Three larger 3.5" holes were drilled at the back of the box and stainless steel marine vent covers were installed to keep rain out.
 The last built item was a new gas bottle/batter carrier. It is built from steel angle, welded together. It bolts through the floor of the box and positions the gas tank as far back as I could get it and still be easily removable.
 All was bolted in place and connections run for electrical and gas hookups. Note that I used J-hooks for the battery hold down. The space was constructed to accept either Group 24 or Group 27 batteries.
 Done!
Done!
First - strip off old plastic box and all associated framing. Then added 3 steel angles (2x2) to support the new box. These are welded to the tongue channels - one to each edge of the Lund box and one in the middle. This provides great support!
Next was roughly fitting the new Lund box and drilling four mounting holes - two front and two back - where the angles overlap the channel.
Then I added a wooden floor since I thought the Lund aluminum was rather thin for supporting the weight of the battery. This did help distribute the weight well.
Next I drilled 6 holes in the Lund box. Three in the floor that are 2" diameter. These allow for wires and gas line to come in from below and also allow venting. Three larger 3.5" holes were drilled at the back of the box and stainless steel marine vent covers were installed to keep rain out.
The last built item was a new gas bottle/batter carrier. It is built from steel angle, welded together. It bolts through the floor of the box and positions the gas tank as far back as I could get it and still be easily removable.All was bolted in place and connections run for electrical and gas hookups. Note that I used J-hooks for the battery hold down. The space was constructed to accept either Group 24 or Group 27 batteries.Done! Stancil Campbell
2011 T@B
Rockingham, NC

2011 T@B
Rockingham, NC
4
Comments
-
 Stancil Campbell
2011 T@B
Rockingham, NC3 -
Nice job!2014 T@B M@XS; 2017 Ford Transit Low Roof, Reg. Wheel Base0
-
Great work. It provides more space, and blends right in, looking like it belongs.
2016 T@b 320 CS-S - 2018 GMC Sierra - St. Catharines, Ontario, Canada0 -
@Estancio, Awesome job! Looks really good.
") Lots more storage room! Nice touch leaving enough room for a GP 27 battery for the future. Would you be able to put 2 6Volt batteries in that space as well? Just curious. 2016 T@B MAX S-aka: WolfT@B
Lots more storage room! Nice touch leaving enough room for a GP 27 battery for the future. Would you be able to put 2 6Volt batteries in that space as well? Just curious. 2016 T@B MAX S-aka: WolfT@B
TV: 2006 Chevy Avalanche LT Z71 aka: WhiteWolf, or 1972 Chevy Custom10 P/U aka: SnarlingWolf
Spokane, Wa.
Eric aka: Lone Wolf0 -
@Estancio Wow! nice work!2017 Tab Basic S Silver on Silver with Sofitel Cushions....upgraded from 2013 LG 5W....Towed by a 2016 Sorento V6 AWD w/5000lb tow capacity. Dave S. married to Jen aka SanDiegoGal We pull a Tab but live in a 2014 Airstream International Signature 27 FBQ...Talk about embracing a trailer lifestyle.0
-
Twojgrams, thanks. Yes there are only 6 pics. My computer still does not let me see them! Guess I have a virus or need some computer update.
@ericnliz, the battery area measures 8" x 14" and was fixed to hold a Group 27 with a marine plastic box. Without the box, the 27 battery is loose. Not enough for dual 6V batteries, but enough to go up to group size 30 or 31 in a 12V.Stancil Campbell
2011 T@B
Rockingham, NC0 -
@Estancio I have the same box and have two group 31 batteries side by side. Do you have the rest of the space allocated for something else?
 2017 Tab Basic S Silver on Silver with Sofitel Cushions....upgraded from 2013 LG 5W....Towed by a 2016 Sorento V6 AWD w/5000lb tow capacity. Dave S. married to Jen aka SanDiegoGal We pull a Tab but live in a 2014 Airstream International Signature 27 FBQ...Talk about embracing a trailer lifestyle.1
 -
dsatwork your dual battery system looks great. I personally did not need the extra amps and wanted to keep the tongue light. I might use the space for folding chairs, power cable, chock blocks and such. Not sure yet.Stancil Campbell
2011 T@B
Rockingham, NC2


Categories
- All Categories
- 10 Cirrus Truck Campers
- 121 Dutchman and Vintage TaB Archives
- 3 Forum Rules
- 3 nüCamp & Forum Contacts
- 954 Air Conditioning & Refrigeration
- 2.6K Battery/Electrical & Solar
- 1.2K Camping & Travel
- 142 Events & News
- 219 Factory Comments
- 20 "FOR SALE" - New/Used Trailers
- 14 “FOR SALE" - Camping & Trailer Gear
- 2.4K Heating/Plumbing & Winterizing
- 140 Help - Computer & System
- 920 Introductions
- 407 Looking to purchase a trailer?
- 2.1K Modifications & Upgrades
- 1.4K Products and Accessories
- 408 Service/Maintenance & Recall Notices
- 37 Solo Travelers Hints & Tips
- 1 T@G Forum
- 75 Teardrop Groups & Links
- 77 Testimonials
- 916 Tips & Tricks
- 1.5K Trailer & Towing
- 27 Owners Manuals/PDF Files/Videos & Resources
- 54 üCamp Rally - News & Information