2015 Tab 320 Outback Driver's side taillight running light

Parlando
Member Posts: 165
My drivers side running light doesn't work. My right side works, but with less than full LEDs showing up. All other functions on both lights work... brakes, turn signals okay. I tested the 7 pin on the car and got a bright light from the 11:00 pin on the 7 pin. So I think that electricity is good there.
I removed the 4 screws from around the driver's side taillight on the T@B. That panel doesn't come off easy so I'm guessing that there is a sealant there. Not sure if it is the correct place to look so I've stopped for now.
I removed the 2 screws from the red lens cap, which falls off easy, but the light is snug there. Not sure what's called for, so I stopped for now.
Any suggestions on how to proceed? Thanks, Parlando


0
Comments
-
The LED lights are very easy to replace. You do not have to remove the socket or any trim pieces. Using a small flathead screwdriver, simply pry the LED light out of it's black socket. You will see three wires attached to the back of the LED light - black, white and red. Simply match them up to your new LED. You can throw away the black socket that comes with the new lights. Word of warning - nuCamp leaves very little slack in those wires, so be careful not to waste any. You can buy a direct replacement on Amazon. There is another thread on the forum with the link.2016 Outback 320
2024 Ford F150 Supercrew short bed.0 -
Thank you. Do you think that is the next logical move? Any other testing to do first?1
-
Here are the lights:
https://www.amazon.com/Kaper-II-L15-0021-Trailer-Light/dp/B0113XPTIK
Not sure how to test for a bad running light situation - when other functions are working. Maybe someone can chime in. However, I do know that with older trailers like ours, the LED's need to be replaced because they start going out. Sorry I couldn't be of more help.2016 Outback 320
2024 Ford F150 Supercrew short bed.0 -
Thanks for your input!0
-
@Parlando, just a quick observation, when I removed the same 4 screws you removed I also had to remove the additional 3 screws to the left and my cover came right off.2020 TAB 320 U
TV 2025 Telluride X Type0 -
I’ve been trying to remove the light with a Flathead screwdriver. The black socket started to chip, almost seems like it is brittle at the bottom. It doesn’t seem to want to release. It’s hot here now, and I’m in the sun, so I’ll wait a bit and maybe try again.0
-
Decided to go back to the T@B brain trust. After trying to remove the LED tail light with a flat head screwdriver, and pieces of the black surround either refused to give or chipped off, I removed the four screws next to the surround and was able to get the surround off and look at the inside of the light casing. I realized that no amount of prying with the screwdriver would pop out the light as it is fully caulked in with some sort of sealant. I've attached two pics, one of the outside with chipped black grommet, and one of the inside with the sealant. Before I proceed to try to remove the sealant and replace the light I thought I'd ask for follow up advice. Proceed? What kind of sealant do I use to replace the old stuff? Thanks.


0 -
See linked post. NuCamp recommends GeoCell.https://tab-rv.vanillacommunity.com/discussion/16031/caulking-and-sealants-what-nucamp-uses
Sharon / 2017 T@B CSS / 2015 Toyota Sienna Minivan / Westlake, Ohio0 -
Thanks for the sealant suggestion. Anyone have a good process for removing all the sealant around the light do I can get it out?0
-
Sorry to see that there is sealant holding the LED section to the black socket. When you get the new lights in, you'll see how that piece simply pops out of the socket. I suggest waiting until you get the new lights before proceeding. I've done four of these replacements and never had to remove any trim pieces or the black socket.2016 Outback 320
2024 Ford F150 Supercrew short bed.0 -
Yes, the sealant looks like it might make the job impossible. I might try cleaning the 7-pin of the build up of electrical grease first. I know I have power from the car side, but I’m not sure if the 7pin connects to the trailer side successfully. Is that back plastic light holder still available for sale? It may beadier to replace the holder rather than clean out the sealant.0
-
I meant “easier” to replace the holder…0
-
The black plastic holder (shown in your photo with the three wires coming out of it) is part of the replacement light from Amazon. Therefore, best to wait until the new units arrive.2016 Outback 320
2024 Ford F150 Supercrew short bed.0 -
I finally heard from our dealer, Apache, in Portland. They said that they have had trouble communicating with NuCamp. Apparently to replace the left and right eyebrows (the white area surrounding the LED lights) are $145 each, $290 for the pair. I assume the lights are extra. They are 4-5 weeks out if ordered.so...I decided to try de-greasing the 7 pin connectors. I did that with WD-40 Special Quick Drying Electrical Contact Cleaner. Then followed up with a pipe cleaner to remove gunk and dry the areas. My trailer side and my car side of the 7 Pin connectors was very difficult to seat, so I added new dialectic grease and they slid into place. I also closed the dual contact connectors on the trailer side with a small screwdriver. I got some increased LED lights, but not all of them. I'm thinking that means that it's not the LED lights that have failed, but maybe one side of the 7 Pin. I also opened up the junction box under the trailer and all of the connections, wires, connectors look tight and actually brand new.so...I'm now thinking that the next step would be to cut off and replace the 7 Pin connector on the trailer side. I have plenty of 7 pin wire. Reasons are: 1: Different lights are sometimes working or not depending on cleaning and adjusting pin connectors. 2: Junction box innards look brand new and tight.A second approach would be to replace the entire 7 PIN connector and wire, but it seems that would be more complex. I could do it, but think the simplest solution is the best to start with. But if I go that way I'm wondering what you all think about this one from Amazon for $19.99. (My RV dealer said that they have a Volterra for $63.)Thanks for any feedback. -Parlando
CheeMuii 7 Way Trailer Cord Heavy Duty 8 FT Trailer Wiring Harness Kit 7 Pin Trailer Plug Inline Wire Harness Cable for Trailers RVs Campers
0 -
@Tabaz The LED lights and black holder they are contained in are permanently sealed with a stiff, white sealant into the white eyebrow. There is no way to replace the LED light. It is permanently glued in place. If the LED lights prove defective (which I hope and actually don't think they are) I would have to purchase new white plastic eyebrows, which are proving difficult to obtain according to my dealer.0
-
I just read some of the reviews of the trailer cord I was possibly going to order and use. Several folks who know what to look for said, "NOT copper wire. It is aluminum with copper color/coating on it. See picture, coating comes off with utility knife and exposes the aluminum wire."I'm still wondering if replacing the cord is the next logical step? And does anyone have suggestions of a good copper wired trailer cord for replacing? Maybe my RV dealer's $63 dollar cord is the one to go with. That brand name is Valterra.Thank you in advance for any replies.0
-
@MuttonChops. Hi Muttonchops. I'm wondering if you have any ideas for troubleshooting my lights and how to proceed. Note that my light surrounds (NuCamp called them eyebrows) are permanently sealed to the lights so that I can't just pop them out and replace them. I don't think that the lights are the problem, but I'm not sure how to troubleshoot the whole system.0
-
General Comments:Parlando said:
. . . MuttonChops . . . wondering if you have any ideas for troubleshooting my lights- 1 - If the tail light LED unit is defective, I would not replace the 'eyebrow'.
A heat gun should weaken the sealant so the old light assembly can be removed.
- 2 - Many folks have been able to pop the LED circuit board out of the housing.
If the LED assembly is bad I'd again attempt to get the Board out first (see #3)
- 3 - It may not be possible to purchase the L15-0021. Possible other brand units don't
match the L15 size so full replacement of the assembly will be needed. There are a
couple of forum threads on installing a different brand light.
- 4 - Your observation that the tow vehicle or trailer 7-pin may impact brightness is
interesting. Poor connects causes high contact resistance which lowers the voltage
at the final wire end.
Troubleshooting Ideas:
- A - Use the trailer battery to fully test the tail light assemblies.
Run a wire from the Battery Positive to the 7-pin contacts for L/R Turn and the
running/tail lights One-at-a-Time.
Observe LEDs (dark shade might be helpful) can you see if the correct number of LEDs are on.
- B - If 'A' results are poor, move the battery jumper wire to the Junction Box location.
If results are Good then 7-pin connector or cable has issues.
If results are still poor . . . time to consider replacing LED assembly.
Test Overview: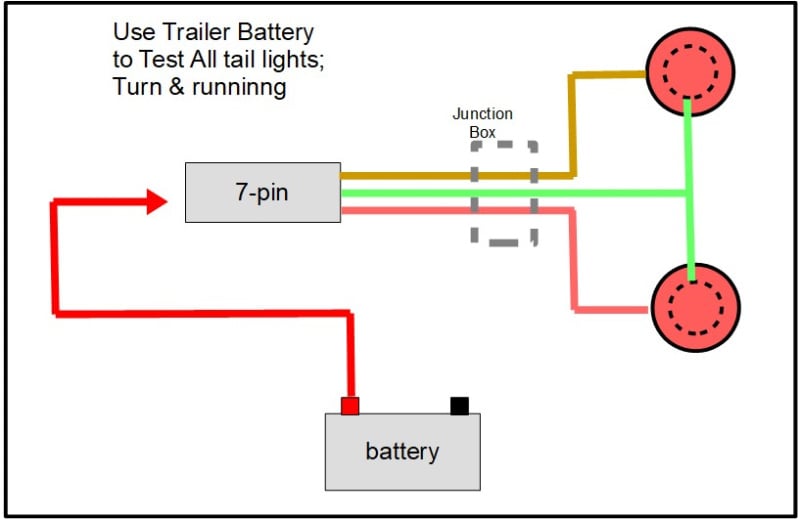
Tail Light Assembly Theory of Operation: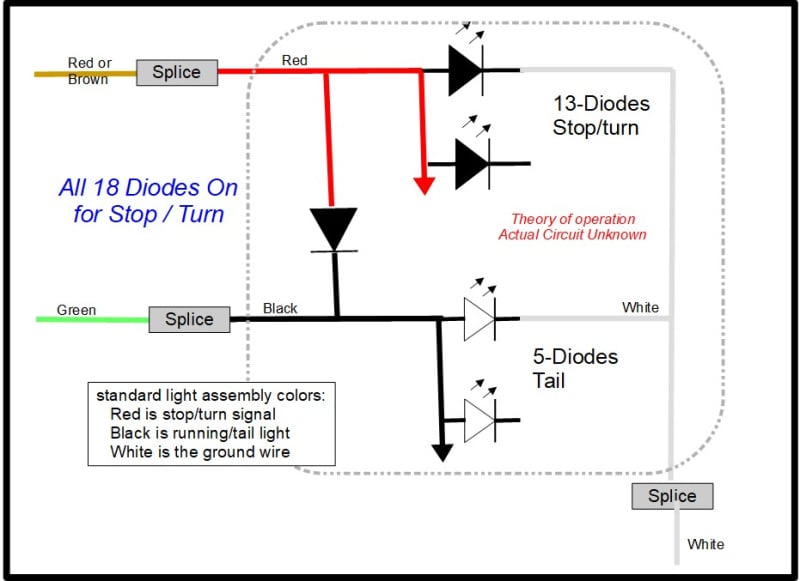 '18 320 S, pitched axle, 3020HE; PNW basedTV: '17 Colorado V6 Z71 4x4, Tow Package, GM Brake Controller
TV: '25 Canyon AT4
Adventures: 58 Nights: 405 Towing Miles 50,1801 -
Man Muttonchops, your advice is very welcome. I will start the analytics and cross my fingers. Heat gun on the sealant is a great suggestion. Thank you!1
-
@MuttonChops PS. When I said that I tested the 7 pin on the car and got a bright light from the 11:00 pin on the 7 pin I merely meant that I got a good steady bright light from that pin. My reasoning from that was that I had a good connection up to that point. Will run the test you suggests tomorrow. Thanks again.0
-
@Parlando, if you have not located it, here is the discussion about the taillight and info provided by @Tabaz :
https://tab-rv.vanillacommunity.com/discussion/comment/125841#Comment_125841
If I am understanding it correctly, you are experiencing some individual LEDs in the taillight on the driver's side being burned out. It seems to me that the solution is just to replace the taillights. I doubt that the 7-way cord or its connection is the issue (at least not the primary issue.) @MuttonChops's suggestion to use the heat gun to remove the caulking is a good one. Hopefully, that will allow you to remove the lights and easily replace them.
In the past, others, including me (in Oct 2022), have had issues with some of the LEDs burning out. I replaced mine with the same taillights as @Tabaz (https://www.superbrightleds.com/catalogsearch/result/?q=TLS-R17HF-R-K (4” round). I took a photo of the original light as the LEDs were starting to fail, so I am posting that here if it is of any value to others. I have a video of the three defective LEDs intermittently flickering on and off, but I cannot figure out a way to attach it here. Before I replaced the taillights, additional LEDs were beginning to fail, so replacement of both taillights made sense. I am also attaching a couple additional photos to show the wiring connections and what the taillight looks like when illuminated.


2019 T@B 320 S Boondock Lite ~ 2025 Toyota Tundra CrewMax 4x4
Greg & Marlene (Tucson, AZ)0 -
I did the two test and both were poor. So that means "If results are still poor . . . time to consider replacing LED assembly". I'll see if I can locate a good substitute for the L15-0021 lights. If anyone has found a good substitute please let me know what and where you found it. Most of the leads on this post that I followed are no longer available.0
-
@Parlando, although the taillights sold by "superbrightleds" are not currently available, it says "Backorder Available," so maybe give them a call and see how long it would take to receive a pair of the taillights. As I recall, I contacted their customer service in the past and they were very helpful.
If that does not work out, take a look at the below discussion. The lights referenced by @Cyclonic at the beginning of the discussion are currently available on eTrailer.com and might work. You can download @Cyclonic's installation PDF to see photos of the lights. @Cyclonic described them as being 4" lights, but the diameter provided by eTrailer is 4 5/16", so you will need to confirm that will work.
https://tab-rv.vanillacommunity.com/discussion/comment/134724#Comment_1347242019 T@B 320 S Boondock Lite ~ 2025 Toyota Tundra CrewMax 4x4
Greg & Marlene (Tucson, AZ)1 -
@Bayliss Thank you for your suggestions. I ended up calling NuCamp and it turns out that they have some lamps available, so I ordered two. Part number 60-00-4037 in case anyone needs one. The taillight number L15-0021 matches, although they are not sure if it is the same manufacturer or an aftermarket, but they thought that they be a proper replacement. I had removed my taillight and cut my light wires as close to the light as others had suggested. Dang. When I took them into my local RV dealer he tested the light and all but 3 diodes were working. He suspects a bad ground somewhere. I guess I'll know more when I install the new lights. In the meantime I opened up the back of the trailer from the inside (removed the board above the Alde radiator) and found some blue wire connectors going to the taillights. I'm thinking of replacing them with WAGO connectors. I may wait and see what the new taillights reveal.0
-
Good to Know.Parlando said:
. . . NuCamp - - - Part number 60-00-4037 in case anyone needs one.
taillight number L15-0021 matches,. . . took them into my local RV dealer he tested the light and all but 3 diodes were working.
He suspects a bad ground somewhere.IMHO the RV Dealership Tech is wrong.
The L15-0021 has 18-diodes; 5-wired for running and 13-wired for stop/turn (which also powers the running 5). So there are Two electrical Blocks of LEDs, if the trailer has a ground wire issue all 5 or all 13 LEDs would not function. Having only 3 bad indicates the individual LEDs have failed**.
Would be fun to know if the 3 bad sites are on the Running light or Stop/Turn block . . or was it a mix.
** failure could be 'the ground' connection on the LED PCB but that is internal to the light assembly.'18 320 S, pitched axle, 3020HE; PNW basedTV: '17 Colorado V6 Z71 4x4, Tow Package, GM Brake Controller
TV: '25 Canyon AT4
Adventures: 58 Nights: 405 Towing Miles 50,1800 -
@MuttonChops Today I re-tested the 7 wire with a circuit tester and got a reading of 12.7. Then I re-tested the positive from the battery to the ground on the junction box and got a reading of 12.5. Then I re-tested the positive from the battery to the ground wire that I exposed when I cut off the tail light and I got 12.7. So that means I don't have a ground fault? My wife just got home so I will re-test the stop, turn & brake lights on both sides and give you a more detailed report.0
-
@MuttonChops Next I tested the left and right light functions of Running Lights, Turn Signals & Brake Lights, both with just the normal wiring in place (W/O Extra Ground), and then again with an extra ground wire running from the negative post on my trailer battery. The results were the same with and without and extra ground. I believe this means I don't have a ground fault in that system. Does it mean that my lights are bad? I'm not sure. I'm posting the results of my test here in this PDF:0
-
@Parlando;
Short answer, agree your extra ground wire test would eliminate a trailer wiring ground issue.
Overall, I've become confused as the various 'tests' seem to have differing LED status results. The PDF file results for the "good bright" right side (passenger) do not track with the L15-0021 specification. Your trailer might not have L15 assemblies or could have failing units in both driver & passenger side.
If my rig . . . I would purchase at least one new (equal diameter) LED assembly, connect it to the trailer and confirm you get correct (to LED specification if known) running, stop & turn LED count and brightness. Or equal to eye when wired to the Driver and Passenger trailer wires.
Expect you will find both the current trailer LED assemblies are failing and/or have running & turn/stop wiring errors.
Your PDF reported results: '18 320 S, pitched axle, 3020HE; PNW basedTV: '17 Colorado V6 Z71 4x4, Tow Package, GM Brake Controller
TV: '25 Canyon AT4
Adventures: 58 Nights: 405 Towing Miles 50,1800 -
@MuttonChops. Thank you for your feedback. I have ordered two replacement LED assemblies. They are due here Tuesday. I suspect that you are right, that I have two failing LED assemblies. I am doubtful that there are wiring errors because they have been working well for the previous time that I have had the trailer, about five years. The only other odd electrical problem I've had lately is that I noticed that I don't get heat from the Alde (and hooked up to an electrical source), but my propane does work. Doubt that is related, but I'm not sure. I seldom hook up, so I can't rely on historical data. I'm not sure that it ever worked.0
-
Lots of different threads on the Forum for you to review on 'that Alde issue'.Parlando said:
. . . other odd electrical problem I've had lately is that I noticed that I don't get heat from the Alde (and hooked up to an electrical source), but my propane does work.
First thing to check . . .
Is the Alde 120VAC power cord plugged into the Alde compartment outlet?
It is very common for the plug to vibrate out of the outlet overtime, many of us have strapped it in place.
'18 320 S, pitched axle, 3020HE; PNW basedTV: '17 Colorado V6 Z71 4x4, Tow Package, GM Brake Controller
TV: '25 Canyon AT4
Adventures: 58 Nights: 405 Towing Miles 50,1800


Categories
- All Categories
- 10 Cirrus Truck Campers
- 122 Dutchman and Vintage TaB Archives
- 3 Forum Rules
- 3 nüCamp & Forum Contacts
- 958 Air Conditioning & Refrigeration
- 2.6K Battery/Electrical & Solar
- 1.2K Camping & Travel
- 143 Events & News
- 219 Factory Comments
- 20 "FOR SALE" - New/Used Trailers
- 12 “FOR SALE" - Camping & Trailer Gear
- 2.4K Heating/Plumbing & Winterizing
- 141 Help - Computer & System
- 922 Introductions
- 408 Looking to purchase a trailer?
- 2.1K Modifications & Upgrades
- 1.4K Products and Accessories
- 411 Service/Maintenance & Recall Notices
- 37 Solo Travelers Hints & Tips
- 1 T@G Forum
- 75 Teardrop Groups & Links
- 78 Testimonials
- 918 Tips & Tricks
- 1.5K Trailer & Towing
- 27 Owners Manuals/PDF Files/Videos & Resources
- 55 üCamp Rally - News & Information