Battery Spaghetti Fix - Bus Bars

BrianZ
Member Posts: 1,770
I used to think bus bars were often for those obsessed with neatness and unnecessary for just a few connections. However, after adding solar power, a battery monitor and a charger to our electrical system, our battery now looks like this..
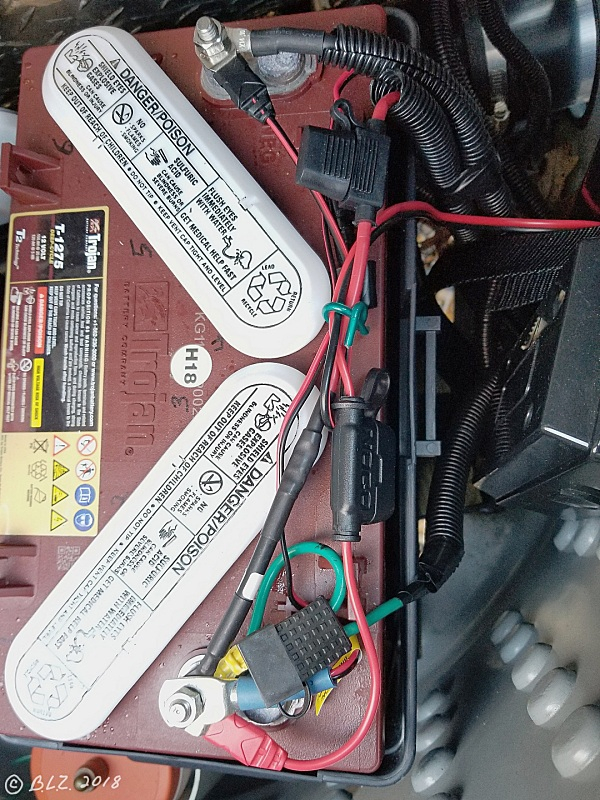
I expect this tangle of wires with no less than 3 fuses attached will make things a bit unwieldy when it comes to battery maintenance & cleaning. Plus, there are a couple more negative post connections already moved to the monitor shunt in addition to these.
So, in anticipation of cleaning up this mess, I am making plans to add buss bars inside a separate junction box, and move most of these wires & fuses there.

I got two of these mini bus bars, a pair of 2-ft 6-gauge cables, and this junction box to house all the extra battery connections.
● Blue Sea Systems 2315 MiniBus 100... https://www.amazon.com/dp/B000OTJ8A0
● ONLINE LED STORE 7-Port Trailer... https://www.amazon.com/dp/B07G8S9ZCB
● 6 AWG 6 Gauge Single Black 2 feet... https://www.amazon.com/dp/B0721GBGGL
● 6 AWG 6 Gauge Single Red 2 feet... https://www.amazon.com/dp/B072MWHC1T
Our tub has gotten quite full with all the additions, so this is the only space left..

There is already a similar junction box holding the shunt wiring for the battery monitor, which I plan to reposition a bit to the left to make room for a second box..

I plan to use some metal brackets to hang them as shown by this digital clone, the only way I could find to fit them both close to the battery box. I'll try to fit the fuses inside the box too.
Finally, here is my wiring plan showing how all three components will be rewired.
I drew in the new wire connections at the bus bars, each keyed to a number label on the existing old connection locations..

The blue connector (4) on the battery pos terminal is the battery temp sensor/shunt power lead, which will remain on the battery, the only other battery connection besides the two 6G black & red cables from the shunt/buss bar boxes.
(for size reference, I put a 6" white ruler inside the bus bar box, but the 3 photos in this composite are not shown at the same scale)
I may not actually get this project done until after warmer weather has returned, when those wires will not be so stiff & easier to reroute. Please let me know if you see any issues with this setup, as I have plenty of time to make changes.
I expect this tangle of wires with no less than 3 fuses attached will make things a bit unwieldy when it comes to battery maintenance & cleaning. Plus, there are a couple more negative post connections already moved to the monitor shunt in addition to these.
So, in anticipation of cleaning up this mess, I am making plans to add buss bars inside a separate junction box, and move most of these wires & fuses there.
I got two of these mini bus bars, a pair of 2-ft 6-gauge cables, and this junction box to house all the extra battery connections.
● Blue Sea Systems 2315 MiniBus 100... https://www.amazon.com/dp/B000OTJ8A0
● ONLINE LED STORE 7-Port Trailer... https://www.amazon.com/dp/B07G8S9ZCB
● 6 AWG 6 Gauge Single Black 2 feet... https://www.amazon.com/dp/B0721GBGGL
● 6 AWG 6 Gauge Single Red 2 feet... https://www.amazon.com/dp/B072MWHC1T
Our tub has gotten quite full with all the additions, so this is the only space left..
There is already a similar junction box holding the shunt wiring for the battery monitor, which I plan to reposition a bit to the left to make room for a second box..
I plan to use some metal brackets to hang them as shown by this digital clone, the only way I could find to fit them both close to the battery box. I'll try to fit the fuses inside the box too.
Finally, here is my wiring plan showing how all three components will be rewired.
I drew in the new wire connections at the bus bars, each keyed to a number label on the existing old connection locations..
The blue connector (4) on the battery pos terminal is the battery temp sensor/shunt power lead, which will remain on the battery, the only other battery connection besides the two 6G black & red cables from the shunt/buss bar boxes.
(for size reference, I put a 6" white ruler inside the bus bar box, but the 3 photos in this composite are not shown at the same scale)
I may not actually get this project done until after warmer weather has returned, when those wires will not be so stiff & easier to reroute. Please let me know if you see any issues with this setup, as I have plenty of time to make changes.
-Brian in Chester, Virginia
TV: 2005 Toyota Sienna LE (3.3L V6)
RV: 2018 T@B 320S, >100 mods
TV: 2005 Toyota Sienna LE (3.3L V6)
RV: 2018 T@B 320S, >100 mods
1
Comments
-
BrianZ said:. . . I'll try to fit the fuses inside the [ Battery Junction (?) ] box too.Overall nice idea.If you are successful placing the Fuses in the Battery Junction box how are you going to quickly change them? Seems Battery Junction Box cannot be opened without unbolting from the tub.Maybe locate that box on the T@B diamond plate like the battery cut-off switch?'18 320 S, pitched axle, 3020HE; PNW basedTV: '17 Colorado V6 Z71 4x4, Tow Package, GM Brake Controller
TV: '25 Canyon AT4
Adventures: 58 Nights: 405 Towing Miles 50,1800 -
Yes, @MuttonChops, that is true, it might be a bit less convenient to get at the fuses - one bolt to loosen plus two screws in the top of the junction box. On the other hand, I've never needed to check any of these fuses, and I don't think I'd need to do it quickly. I figure it's a small price for having them well protected from corrosive dirt & water. Mounting on the diamond plate sounds like it might be more convenient for fuse access, but I don't think I have enough space available. Will have to look again. It might also require extending or replacing some cables. Thanks for that idea.
-Brian in Chester, Virginia
TV: 2005 Toyota Sienna LE (3.3L V6)
RV: 2018 T@B 320S, >100 mods0 -
An unseasonably mild 60° day yesterday made wires more flexible & gave me the opportunity to complete this project..

Unfortunately, I could not find any other place to mount the junction box holding the bus bars, as @MuttonChops had suggested. Since this new box is a bit larger than the one holding the monitor shunt, I had to mount it at an angle to fit it in.
The shunt box no longer has a bunch of battery negative wires connected to the load side (bottom terminal) of the shunt; as these have been moved to the negative bus bar in the newly added junction box, and replaced by a new 6G cable to that bus bar.
This new junction box holds all the (+) and (-) cables previously connected to the battery, including the three labeled fuses. I took this photo before replacing the two plastic protective caps that snap over the two rows of bus bar terminals.
With regard to the issue @MuttonChops raised about having to unscrew the box top to access fuses, I realized that both the charger & solar lines have pigtail ends hanging inside the tub, so I could easily check the integrity of both fuses simultaneously without opening the box, by connecting a multimeter to their positive ends & performing a continuity test. If it failed, then at least one of the fuses may be bad.
Not sure if there is an equivalent shortcut for the trailer fuse, though I would expect there would normally be a higher index of suspicion involved with the need to check that trailer line fuse (if one needs to check it, then it is likely bad?).
So, here's the difference the new junction box with bus bars makes at the battery.
It would have been just the two big cables remaining, except the battery monitor has a battery temperature sensor (blue connector) at the positive terminal, a line which also powers the monitor. This will make battery maintenance & clean up a whole lot easier & with less exposure of fuses to corrosion.
-Brian in Chester, Virginia
TV: 2005 Toyota Sienna LE (3.3L V6)
RV: 2018 T@B 320S, >100 mods2 -
Forgot this one..

Final test of wiring showing two cell phone displays of the battery monitor app connection via wireless bluetooth connection with house power off, then on. Everything appears to be working normally.
Without AC power hookup, the monitor display at left correctly shows a fully charged voltage with a negative 200 milliamp current consumption from background trailer electronics that would drain the battery in about 10 days at 57°F. With power reconnected, the typical converter float charge voltage of 13.6V & 1 amp positive charge current is displayed.
This will typically drop back to a 13.2V trickle charge after 2-3 days..
-Brian in Chester, Virginia
TV: 2005 Toyota Sienna LE (3.3L V6)
RV: 2018 T@B 320S, >100 mods1 -
@BrianZ, Beautiful work and a clear vision! I have been following and using yours and others ideas - so helpful!Kay and Tom - SW Wisconsin - Silver T@bernacle - 2018 T@B 320S Boondock Silver/Black trim TV, 2018 Chevy Colorado, Silver/Black trim, Duramax, TowHaul, IntelliHaul1
-
Thank you, @tybladesmith!
I enjoy sharing my projects, and it's especially nice to hear when someone finds it useful.-Brian in Chester, Virginia
TV: 2005 Toyota Sienna LE (3.3L V6)
RV: 2018 T@B 320S, >100 mods0 -
I went with bus bars last year. I might move them to a box, too. Looks great!
2021 T@b 320 Boondock "Mattie Ross" | 2021 T@b Nights: 239 | Total nights in a T@b 455 | 2022 Jeep Grand Cherokee L Overland | T@b owner since 2014
1 -
Thanks, @jkjenn, I may have never gotten this far along without first following your lead to get the Victron monitor & SCC. I've been very happy with both. I sometimes wonder how we got along without the battery monitor, and when using solar it's a thing of beauty to see how it works together with the SCC to keep the battery charged & let you know its status & usage history. And now that our T@B is covered for the winter, I can check the battery status remotely from the app without even going outside. So thank you!
-Brian in Chester, Virginia
TV: 2005 Toyota Sienna LE (3.3L V6)
RV: 2018 T@B 320S, >100 mods1 -
Yes, I believe there is, but please correct me if I'm wrong!..BrianZ said:"With regard to the issue @MuttonChops raised about having to unscrew the box top to access fuses, I realized that both the charger & solar lines have pigtail ends hanging inside the tub, so I could easily check the integrity of both fuses simultaneously without opening the box, by connecting a multimeter to their positive ends & performing a continuity test. If it failed, then at least one of the fuses may be bad.
Not sure if there is an equivalent shortcut for the trailer fuse,"
Battery switch must be on, then..
To check the trailer fuse inside the bus bar box without opening it, perform another continuity test by connecting one probe to one of the same positive pigtails (charger or solar) connected to the positive bus bar. Then, connect the other test probe to the 12V positive connector inside the trailer's 7-way plug (top left terminal socket in the plug)..
If it beeps positive, then both fuses on those lines inside the bus bar box are good.
So, no need to open the box to check any of the fuses, and a continuity test is better than a visual inspection anyway!
-Brian in Chester, Virginia
TV: 2005 Toyota Sienna LE (3.3L V6)
RV: 2018 T@B 320S, >100 mods1 -
Forgot to share these "Application Steps Which Improve Bus Bar Performance", tips that I tried to apply in my own bus bar wiring plan, which I found at Blue Sea Systems, manufacturer of my mini bus bars..
- "Optimize Current Flow: the performance of a busbar can be increased by attaching the primary feed wire to the center of the busbar. The performance can be further increased by first attaching the primary feed wire followed by the highest load wire to the same terminal. This will allow the current to be carried by the large cables and avoid sending all of the current through the busbar. Although this will improve the performance of the busbar, it does not change the actual ampacity rating of the busbar and should not be used when comparing one busbar to another.
- Increase Voltage Capacity: Most busbars have both an amperage and voltage rating. Higher voltage can be achieved by:
- Increasing the creepage distance, which is the distance from a busbar mounting fastener to a grounded surface like a firewall. Creepage distance directly impacts the voltage rating of the busbar. Insulating the base and using insulating fasteners rather than conductive fasteners will significantly increase the safe operating voltage of a bus bar. The insulating system including the creepage distance has to prevent failure in the event of transients and surges in voltage.
- Managing the buildup of corrosion will significantly improve the safety and service life of a busbar. No exposed busbar can be expected to operate safely with a live connection in a wet location. An exception would be busbars used for lightening protection and grounding systems."
I've always wondered about the safety of bus bars I've seen mounted in exposed areas, so the second highlighted point seems to validate my concern & reasons for installing inside a water-resistant box. Probably should still use some of the waterproofing goop I used on my shunt board on all these terminal connectors that may still be exposed to humidity & condensation.
-Brian in Chester, Virginia
TV: 2005 Toyota Sienna LE (3.3L V6)
RV: 2018 T@B 320S, >100 mods3 -
I'm unclear about the purpose of the shunt here. Can you please explain?Thanks in advance...JonW - 2018 T@B 320UMarlborough, Mass0
-
@JonW ,
The shunt is part of my installed battery monitor (Victron BMV712). It's not required for using bus bars, so without a shunt/battery monitor, the main negative cable from the neg bus bar would simply be connected to the negative battery terminal instead of the shunt. The shunt allows the battery monitor to record all current flows to & from the battery for purposes of more accurately determining the battery's state of charge than by using just a voltage measurement.
Before installing the bus bars, I had to connect the negative leads to the shunt, which was difficult, due to the large size of the shunt terminals & space limitations.
-Brian in Chester, Virginia
TV: 2005 Toyota Sienna LE (3.3L V6)
RV: 2018 T@B 320S, >100 mods0 -
Brian - makes perfect sense. Thanks for the explanation.Jon WJonW - 2018 T@B 320UMarlborough, Mass0
-
This is a my wrap-up on the battery junction box holding the bus bars and 3 fuses for charging pigtails..

I wanted to illustrate this simple testing procedure which allows quick & easy checking of all three fuses without opening the box..
By using a multimeter to test for continuity between any two different pairs of the 3 positive pigtails, I can quickly tell if all three fuses are good. If one or both tests fail, then testing a third pair will confirm which single fuse is bad, as shown in the chart.
It is easy to stick one probe inside the top left power contact of the trailer 7-way plug, then touch the the other probe to the + contact of a charger and/or solar pigtail plug. That's it! - If both tests show continuity, all fuses are good. Of course, the battery switch must be on for a valid test of the trailer fuse using the 7-way pigtail.
So, if you have a multimeter, you don't need to open a junction box (or battery box) to check these fuses, if you have a charger or solar pigtail installed.
Some meters don't have a dedicated continuity test mode that beeps, but you can also use the lowest range of the resistance mode to test for continuity.
-Brian in Chester, Virginia
TV: 2005 Toyota Sienna LE (3.3L V6)
RV: 2018 T@B 320S, >100 mods2 -
Simple battery connections always make it easier to disconnect or remove and replace the battery(s) without messing up the connections, which can have very unfavorable results.T@B 320 manuals and electrical drawings
Considering a 2024 TaB 400 with all the option packages (full lithium),
2023 Jeep Gladiator Sport S, Max Tow Package.1 -
I have just now gotten around to installing the nice snap-on plastic terminal covers that came with these BlueSea mini-bus bars.

I had to readjust a couple of wires to fit the tight space, something I ran out of time for & had to postpone after initial installation.
The covers help prevent accidental shorting of positive & negative contacts, especially needed here where they are in such close proximity. If you're not sure what the danger is with shorts, please read @MuttonChops interesting write up about his wiring mishap & excellent recovery:
https://tab-rv.vanillacommunity.com/discussion/7467/bad-day-mod-update-broke-dc-system
I'm not sure I could think fast enough in that kind of situation, so "an ounce of prevention.." as they say.
-Brian in Chester, Virginia
TV: 2005 Toyota Sienna LE (3.3L V6)
RV: 2018 T@B 320S, >100 mods2 -
@BrianZ I just got around to reading this. Beautiful job! Thank you for the detailed post. I will likely copy your work with my new lithium battery. However, I do have a question. I may move my battery (and perhaps a second one that I will wire in parallel) inside the tab and I would pull positive and negative leads though conduit beneath the trailer to the tub and a secure to a junction box inside the tub. In this case I am planning to leave the shunt attached at the battery inside, so the negative wire will first pass through the shunt. I will use 4 or 6 AWG to the shunt. What size wire should be used to go from the shunt to the bus inside the tub? Also, if there is a simpler solution for wiring the batteries inside, it would be much appreciated. Again, thank you.2017 T@B 320 Q Max
2018 Toyota Highlander, XLE
Wisconsin0 -
@BrianZ Another question. Looking at your parts list you write: “I got two of these mini bus bars, a pair of 2-ft 6-gauge cables, and this junction box to house all the extra battery connections.
● Blue Sea Systems 2315 MiniBus 100... https://www.amazon.com/dp/B000OTJ8A0
● ONLINE LED STORE 7-Port Trailer... https://www.amazon.com/dp/B07G8S9ZCB
● 6 AWG 6 Gauge Single Black 2 feet... https://www.amazon.com/dp/B0721GBGGL
● 6 AWG 6 Gauge Single Red 2 feet... https://www.amazon.com/dp/B072MWHC1T”
Looking at “Online LED Store…” I see that the junction box contains a 7 port bus bar for the trailer wiring. Did you remove the 7 port bus or did you actually order something else? Please advise. Again, thanks in advance.
2017 T@B 320 Q Max
2018 Toyota Highlander, XLE
Wisconsin0 -
Good catch, @MadCityJack, and yes, I removed the strip of 7 terminals, which I seem to recall were bolted inside the box, so easy to remove. It's been a while, but I also recall using a dremel tool to cut away some remaining excess plastic mounting for the terminals in the bottom, to get more room for mounting the bus bar.
As far as the wire gauge, it may depend on what all you plan to connect. I probably erred on the side of safety by using 6G cable, since I had solar, charger port, etc, but the distance was short, so I could have used smaller gauge. Since you're going a longer distance, I'd suggest being conservative too, but 6G may be ok. Perhaps we'll get a second opinion here.
My junction box got very crowded, so if you have more space in the tub without the battery, where you have more room, you may want to consider a larger junction box. It gets crowded fast when you start adding more fuses.-Brian in Chester, Virginia
TV: 2005 Toyota Sienna LE (3.3L V6)
RV: 2018 T@B 320S, >100 mods1


Categories
- All Categories
- 10 Cirrus Truck Campers
- 122 Dutchman and Vintage TaB Archives
- 3 Forum Rules
- 3 nüCamp & Forum Contacts
- 956 Air Conditioning & Refrigeration
- 2.6K Battery/Electrical & Solar
- 1.2K Camping & Travel
- 142 Events & News
- 219 Factory Comments
- 21 "FOR SALE" - New/Used Trailers
- 14 “FOR SALE" - Camping & Trailer Gear
- 2.4K Heating/Plumbing & Winterizing
- 140 Help - Computer & System
- 920 Introductions
- 408 Looking to purchase a trailer?
- 2.1K Modifications & Upgrades
- 1.4K Products and Accessories
- 409 Service/Maintenance & Recall Notices
- 37 Solo Travelers Hints & Tips
- 1 T@G Forum
- 75 Teardrop Groups & Links
- 78 Testimonials
- 918 Tips & Tricks
- 1.5K Trailer & Towing
- 27 Owners Manuals/PDF Files/Videos & Resources
- 55 üCamp Rally - News & Information