Big Data for a Tiny Trailer: Battery Monitor Installation: Victron BMV-700

Many of us with older T@bs have relied on inexpensive cigarette style battery monitors or tapped into existing DC power to install battery monitors. I realized that I needed something more prescriptive than what the inexpensive battery monitors provided. The monitor I had never really gave me an exact state of charge of voltage because it automatically accounted for either the charge coming into the battery or the draw being pulled from the battery. For example, tonight, it showed around a 12.68v because I had a few lights on inside of the T@b. I knew I was actually getting 13.6v. I would have to unplug from shore power or solar, during the day, and turn off all DC power draws to get a closer to true readying, and even then, I knew that depending on how I inserted the monitor into the outlet, I tend to get different readings. A lot of people are perfectly fine with this. If you only want that level of understanding, than the cigarette monitor is a great choice for you. I desired something more precise
Choosing the Battery Monitor
I did a little research and found that there were a few good monitors and they were all expensive and required some wiring. Bogart Engineering, Xantrex, and Victron were consistently the most frequently recommended by other RVers and those who do other types of power monitoring. In addition to giving you a more accurate read, these monitors provide you with some additional data to allow you to some analysis of your use.
My research led to the Victron BMV-700. I believe the others were of similar quality, but this seemed to provide the simplest wiring installation, which was very appealing to me. These monitors use a shunt, connected to the negative terminal of the battery. Most of them use an RJ45 cable to connect and send data to the inside display. It is important that there be no other connection prior to the shunt or else the monitor will not capture the data. For example, prior to installing the shunt, I wired my solar ports directly to the battery. Not they come after the shunt. I will now be able to measure how much solar I gained during the day.
Features
The Victron BMV-700 lets you either choose a very simple set-up or choose from some advanced settings. A few monitoring options include:
- Battery voltage (state of charge in volts)
- Current (current being drawn from battery)
- Power: (watts being drawn from battery)
- Consumed Amp-Hours (How many Ah used)
- State-of-charge: (current % of battery charge remaining)
- Time-to-go (based on current draw, time before battery needs to be recharged)
- Alarm (you can set an alarm to go off when the charge drops to your desired setting.)
- Has a data port that allows you to attach either a USB cable or Bluetooth dongle to help you analyze your data.
There are a number of options that let you really dial in your preferences.
Wiring the Shunt
I unplugged from shore power, turned the battery switch to off, and unplugged the solar cables. I made sure to cover all ends of the cables with electric tape while working with them to avoid any unwanted, shocking, experiences. Here is how I am currently wired:
- The positive of the first battery goes to the second battery. This allows the two 6v batteries to be connected in series and give me 12v. Nothing else connected to battery 1.
- On battery 2, from the positive, I go to the battery switch. I had previously wired the switch to the negative, but with the shunt wired to the negative, I believed it to be better to wire to the positive. The Blue Seas switch I am using is designed to be connected to the positive and I am using a high quality battery cable to connect to the switch, being careful to make sure no metal can be touched between them. Also from the positive side is a wire to go to the shunt.
- On the load side of the switch, I have the positive wire to the trailer and the 2 Zamp positive wires. (I installed a second Zamp port.)
- On the negative side of battery 2, I have the cable going to the shunt and nothing else but the cable coming from battery 1.
- On the shunt, I connected the negative cable from the battery to the battery side of the shunt, and to the load side of the shunt, I wired the negative trailer wire and the 2 negative Zamp cables.
The installation was not complicated. I used a wire fish tool and was glad that I did. Here were the steps I followed for fishing the wire:
- I fished through the wall, then taped the end of the RJ45, making sure to wrap and protect the connector so that it did not catch on other wiring, and then pulled the wire back through the section that I had just fished. I started with the bottom cabinet below the sink in my S model, fished it through the opening to the left that led up the wall to the area behind the toilet, where the little hatch is located.
- From there, I located the are on the bottom left, where other wires ran, and into the area in the driver side bench.
- Next, I drilled hole from the cabinet below the sink to the small storage space below the fridge.
- Then, I removed the vent in that storage area and cut a tiny hole in the screen, just enough for the RJ45 to fit through. That screen needs to be sealed if you cut it. You can sew that closed or use some type of sealant. I am planning to do both.
- I then fished the cable through, where it exits via a vent. I fished the cable through a semi-rigid wire loom and secure it below the T@b by utilizing existing wiring. It created a very tight hold on the looming. My battery box has a space for the looming to enter the battery box. Once it is there, the cable just connects to the shunt.
To complete the installation, I:
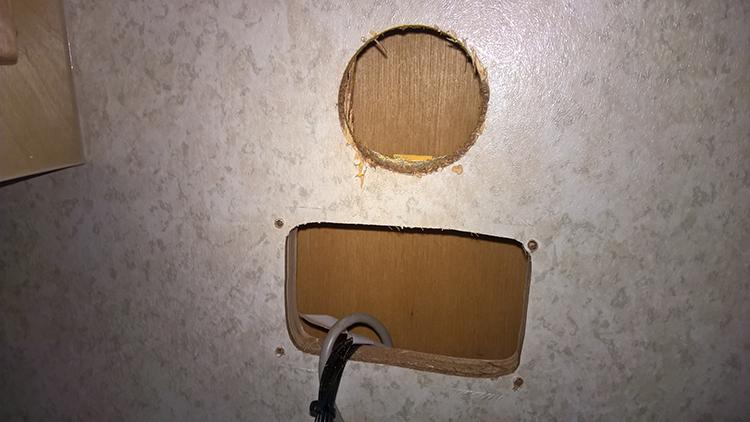
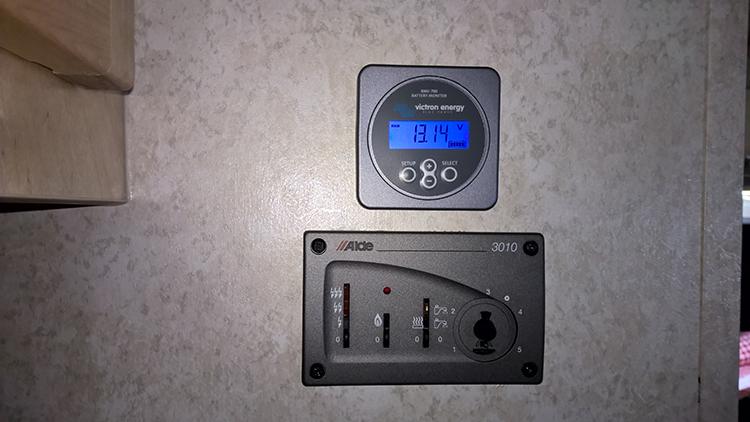
- Removed the Alde control panel plate and fished the RJ45 cable through that hole.
- Used a hole saw and hole saw attachment with my drill to create a hole for the display above the Alde panel hole.
- Brought the RJ45 cable up through the new hole and connected it to the display.
- I then snapped the display into the provided mounting plate and out the display into hole.
Thanks to everyone who offered advice, it all came in handy. I am very pleased with the monitor and believe this will really help me have a better understanding of my battery and how my power usage is really impacting the state of charge.
2021 T@b 320 Boondock "Mattie Ross" | 2021 T@b Nights: 239 | Total nights in a T@b 455 | 2022 Jeep Grand Cherokee L Overland | T@b owner since 2014
Comments
-
Jenn - what does this cost and how much time did it take you to install? Also, why did you disregard a multi-function monitor (i.e. water, black, grey and battery)?2016 Outback 320
2024 Ford F150 Supercrew short bed.1 -
Outback, the multifunction monitors do not provide as accurate of a read on your battery as the Victron, nor the detail. With shipping, the monitor came to $184.65. It is hard to determine time since I did a little bit on several different days. I preferred to work in the daylight. All in all, if I would have done it straight through, it could have probably been done in around 2 hours, I would guess.
I don't feel I necessarily need tank monitors at the moment because my freshwater tank is under the sink and is only a 5 gallon tank. That means I can fill it 2x before I need to empty the grey tank(11 gal). I also found that I could go 5 days and the black tank was not full. Tank monitors are a nice to have but not as much of as a need to have for me. If I ever upgrade to larger tanks, I would consider the tank monitors.2021 T@b 320 Boondock "Mattie Ross" | 2021 T@b Nights: 239 | Total nights in a T@b 455 | 2022 Jeep Grand Cherokee L Overland | T@b owner since 2014
0 -
Wonderful install, Jenn!! Very detailed instructions and professional install end result.
My monitor (using the same type of shunt) is Trimetric. It is made for, and paired with, my solar panel controller (but can be used alone without any solar install). Because the display is red LED, I put it in the cabinet under the sink. Red LED is bright at night (for me). Your product has many more features than mine. I really like it. Your research certainly paid off!
Thanks again for your great detailed install instructions and picts! I know this will help many folks.2017 820R Retro Toy Hauler from 2015 Tabitha T@B from 2009 Reverse LG Teardrop (but a T@Bluver at heart)0 -
Thanks, Ratkity. I liked that the backlight turns off after a few seconds and that I can adjust the brightness of the back light.
2021 T@b 320 Boondock "Mattie Ross" | 2021 T@b Nights: 239 | Total nights in a T@b 455 | 2022 Jeep Grand Cherokee L Overland | T@b owner since 2014
0 -
Nice install, Jenn. Does the circuitry in the monitor allow it to display the exact state of charge by somehow accomodating any battery inputs or loads, or is this just something you can infer given the additional information being provided?
We camp quite a bit without shore power, and have run on battery for several days by being very conservative. I think I've probably strained my battery's health doing that, so a bit better battery management may be in order next season. Still much to learn!2015 T@B Max S (320)
2015 Nissan Frontier SV V6 4x40 -
Yeah, you can see what the current load and charge inputs are. You can get historical data on charges, too.ScottG said:Nice install, Jenn. Does the circuitry in the monitor allow it to display the exact state of charge by somehow accomodating any battery inputs or loads, or is this just something you can infer given the additional information being provided?
We camp quite a bit without shore power, and have run on battery for several days by being very conservative. I think I've probably strained my battery's health doing that, so a bit better battery management may be in order next season. Still much to learn!
2021 T@b 320 Boondock "Mattie Ross" | 2021 T@b Nights: 239 | Total nights in a T@b 455 | 2022 Jeep Grand Cherokee L Overland | T@b owner since 2014
0 -
I can't tell you how much I love having this monitor. Yesterday, I ran to the T@b to grab something and I accidently left the overhead light turned on. I went out about 3.5 hrs later to watch TV (testing battery capacity) and realized my error. Prior to knowing exactly what my state of charge was, I probably would not have watched TV to compensate for my error. With the monitor, I was able to see that my error had a very small impact on my battery. After an hour of tv, with the stereo on, I still had over 99% battery capacity left, which I am sure will be quickly replenished with the 50 watt I have charging the T@b, now. I will check it at lunch.
2021 T@b 320 Boondock "Mattie Ross" | 2021 T@b Nights: 239 | Total nights in a T@b 455 | 2022 Jeep Grand Cherokee L Overland | T@b owner since 2014
1 -
Jenn - my BVM 700 just arrived. Looks like a very well-made device. Regarding the negative wire shunt, one side goes directly to the battery and the other to ground. However, I cannot see where the wire from the battery actually attaches to the frame (to ground). That wire goes into a black box on the frame. Do I need to open that black box, or can I simply splice into the wire going from the negative terminal to the black box? I also bought the Bluetooth accessory. I assume I can screw that behind the wall next to the round monitor without affecting the Bluetooth signal?2016 Outback 320
2024 Ford F150 Supercrew short bed.0 -
@OutbackAZHere is a diagram, that I think will answer your questions. It's not the same model, but it's the same idea.

There is a tiny serial port on the backside of the monitor display that you will plug the Bluetooth dongle into and the dongle can simply hang from the monitor. You might want to tie up the slack and if possible tie the slack to something, but I am not sure that is imperative.
RE: negative wire - just take the negative from the battery and run to the shunt as shown. You will need an additional battery cable for that. Then run the existing negative lead from the system side of the shunt.
2021 T@b 320 Boondock "Mattie Ross" | 2021 T@b Nights: 239 | Total nights in a T@b 455 | 2022 Jeep Grand Cherokee L Overland | T@b owner since 2014
0 -
Thanks Jenn, that answers my questions!2016 Outback 320
2024 Ford F150 Supercrew short bed.0 -
Oops! Just one more. Where do I put the Zamp negative wire - on the battery side or the trailer side of the shunt? Or does it even matter?2016 Outback 320
2024 Ford F150 Supercrew short bed.0 -
It actually does matter because the monitor won't see it if it is on the battery side. You want it on the trailer side. Here is another photo I found:OutbackAZ said:Oops! Just one more. Where do I put the Zamp negative wire - on the battery side or the trailer side of the shunt? Or does it even matter?
2021 T@b 320 Boondock "Mattie Ross" | 2021 T@b Nights: 239 | Total nights in a T@b 455 | 2022 Jeep Grand Cherokee L Overland | T@b owner since 2014
1 -
Jenn - thanks for the additional photo. Does this mean I also put the negative wire from the 2,000 W inverter on the load side?2016 Outback 320
2024 Ford F150 Supercrew short bed.0 -
Definitely. Are you fusing the inverter?OutbackAZ said:Jenn - thanks for the additional photo. Does this mean I also put the negative wire from the 2,000 W inverter on the load side?
2021 T@b 320 Boondock "Mattie Ross" | 2021 T@b Nights: 239 | Total nights in a T@b 455 | 2022 Jeep Grand Cherokee L Overland | T@b owner since 2014
0 -
Jenn - no fuse between the inverter and battery at this time. I do have a #4 gauge quick disconnect between the inverter and battery.
2016 Outback 320
2024 Ford F150 Supercrew short bed.0 -
Thanks for everyone's help! I just finished the inverter install. Looks a little messy, but seems to work fine.
 2016 Outback 320
2024 Ford F150 Supercrew short bed.2 -
Always good to see a nice professional job - well done.0
-
Thanks PXLated. An unexpected bonus is that I now receive free HBO on my Alde touchscreen.2016 Outback 320
2024 Ford F150 Supercrew short bed.1 -
You should for all that wiring :-)0
-
Hummmmm......I always left my wiring so that I could sign my work.... You're not putting your signature on your work are you?Verna, Columbus, IN
2021 T@B 320S Boondock “The T@B”
Towed by a white 2019 Ford F-150 4x4 Supercab, 3.5L V6 Ecoboost “The Truck”0 -
I got the basics done of my new solar set up tonight. I will need to tidy everything up the next time I can catch some daylight. It was dark before I could check the productivity.
2021 T@b 320 Boondock "Mattie Ross" | 2021 T@b Nights: 239 | Total nights in a T@b 455 | 2022 Jeep Grand Cherokee L Overland | T@b owner since 2014
0 -
Quick question. On all the wiring diagrams I'm seeing around, the positive wire to the shunt is hooked up directly to the positive side of the bank. Is it possible to hook it to the other side of the power shutoff switch so that the dongle does not creat a slight drain on the bank while the vehicle is in storage?0
-
Yes, but the drain is extremely small.Coolparrot said:Quick question. On all the wiring diagrams I'm seeing around, the positive wire to the shunt is hooked up directly to the positive side of the bank. Is it possible to hook it to the other side of the power shutoff switch so that the dongle does not creat a slight drain on the bank while the vehicle is in storage?2021 T@b 320 Boondock "Mattie Ross" | 2021 T@b Nights: 239 | Total nights in a T@b 455 | 2022 Jeep Grand Cherokee L Overland | T@b owner since 2014
0 -
I just looked that up in the data sheet for my BMV-712, which shows it only uses 1 millamp with the display backlight off, which is only 0.7 Amp-Hours per month!
For us, that's only 1/750 th of our typical average current draw when camping without hookups, or one tenth of one percent of what we use.
The measuring resolution is +/- 0.01A, so it would have to run for more than 10 to 20 hours to even register any detectable usage, which would still only amount to 1/100th of an Amp-Hour.-Brian in Chester, Virginia
TV: 2005 Toyota Sienna LE (3.3L V6)
RV: 2018 T@B 320S, >100 mods0 -
So effectively it could be hooked up the the battery directly to the positive side for months in storage and not drain it too low. Alternatively hooking it to the power cutoff switch (positive side}) would cut off all drain but I would need to go through setup proceedure every time I turn power back on? At least thats the way I understand it at this point. Thanks for all the info. I'm convinced to order it now.0
-
I have been too cheap/lazy to install the Victron so I've been using this instead. I was worried about the battery drain but last week I checked it and after a month sitting in storage my battery was still reading 12.7jkjenn said:
Yes, but the drain is extremely small.Coolparrot said:Quick question. On all the wiring diagrams I'm seeing around, the positive wire to the shunt is hooked up directly to the positive side of the bank. Is it possible to hook it to the other side of the power shutoff switch so that the dongle does not creat a slight drain on the bank while the vehicle is in storage?
San Francisco Bay Area | 2013 CS-S us@gi | 2015 Toyota Tacoma PreRunner Double Cab
0 -
@Coolparrot , I would expect that self discharge would be a much greater concern, at least for a flooded lead acid battery, which you wouldn't want to let sit for months anyway, without some recharging.
-Brian in Chester, Virginia
TV: 2005 Toyota Sienna LE (3.3L V6)
RV: 2018 T@B 320S, >100 mods0 -
Makes sense. Thanks BrianZ for the info.0
-
P.S.
If you want to use their optional temperature sensor (for reporting battery temperature to a solar charge controller for temperature compensation of charging voltage and for adjusting battery capacity for temperature), it must be connected to the positive battery terminal, and it includes the positive power lead for the monitor.-Brian in Chester, Virginia
TV: 2005 Toyota Sienna LE (3.3L V6)
RV: 2018 T@B 320S, >100 mods0 -
 I recently replaced our Group 24 battery with a Battle Born LiFePO4 100 Ah in our 2018 T@G Outback. In addition, we installed a Victron 700 monitor using @BrianZ posts as our guide. We purchased a junction box from nuCamp parts for the Victron shunt and installed it in the front tub. We also purchased the bluetooth dongle so that we can monitor the battery wirelessly from outside the rig. It works flawlessly and allows us to know the SOC and current draw of the battery at all times. I think it is well worth the investment. Sorry the picture is a little out of focus. I brought the RJ45 cable hrough a hole in the floor to the aft wall, gaining access via the converter. Fairly straight forward, as has been stated. 0


Categories
- All Categories
- 10 Cirrus Truck Campers
- 122 Dutchman and Vintage TaB Archives
- 3 Forum Rules
- 3 nüCamp & Forum Contacts
- 957 Air Conditioning & Refrigeration
- 2.6K Battery/Electrical & Solar
- 1.2K Camping & Travel
- 142 Events & News
- 219 Factory Comments
- 22 "FOR SALE" - New/Used Trailers
- 14 “FOR SALE" - Camping & Trailer Gear
- 2.4K Heating/Plumbing & Winterizing
- 141 Help - Computer & System
- 922 Introductions
- 408 Looking to purchase a trailer?
- 2.1K Modifications & Upgrades
- 1.4K Products and Accessories
- 411 Service/Maintenance & Recall Notices
- 37 Solo Travelers Hints & Tips
- 1 T@G Forum
- 75 Teardrop Groups & Links
- 78 Testimonials
- 918 Tips & Tricks
- 1.5K Trailer & Towing
- 27 Owners Manuals/PDF Files/Videos & Resources
- 55 üCamp Rally - News & Information