How I came to do the Alde glycol maintenance DIY

jimcenname
Member Posts: 346
I completed my first DIY replacement of Alde glycol in my 2019 T@B 400 with the reservoir in the front left. I purchased a setup of a small pump with hoses, copper pipes and plugs ($150) from a T@B owner on Facebook (Mark Johnson.) At the recommendation of Truma/Alde I purchased the Adle glycol on Amazon ($68/gal.) I purchased 5 gallons and install about 3.6. I'll keep a gallon to top off.
For this service I previously employed nuCamp (~$500), Truma/Alde ($600) and John Schilling (~$400) (San Diego region, nuCamp factory trained.) I learned what I liked and didn't like about each of their processes and I chose to DIY this time. I got what I wanted.
I live in my T@B and the heater and water heater get used every day. I replace my glycol every 12-18 months. I switched from Century to Rhomar/Alde glycol with my second glycol flush. Due to convector corrosion nuCamp replaced my Alde hoses and convectors in 2023.
2019 T@B400
TV: 2017 Nissan Frontier SV 4X4
Southern California
Full-timer since 2019
TV: 2017 Nissan Frontier SV 4X4
Southern California
Full-timer since 2019
2
Comments
-
Thanks for the post @jimcenname. It seems inevitable that corrosion is going to impact these connections at some point. Is Truma pretty convinced that regular changes with the Rhomar will prevent future corrosion? I am sure your corrosion service for the 2019 400 involved a fair amount of work to access the convectors, which had to be pricey. But when I think about maintenance on a regular house HVAC and water heater, it might be not so bad in comparison.
2019 T@B 400 Boondock Lite towed by 2016 5.7L Toyota Tundra
1 -
I had early signs of corrosion, even before the first service. I hoped that switching to the new glycol would stop the corrosion but it didn't. Ultimately I had to replace the convectors and hoses. That appears to have worked. As I understand it the corrosion inhibitors in the glycol diminish with time and the 2 year interval assures sufficient protection.2019 T@B400
TV: 2017 Nissan Frontier SV 4X4
Southern California
Full-timer since 20190 -
There have already been a couple of reports of the "Rhomar" trailers having corrosion in places where the clamping is not sufficient to prevent glycol intrusion under the hoses at the "stub ends".In the newer trailers, (I want to say after 2020) the design and setup of the Alde hoses and convectors is quite different compared to the Alde 3010 trailers, with extensive hose runs leading to poorly fitted and clamped convector stub ends, or at places like the "non-return valve" next to the Auto Air Bleed Valve.This thread has a discussion about this, and a picture of the owner's 2023 check valve that corroded and leaked. If there is glycol under a clamp between the hose and the aluminum, it will corrode over time, even if you change the glycol once a month.
2017 Outback
Towed by 2014 Touareg TDi0 -
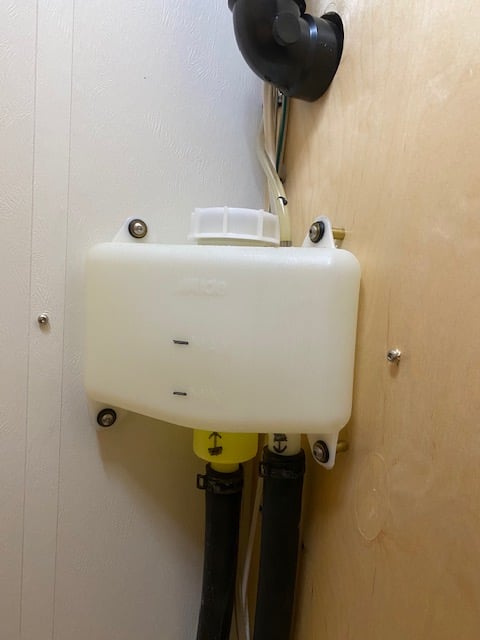
When nuCamp replaced my hoses and convectors they used hose plastic couplers in place of aluminum. Of course the convectors remain aluminum. The recent photo below is of the convectors in the kitchen cabinet. It's representative of others I have recently inspected. It looks good to me, after 2.5 years of use.
 2019 T@B400
TV: 2017 Nissan Frontier SV 4X4
Southern California
Full-timer since 20190 -
For additional protection, I followed the recommendation to put two spring clamps on the ends of the convectors. One as close to the end as possible to lessen the chance of glycol getting between the hose and aluminum end on the convector.

Stockton, New Jersey
2020 nuCamp T@B 320S * Jeep Wrangler
60,865 camping miles through the end of 20252 -
Hello "jimcenname"
I recently purchased a 2022 Tab 320 and am interested in changing the Alde fluid myself. Do you know if Mark Johnson is still selling the pump and associated hardware to complete the task? I found his Youtube video but he doesn't seem to be responding to recent comments. Any information would be greatly appreciated.0 -
@mwjoe
Since I do not have his phone or email address the best I can offer is for you to message (using Messenger, not comment) him on Facebook. Search for this profile:
2019 T@B400
TV: 2017 Nissan Frontier SV 4X4
Southern California
Full-timer since 20191 -
@mwjoe Many owners have assembled their own pumps and the basic tools to do the job.Find the DIY Glycol Change File at this link. No matter which pump you use, or what video you watch, the DIY File has the step by step procedure.
Towed by 2014 Touareg TDi0 -
@mwjoe
I like the pump Mark Johnson used because it is very low pressure and it has a cigarette lighter plug that is compatible with a socket in my 400.2019 T@B400
TV: 2017 Nissan Frontier SV 4X4
Southern California
Full-timer since 20190 -
I have a 2022 T@B 320 BD with the two Alde drains. Has anyone documented a DIY bottom fill procedure? I understand you need to put a needle nose clamp between the two drains under the seat (it's a rubber assembly) to make one drain an input and the other drain an output (i.e. break the loop). There is a hold down clamp between the two drains in my unit so I'm guessing that has to be removed to install the clamp.Once that's done it seems that it would help to install a hose between the in/out connections in the reservoir so that you can just run a pump and flush the system before refilling.If anyone has done this and can post some tips that would be great.2022 T@B 320S Boondock0
-
I'm not familiar with that method.2019 T@B400
TV: 2017 Nissan Frontier SV 4X4
Southern California
Full-timer since 20190 -
@stepheng, I know what you are talking about--and even considered retrofitting my 2015 with the double-drain for this purpose--but I'm not aware of any documentation, or of anyone reporting that they used this method. If you give a try, please report back!2015 T@B Max S (320)
2015 Nissan Frontier SV V6 4x40 -
Thinking I’ll just do the exchange in my 2022 320 thru the reservoir like I previously did in my 2018 320.
A few questions.
1) Since this time I’m just replacing the green glycol with the same is there any need to flush with distilled water first?
2) Are the stoppers for the reservoir behind the toilet the same as the ones used in the older (e.g. 2018) reservoir that was in the back of the trailer?
3) If not, what size stoppers have others used in the newer models.
4) In picture below which hole is the return? Big one?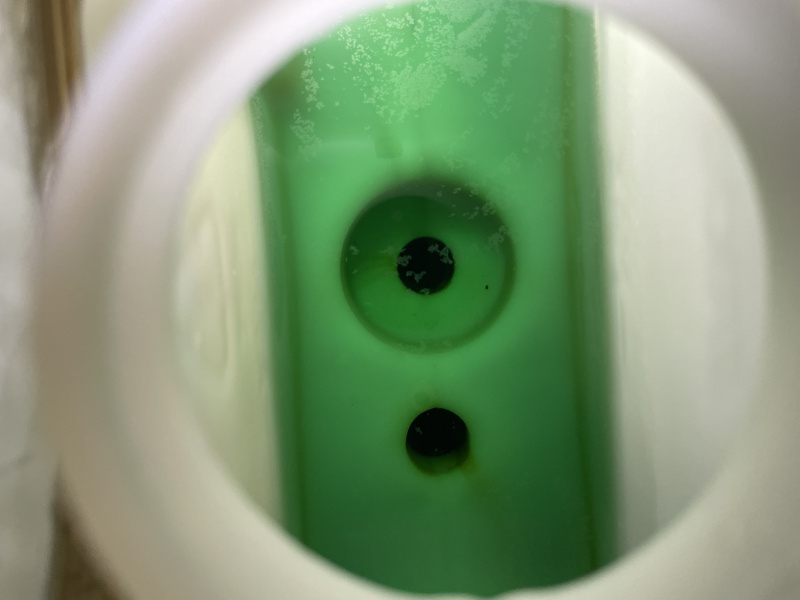
2022 T@B 320S Boondock0 -
The large one should be the return to the reservoir. I marked mine when I did my exchange:
2019 T@B 400 Boondock Lite towed by 2016 5.7L Toyota Tundra
0 -
I retrofitted my 2021 T@B 400 BD with the two Alde drain from the one. With needle nose pliers pinching between I was able to use a hand pump to push new fluid through the system. It worked well and even the fluid in the reservoir was replaced without installing a hose between the in/out connections. I really liked that I was able to have all the messy part of exchange outside of the Tab.stepheng said:I have a 2022 T@B 320 BD with the two Alde drains. Has anyone documented a DIY bottom fill procedure? I understand you need to put a needle nose clamp between the two drains under the seat (it's a rubber assembly) to make one drain an input and the other drain an output (i.e. break the loop). There is a hold down clamp between the two drains in my unit so I'm guessing that has to be removed to install the clamp.Once that's done it seems that it would help to install a hose between the in/out connections in the reservoir so that you can just run a pump and flush the system before refilling.If anyone has done this and can post some tips that would be great.2021 T@B 400 BD
2021 Ford F150 2.7 turbo0 -
If you're replacing with the same fluid, a distilled water flush is not required.stepheng said:Thinking I’ll just do the exchange in my 2022 320 thru the reservoir like I previously did in my 2018 320.
A few questions.
1) Since this time I’m just replacing the green glycol with the same is there any need to flush with distilled water first?Rich2019 T@b 400
2025 Toyota Highlander 2.4L TurboBellingham WA0 -
@westernstates Did you drain as much out as you could before replacing? Blow out with air? Does it matter which way you pump the new glycol through the loop once you pinch between the two drains?2022 T@B 320S Boondock0
-
stepheng said:@westernstates Did you drain as much out as you could before replacing? Blow out with air? Does it matter which way you pump the new glycol through the loop once you pinch between the two drains?
I did drain out as much as I could by pushing air only toward the Alde unit then pulling from the reservoir with my handheld pump.
I started by pinching close the middle part of the double drain with needle nose vice grips.
I used a bucket to catch all expelled fluid.
This is the pump I bought. https://www.amazon.com/dp/B00J8331U6?ref=ppx_yo2ov_dt_b_fed_asin_title&th=1
Next I hooked up the glycol fill line to the port which goes to the Alde pump and started hand pumping.
Keep an eye on the reservior, fill to 1/2 full and make sure it does not overfill.
Now remove the needle nose pliers and continue to pump in more glycol keeping an eye on the reservoir.
Now plug both drain ports, set the pump to continuous and run the glycol pump on high (5) for 20 minutes to allow mixing and air removal.
Lower and raising the T@B helps a bit as well as checking the radiator bleed valves.
Lower pump to 2, set on Therm and start heating, check reservoir level and bleed as necessary.Done!
2021 T@B 400 BD
2021 Ford F150 2.7 turbo1


 2017 Outback


Categories
- All Categories
- 10 Cirrus Truck Campers
- 122 Dutchman and Vintage TaB Archives
- 3 Forum Rules
- 3 nüCamp & Forum Contacts
- 958 Air Conditioning & Refrigeration
- 2.6K Battery/Electrical & Solar
- 1.2K Camping & Travel
- 143 Events & News
- 219 Factory Comments
- 20 "FOR SALE" - New/Used Trailers
- 12 “FOR SALE" - Camping & Trailer Gear
- 2.4K Heating/Plumbing & Winterizing
- 141 Help - Computer & System
- 922 Introductions
- 408 Looking to purchase a trailer?
- 2.1K Modifications & Upgrades
- 1.4K Products and Accessories
- 411 Service/Maintenance & Recall Notices
- 37 Solo Travelers Hints & Tips
- 1 T@G Forum
- 75 Teardrop Groups & Links
- 78 Testimonials
- 918 Tips & Tricks
- 1.5K Trailer & Towing
- 27 Owners Manuals/PDF Files/Videos & Resources
- 55 üCamp Rally - News & Information