Leak from fresh water tank area

I believe I have a leak from my fresh water tank, possibly one of the fittings. I have not tried to remove the plastic cover yet. I am thinking to cut away an area, rather than removing the whole thing. I can see where a couple of screws are missing and I tried to remove one and snapped off the head. I am hoping someone has dealt with this before than can give me some pointers. Thanks in advance
Comments
-
Tell us what year and model your trailer is. And, yes, the screws for the "coroplast" cover are problematic, but there are a number of posts that can help.
The water you are seeing, since it is above the coroplast, could be coming from anywhere under the trailer, and has simply flowed to the lowest point. You still should have a look under there, but the actual source of the water might be a bit harder to find. Owners have had this sort of thing happen due to condensation, driving in the rain and having water get under the coroplast, etc. So think about the possibilities of that sort of thing.
Here is just "one" of the several discussions about the coroplast cover screws.
2017 Outback
Towed by 2014 Touareg TDi0 -
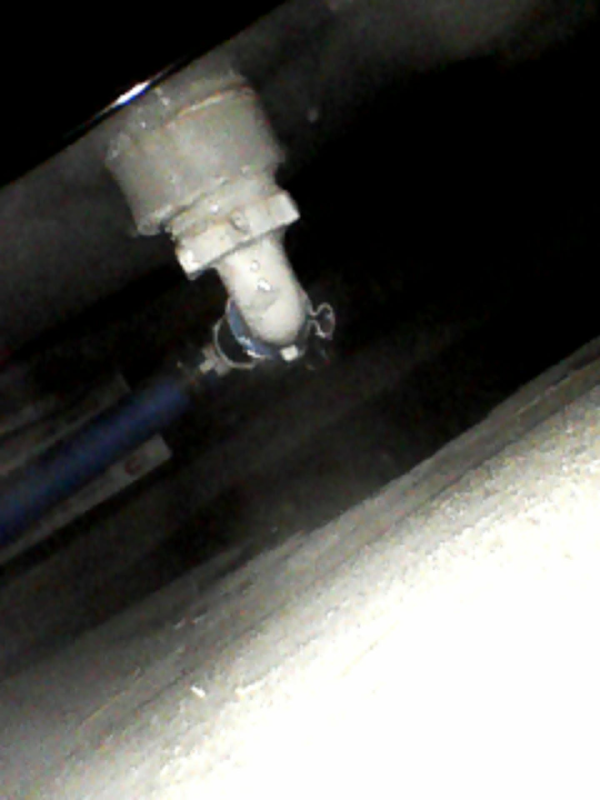
Thank you for your reply. I have used my endoscope through a crack in the coroplast cover. Water is dripping from this fitting. not sure exactly where until I get my hands on it. I am going to order some self tapping 3/4 #8 self tapping screws and be ready to put some reinforcement on the coroplast edge when I am all ready. I watched a couple videos on you tube and it looks like cutting an access hole is the way to go. I need to determine exactly where the cut will be before I proceed. Not in a big rush so, I will get my screws and some tape first. My Tab is a 2019 320S. I think I may have created the problem by overfilling the freshwater tank with my hose jammed into the fill hole. Would you or anyone you know exactly where the access cover should be? I am thinking about 4 to 6 inches in from the drain line and maybe 12 inches or so across, cutting 3 sides to make a flapper . I definitely am not going to try and remove the coroplast unless I really have to, after reading stuff on here.
 0
0 -
Nice scope! I have an Amazon cheap one, and I can make it work, but it makes me dizzy.
I'm curious about where exactly this is? On my 2017, I had issues (long story) and the repair involved dropping the coroplast from the front of the trailer near the tongue, and just letting it fall away from the tank fittings. This is one photo: The fitting I think you are looking at is on the "passenger side" of the trailer, just behind the front step? That is where my fresh water tank is (the white box) and the fitting in the center coming down from the tank (slightly obscured by the aluminum bar that holds the coroplast) seems to match up to your photo.
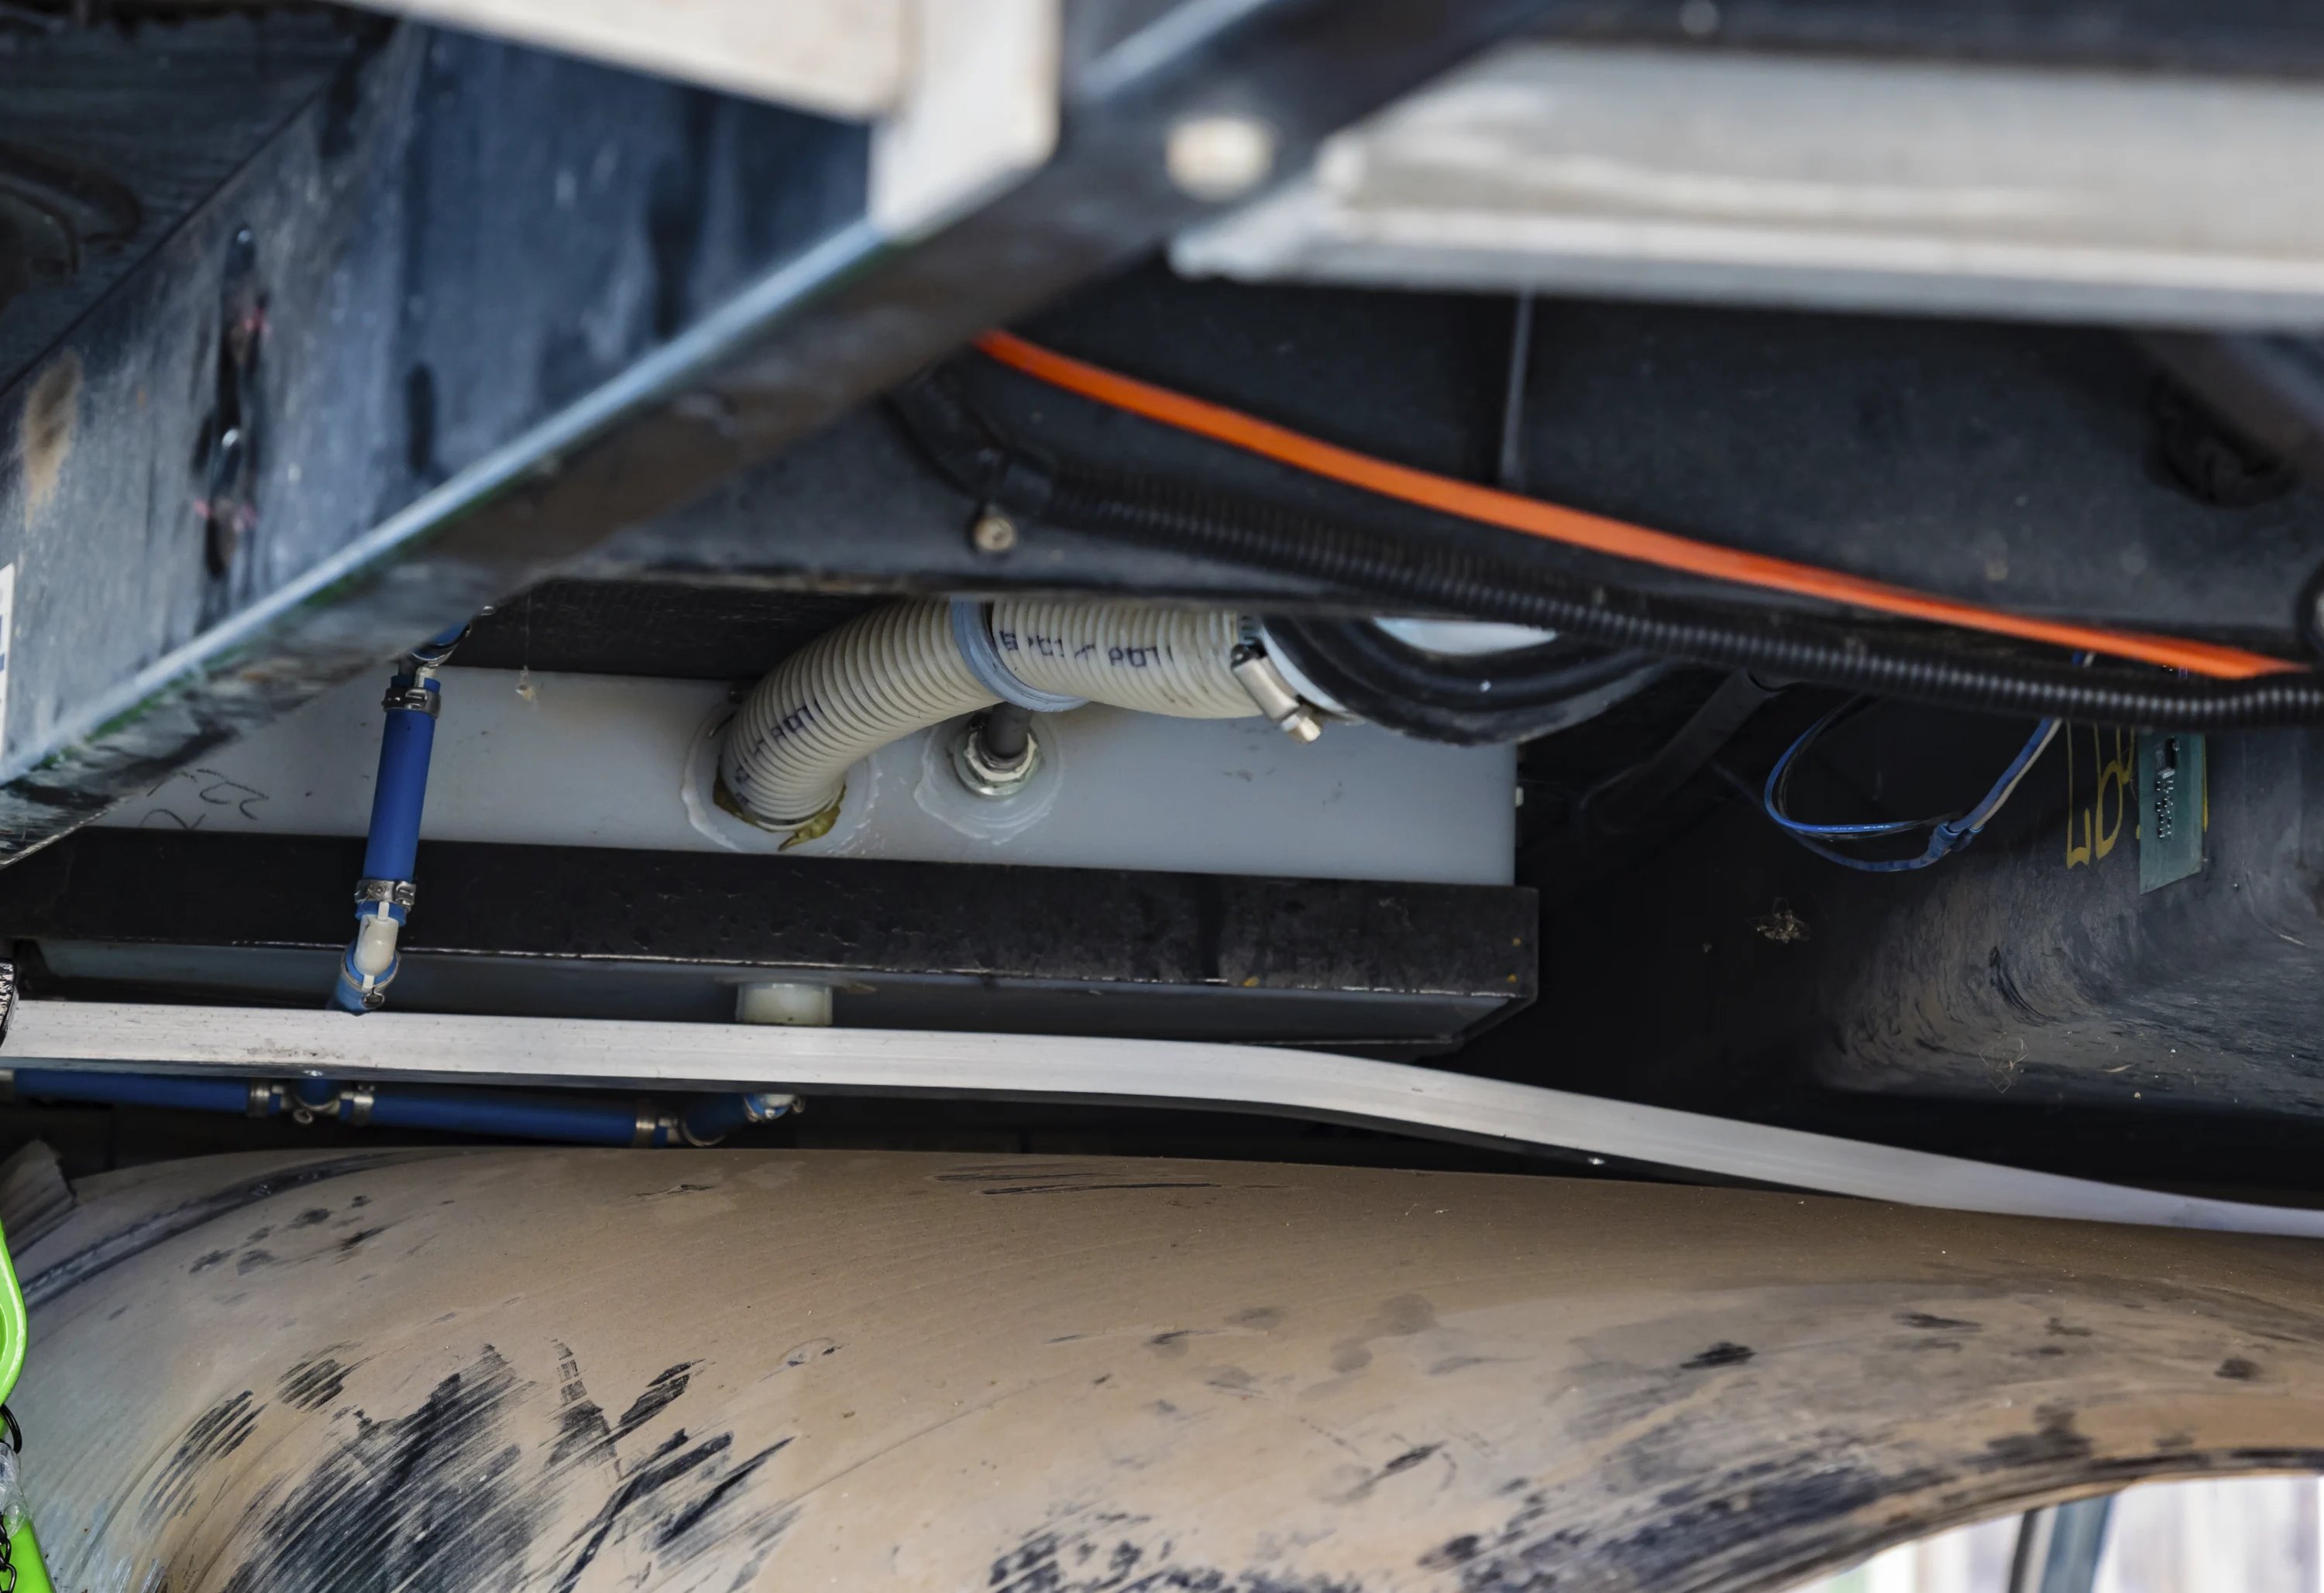
Below is a wider view of the situation. The coroplast has been dropped from both sides of the trailer, and from that aluminum bar. That is the gray tank on the right. The square plastic black box toward the front of the trailer is the wiring junction box. The fitting with the propane hoses is the "propane manifold". The fresh water tank on the left of the photo. The fresh tank drain is on the lower left next to the tire. The blue pex is the fresh water lines coming out of the tank, and running towards the pump behind the toilet in my 2017. The big flexible "hose" is the fresh water inlet from the side of the trailer. The smaller tube next to the big "hose" is the clear vent line for the tank. To complete the tour, the black rectangle farther back with the white label on it is the trailer axle.
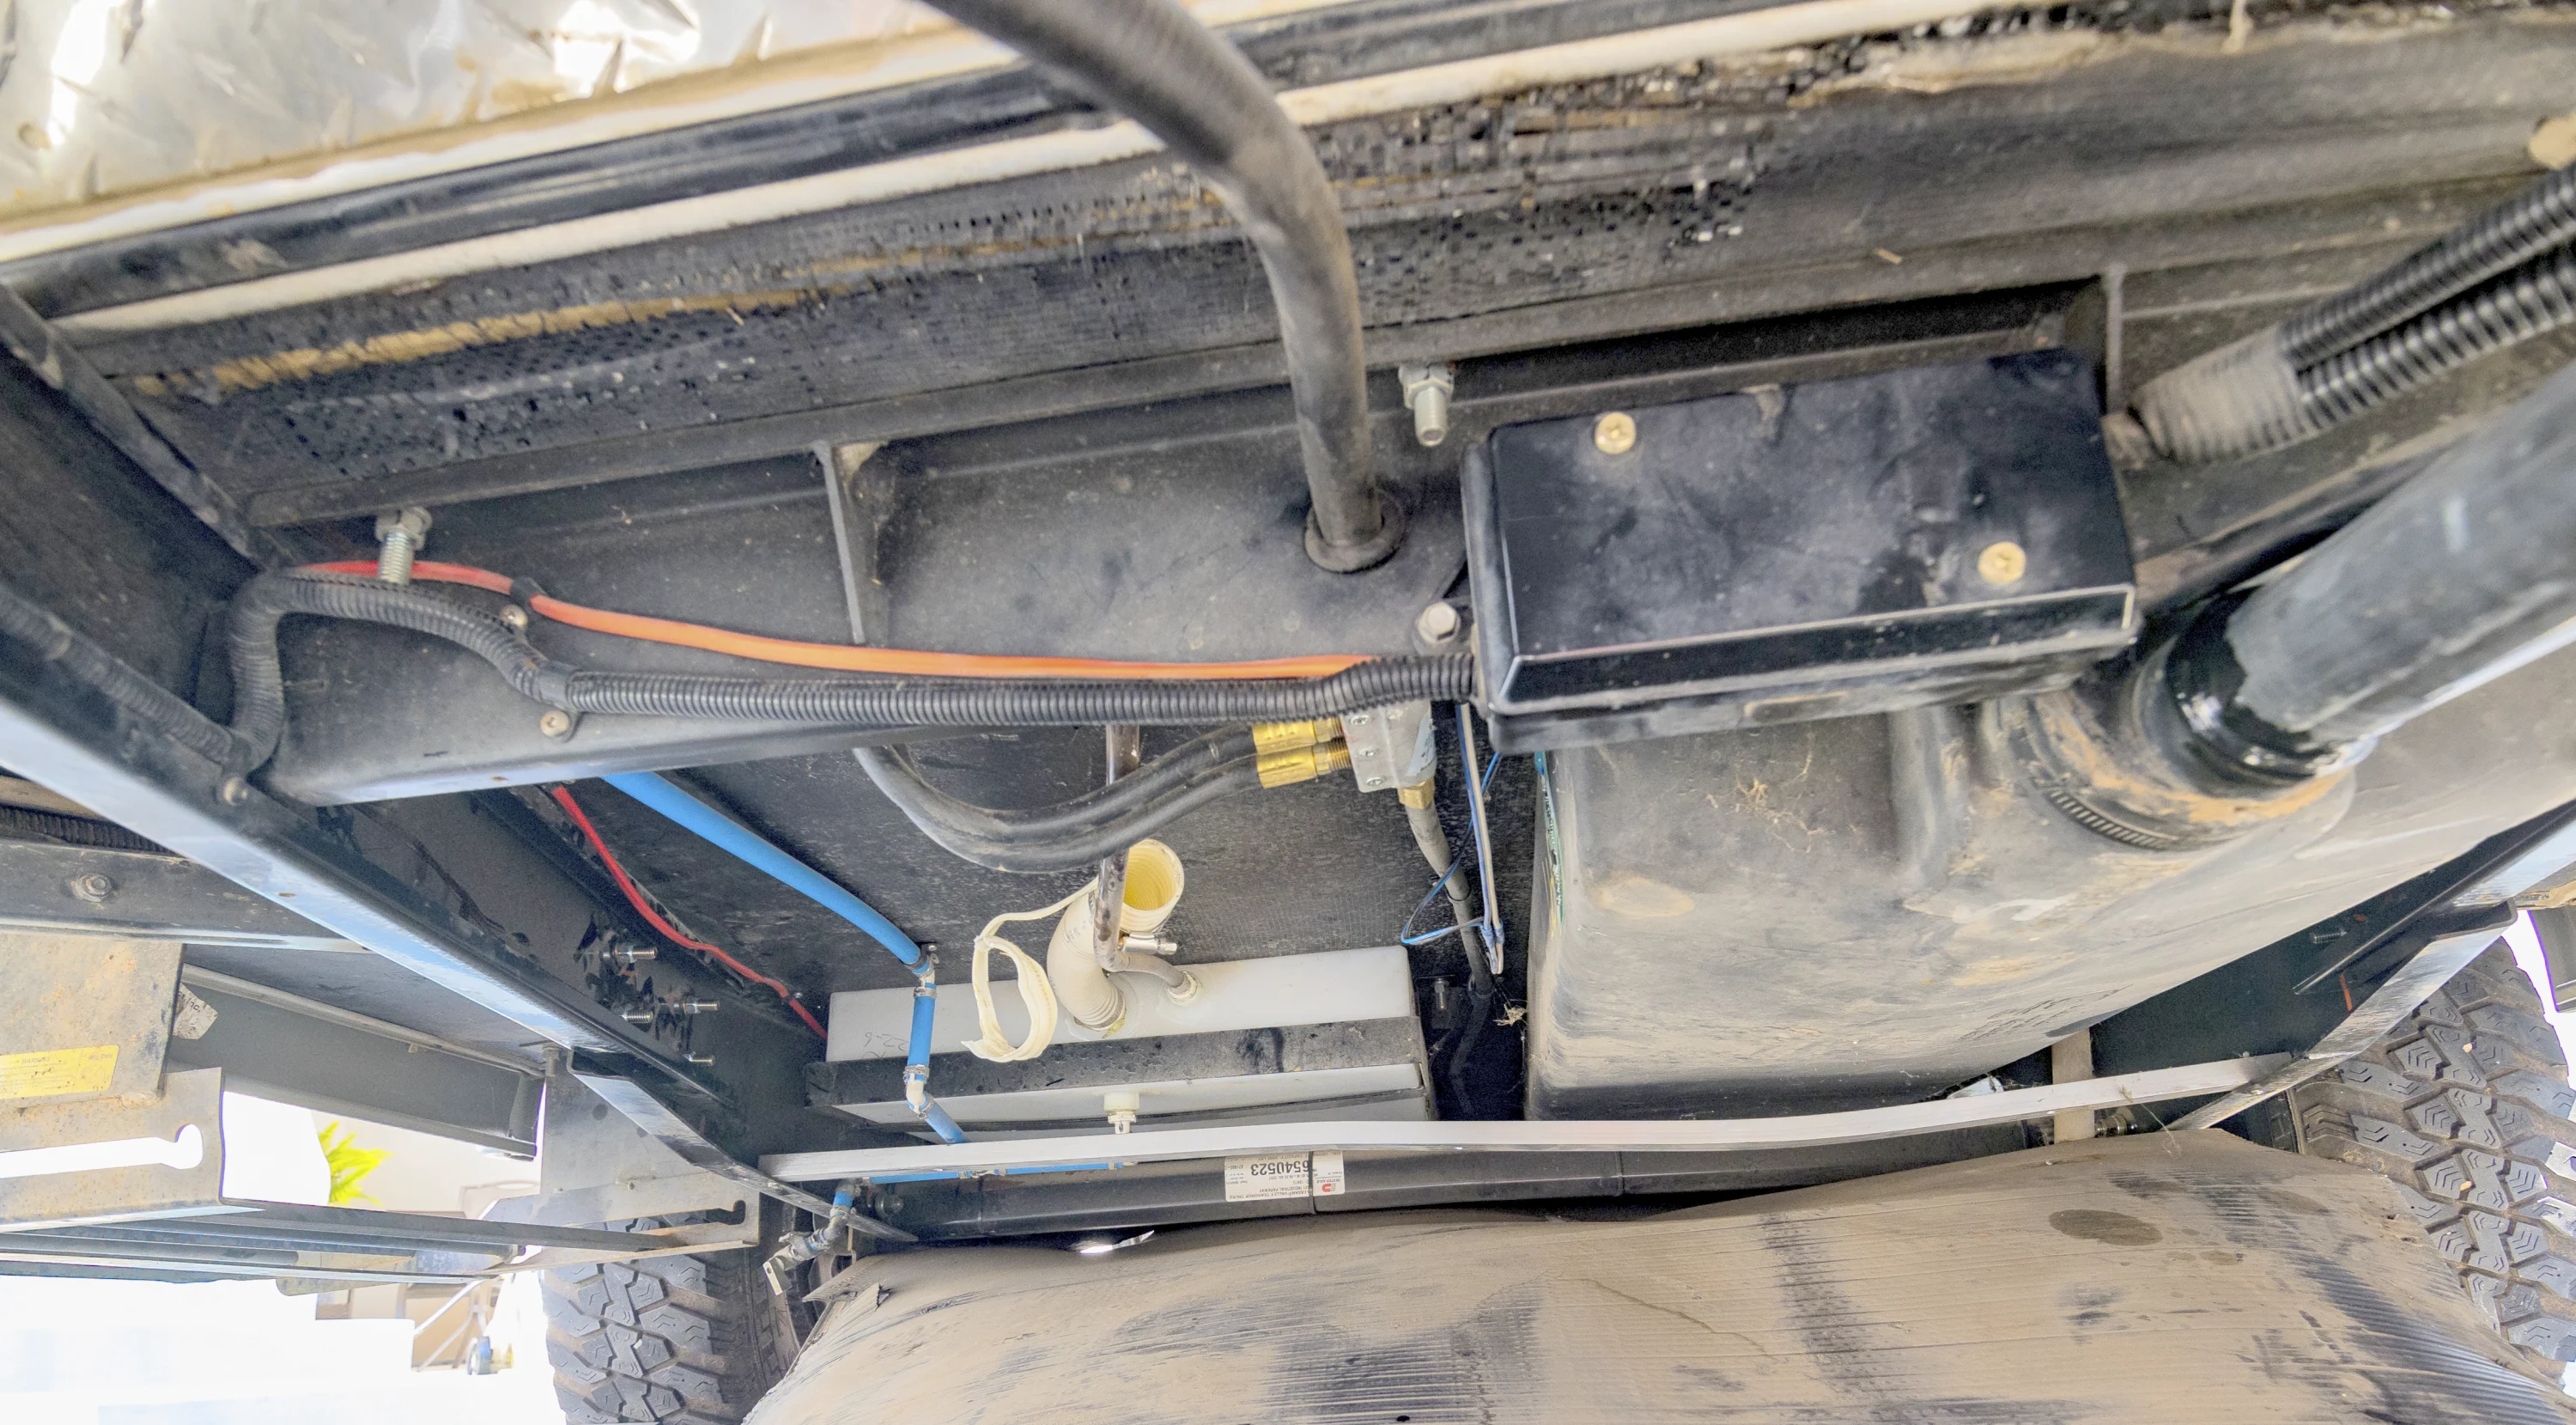
You "could" saw a hole in the coroplast and then put some sort of access port down there . That stuff takes a beating over time. I've made a few "tape" repairs to it.
Be careful with how you proceed when you get to that fitting (if this is what it is!) Removing the fresh water tank would be a big undertaking.
Towed by 2014 Touareg TDi0 -
thank you so much for those photos, that is almost exactly what I am looking for! yes I am proceeding with caution. From what I have been reading, many new units (not sure about Tabs) are actually being built with access doors for various parts. what size screws and other hardware did you need to put your coroplast back together?
0 -
I am going to scope some more and see if I have an aluminum support rail there as well.
0 -
@Paul1, I think you might regret cutting an access opening through the coroplast. I only suggest that because, over time, keeping the area you cut secure and in place may create more headaches for you down the road. I think that will be particularly true if you secure the access opening with tape, because that area is exposed to water and constant changes in temperature (depending on where you travel), etc. Thus, the tape potentially will become degraded and possibly detached over time. Also, I believe you will find it much easier to work in that area by removing the coroplast cover, or at least remove the screws from the axle to the front of the trailer, probably on both sides. But, the problem with not removing the entire cover is that the cover will likely be in your way while your are repairing the leak. Also, you don't want to lay on top of the cover while it is still partially attached to the trailer frame, because it could break from the weight of your body.
Below are some recent comments I posted regarding removing and replacing the coroplast cover. There are comments posted by others as well in different forum discussions. My comments are dated April 27th and May 19th (2026). In that discussion, I mentioned that I individually marked each section of aluminum termination strip (the metal support framing located along the outer edges of the coroplast) with a black Sharpie to identify where each is attached. Make sure you do that, because if you choose to remove the coroplast and aluminum strips, it will save you a lot of reinstallation time. Include some arrows pointing toward one end, or both, of the trailer, as well as which side (driver, passenger, front and rear) the individual strips are located so you document the proper orientation of each section. You will be VERY glad you did that when you reinstall those strips. Also, because of the recurring problem of the original screws breaking off, I replaced all of my screws with stainless steel self-tapping screws.
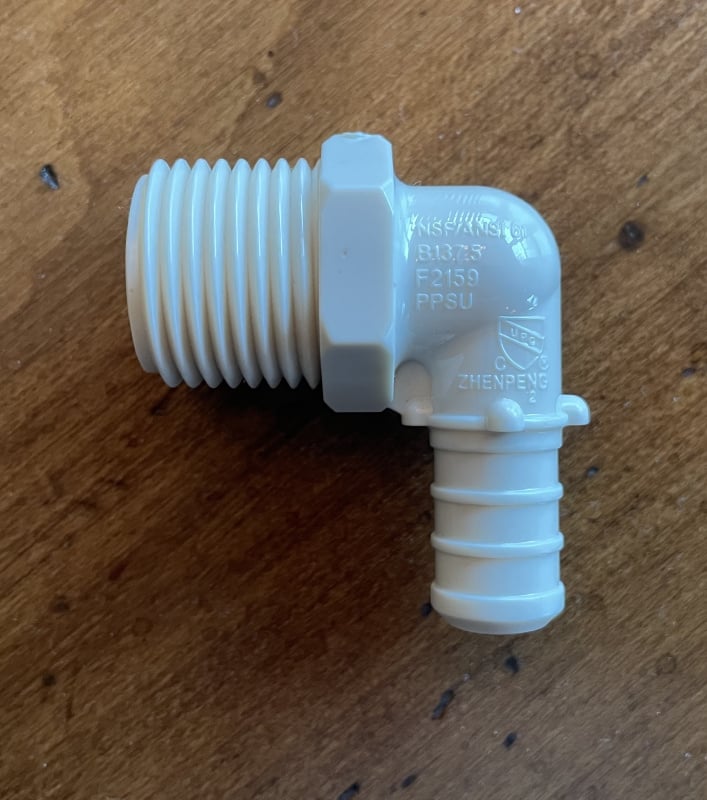
Regarding the specific source of your leak, I had to replace that particular PEX drain fitting when it completely broke on my 2019 320 S Boondock Lite in May 2024. Below is a photo of that fitting (you might be able to find the same/similar fitting online for less cost).
nüCamp Part No. 68-65-5415 PIPES/FITTINGS – ELBOW – AC ½” x 1/2 “ MPT POLY ALLOY:
For the Pipe Thread Sealant: Use “RectorSeal T Plus 2” (1¾ oz tube) – it is a non-hardening sealant containing PTFE (teflon), plus synthetic fibers dispersed in a resinous base combined with inert mineral fillers to provide maximum sealing performance. It is non-toxic, so OK for use with potable water, hot or cold. It is formulated for plastic and metal pipe. Their Product Data Sheet specifically references use with PPSU plastic. SKU: 23710. (Do not use RectorSeal No 5 or Tru-Blu, because they have acetone. If RectorSeal is unavailable, use a sealant that has 100% teflon and synthetic mineral oil, per RectorSeal tech on 07-10-2024.)
Here are some recent comments I posted on dealing with removing and attaching PEX fittings and the tool(s) you may need:
PEX Pipe Cinch and Removal Tool
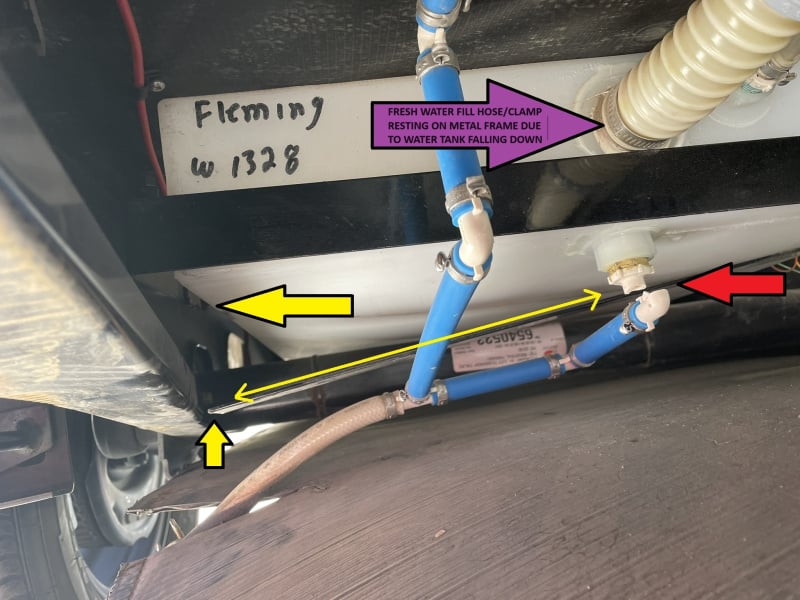
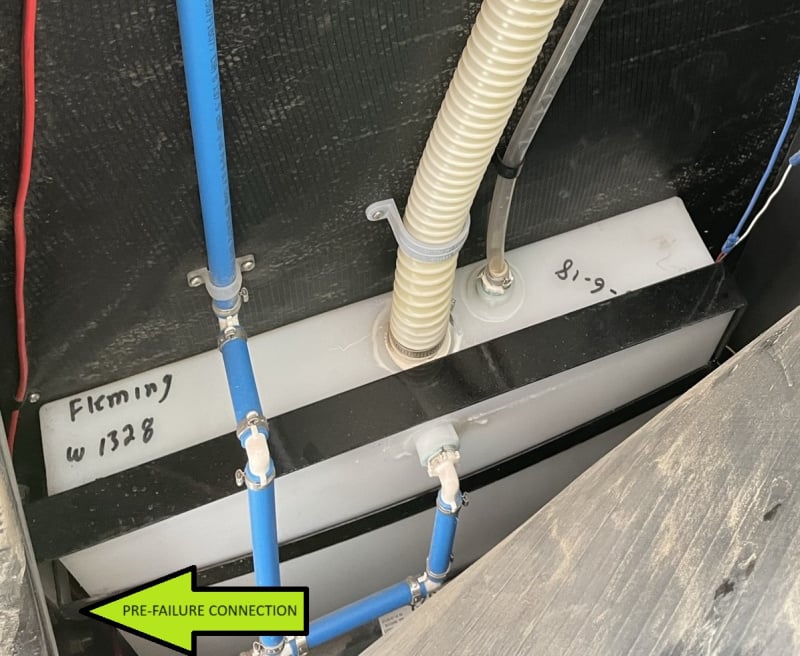
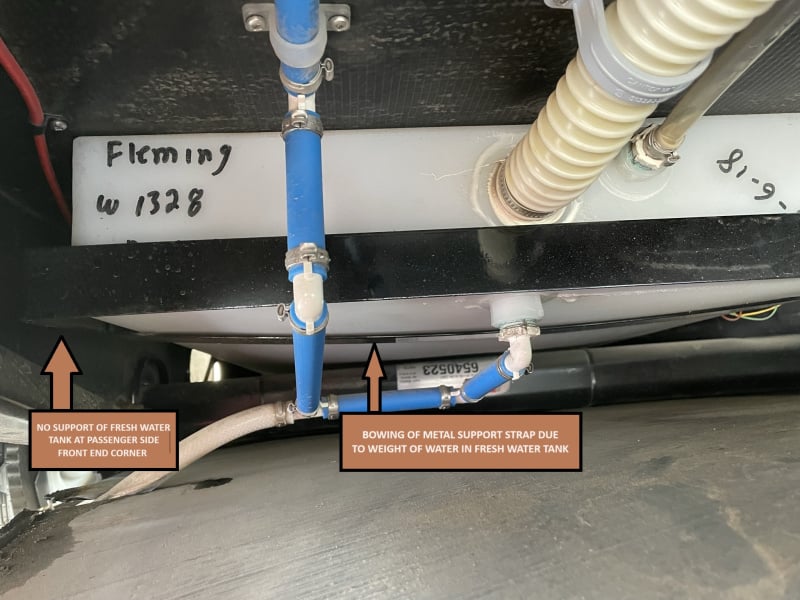
I don't know if you will find the same issue I encountered back in 2024, but the same PEX fitting broke because the metal bracket that is supposed to support the fresh water tank failed. Although the photos below may have little relevance to the cause of your leak, I am including them for anyone who may be interested, or have to deal with the same issue in the future. (FWIW, nüCamp told me they have never received a similar reported failure of the support bracket depicted.)
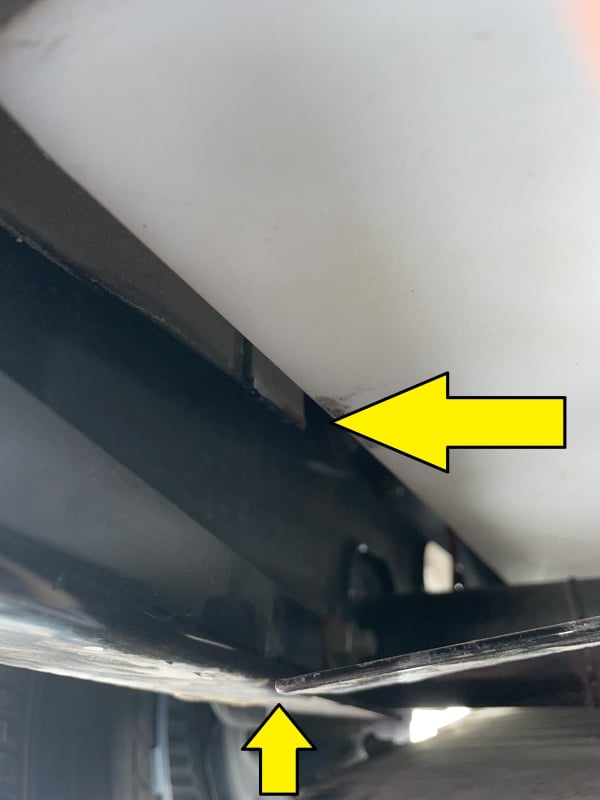
What occurred is that the horizontal metal band that supports the weight of the fresh water tank broke at the location identified in the photos with the yellow arrows. It was a clean break. nüCamp told me the area of the break is a bend in the metal and that it was not welded at that location. Initially, nüCamp was not willing to address the problem since it occurred beyond the warranty period. However, to their credit, they did send me the bracket and PEX fitting without cost, which I greatly appreciated. They were not willing to cover the labor, so I did that myself.
I believe there are two design defects with the support bracket (1) the metal support band, which stretches horizontally below the tank, is not robust enough to support a full tank of water, and (2) there is no additional support included with the bracket design at the front end corners of the tank. The metal frame that extends horizontally across the front end of the tank prevents the tank from shifting forward, but it does not provide any supplemental support for the tank. (SIDE NOTE: If you look at the photo posted by @pthomas745, the aluminum metal strip that runs perpendicular to the trailer axle is bent downward from the weight of the gray water holding tank - - the lack of support for both the fresh and gray water tanks leads to them resting on the trailer axle when they are full/nearly full).
Sorry for the long message, but hopefully it helps. Good luck with your repair!
2019 T@B 320 S Boondock Lite ~ 2025 Toyota Tundra CrewMax 4x4
Greg & Marlene (Tucson, AZ)0 -
Thank you Bayliss for the detailed photos and information. This is very helpful, and I will look at them in detail before I proceed. Much appreciated. Did you happen to know the length of the tubing between the T and the elbow, running up to the fitting which had the leak? Also, it appears that your fitting that you replaced, was actually broken? Thanks so much for you help.
0 -
@Paul1, I did not measure the length of the PEX tubing between the T and the elbow. However, there should be no issue with using the section that is currently installed. If you read my post about adding/inserting a PEX fitting to the tubing, I mention how to easily do that (i.e., by slightly heating the tubing).
Yes, my 90-degree elbow broke completely in half when the support bracket failed and the tank dropped. Your fitting may just need to be removed and new sealant added to the threads. You probably won't know for sure where it is actually leaking until you are able to get a closer look (and after adding some water to the tank to help locate the specific location of the leak). Hopefully, you will be able to easily determine if it is leaking from the threaded area, or if there is a crack in the elbow fitting itself.
2019 T@B 320 S Boondock Lite ~ 2025 Toyota Tundra CrewMax 4x4
Greg & Marlene (Tucson, AZ)0 -
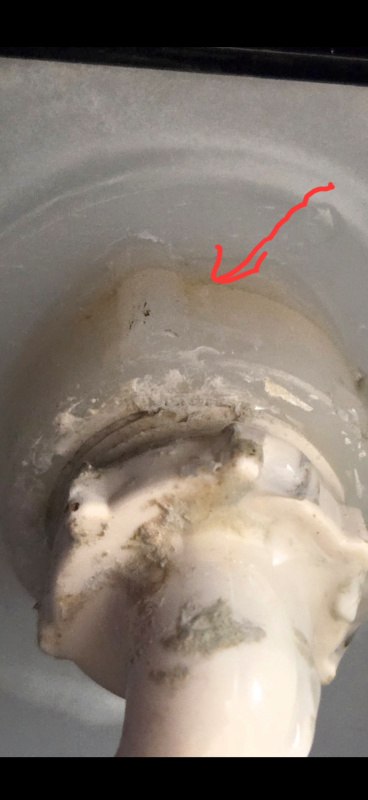
So. I finally made a trap door under the fitting. Put some water in the tank and watched it drip The drip is coming from the very top where the red arrow points on the photo. Before I do any more damage,. Any idea if that top piece can thread off?
0 -
@Paul1, I don't believe so. I believe that is molded into the tank itself, and threaded. The fitting I posted earlier screws into the threaded (female) piece that is part of the tank structure. Somehow, you'll likely have to do some sort of plastic "weld" around the area of the leak, but I have no experience doing that. Maybe some good two-part epoxy (like JB Weld)?
At this point, it would be worth sending the photo to nuCamp to see what they suggest. You might also search online for companies that make fresh water RV holding tanks and see if they can provide some help/suggestions.
I'm heading out on a two-month camping trip, so I will not likely be able to keep tabs on this, so I hope others chime in if they have some helpful suggestions or experience with that type of leak. I wish you the best of luck and will keep an eye on how things are going, if and when I can.
2019 T@B 320 S Boondock Lite ~ 2025 Toyota Tundra CrewMax 4x4
Greg & Marlene (Tucson, AZ)0 -
Thank you Bayliss,I appreciate your response . I think you are correct. I was googling and Youtubing this last night. Seems to be, the tank is composed of polyethylene (HDPE) and some epoxy or bonding products may work temporarily, but wont last. I have sent the information to nucamp to see what they suggest. I will probably end up buying a plastic welding kit from Amazon and give it a try. Just an awkward spot to be doing that, but not much choice other than pulling the whole tank out. Thanks again for sharing your experience.
1 -
FWIW, I successfully patched a pinhole leak in an HDPE (i.e., #2 plastic) kayak with a heat gun and strips cut from a milk carton. In such a tight spot, you might also be able to weld the leak shut with a small soldering iron. Either approach would take a steady hand so as not to do further damage, but I'll bet they would work.
2015 T@B Max S (320)
2015 Nissan Frontier SV V6 4x40 -
Hi Scott. That is encouraging. Been looking for a soldering gun type plastic welder. I will practice on something before I attack the fitting after I get the welder. Got a response from Nucamp today stating ots a spin on fitting,bit no suggestions as what to do.
0 -
Yeah, it looks from the photo like it might be a separate fitting—the little lugs look like places to get some leverage for installation/removal--but I have no firsthand experience.
If it is threaded, the leak may be originating from somewhere other than where the drip is appearing. This could make welding it challenging. I'd probably see if I could remove it without boogeringthe tank and better determine if it's just a leaky thread or if there's a crack or hole somewhere in the plastic.
Sorry you have to be the pioneer on this. Let us know what you find!
2015 T@B Max S (320)
2015 Nissan Frontier SV V6 4x40

 2017 Outback

Categories
- All Categories
- 12 Cirrus Truck Campers
- 128 Dutchman and Vintage TaB Archives
- 3 Forum Rules
- 3 nüCamp & Forum Contacts
- 969 Air Conditioning & Refrigeration
- 2.7K Battery/Electrical & Solar
- 1.2K Camping & Travel
- 145 Events & News
- 220 Factory Comments
- 28 "FOR SALE" - New/Used Trailers
- 15 “FOR SALE" - Camping & Trailer Gear
- 2.4K Heating/Plumbing & Winterizing
- 138 Help - Computer & System
- 925 Introductions
- 408 Looking to purchase a trailer?
- 2.2K Modifications & Upgrades
- 1.4K Products and Accessories
- 425 Service/Maintenance & Recall Notices
- 37 Solo Travelers Hints & Tips
- 1 T@G Forum
- 78 Teardrop Groups & Links
- 78 Testimonials
- 922 Tips & Tricks
- 1.5K Trailer & Towing
- 27 Owners Manuals/PDF Files/Videos & Resources
- 56 üCamp Rally - News & Information