Variable Speed (PWM) Ceiling Fan Mod == 10 Bucks
Comments
-
BrianZ, thank you for taking the time to post your pictures of the PWM Controller install. My wife and I followed your picture instructions to the “T” and everything went back in place perfectly and worked as expected the first time. No issues at all!! We can now leave our portable fan home and use that space for something else.2020 TAB 320 U
TV 2025 Telluride X Type1 -
You're welcome, @Freespirit. Glad to hear it worked for you the first time - that's great!
@MuttonChops found a great application for the PWM controller. It has really helped us sleep without excessive fan noise & also conserve battery power when camping without hookups.
-Brian in Chester, Virginia
TV: 2005 Toyota Sienna LE (3.3L V6)
RV: 2018 T@B 320S, >100 mods2 -
Jumping in late, but I just completed this mod. It was as simple as swapping out the 3-speed switch for the variable speed rheostat provided by @Lloyd above. The existing connectors aren't an exact match with the new part but I made them work. Ultimately I'll have to replace the connectors or apply a couple dabs of solder for connections that will hold up in the long run.
Edit: 4 years later. I have never made any changes to the connectors and the fan modification still works as desired.2019 Tab 320 CSS, 2019 Ranger TV, OH1 -
I added one to the bathroom fan in our 400. On low speed you can barely hear the fan. I can run it in the rain as well. I prop the door open with a pool noodle.I was all set to swap out our fan but I’m happy as is.2019 T@B 400 BDL 2017 F150 3.5L Ecoboost
Jeff & AmyNow in Manistee, MI2 -
Thanks to all the prior wizards for their trials and posts on making the speed controller retrofit a success.
Who else has had the fan cover plastic tabs fail?
While adding a fan hood to our 2021 TAB 320, I found a piece of black plastic atop the fan screen. Turns out the lifting mechanism attaches to the fan cover via two extruded plastic 'clip angles' which cracked where the sheetmetal screws go into them. Have not read about this happening to others, we travelled on very bumpy highways with the lid socked down.
Upgrading to variable speed control and disassembly elicited the second clip angle was also broken.
Pic 1. Cut the clip angle remnants off with a dremel wheel and fabricated an aluminum angle to mount he lifting mechanism to. SS #12 x 1/2 sheetmetal screws through fan lid, did not want to remove the added hood to through-bolt which would be better. Buttered the holes with silicone caulk before assembly.
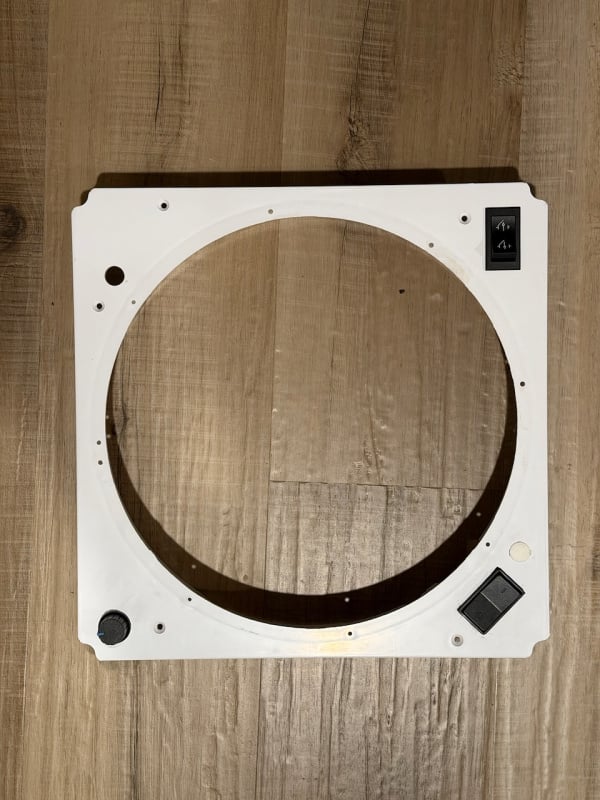
2. removed four-position original fan switch, used 1/8 drillbit to slot edge for metal tab on potentiometer (speed control knob) so it does not swivel after mounting. Mounted potentiometer here. Peeled and scraped off 0123 label and created a tapered arrow label in its stead.
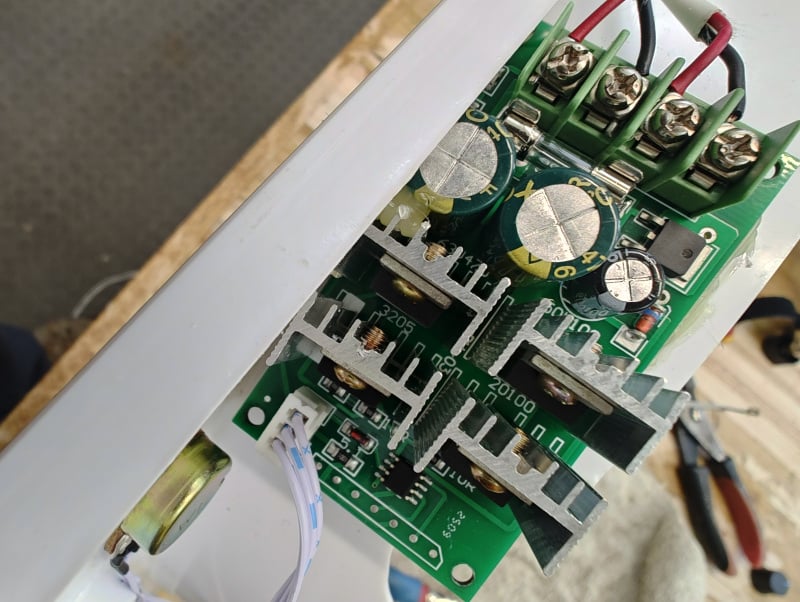
3. After experimenting with speed controller (printed circuit board) locations, determined the only feasible spot is angled atop the potentiometer (below photo 2 above) as others have done. Made plywood support for it to anchor to. Epoxied plywood to plastic fan cowling. Covered potentiometer with stickyback epdm pipe insulation to prevent circuit board shorting.
4. Used angle grinder to remove corner of outer heat sink, to clear fan cowling. Careful not to overheat board from the grinding heat. Test fit into cowling and test fit cowling into fan opening.
5. Hot melt glued controller board in place.
6. Wired it up with 14ga stranded, see PDF. You need both fullsize and half-width female spade connectors, insulated or heat-shrunk. Cut down several zip-tie adhesive-backed mounts to corral wires.
7. Final install.
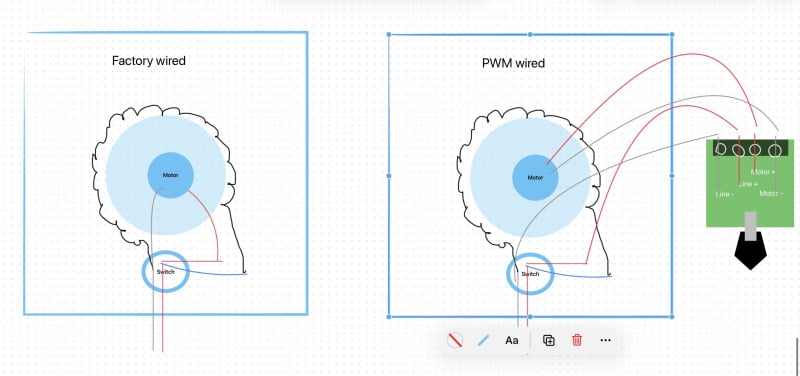
8. PDF wiring diagram.
2021 T@B 320S Boondock/ 2012 Tacoma 4 cylinder truck / 2023 Tacoma 6 cyl. truck4 -
15 month followup. Had to replace fan motor due to whining. (The fan motor not the occupants.) Less than 1000 hours on it. Unhappy that I had to swap it out so soon. Also the injection molded fan rotor assembly exhibits stress cracks around the shaft opening.
New fan motor, mounting arm, and fan from Amazon. DOMETIC-K8017-00-Blade-Motor-Assembly/dp/B01N1MK7T9 for $57.
However the shaft has significant runout and the rotor wobbles... it will not last! Not as visible during preinstallation test off 12v power center.
Pulled 12v fuse during work.
Pulled interior screen, unscrewed and pulled fan blade from below.
Must remove added fan hood, unscrew raising arm, and access from top of camper, to access the four fan arm screws.
Pressure switch interrupts power when fan lid is down. Black lead of replacement fan has ring connector, must unscrew pressure switch from above camper to replace this lead. (You can pull out this banana plug from below rather than chopping off and replacing crimped connector to in/out selector, as I did.)
We run fan outgoing at low speed 100% of time when occupying camper. Reverse to inflow during showers and heating water on stove.
Just added a cooking exhaust portable 12v fan below stove wall cab as well.
2021 T@B 320S Boondock/ 2012 Tacoma 4 cylinder truck / 2023 Tacoma 6 cyl. truck0 -
I realize I am resurrecting an old thread, where the previous last post is 3 years old - but...
I did this mod this week. Worked great. Took me an afternoon (but I am a little OCD & AR).
Only one blown fuse during the whole process: as it turns out, the hot wire from the camper is the black wire. Fuses are our friends. (Noteworthily strange: in our 2025 360 CS - the fuse was marked only for "fan" but it also took out all of our accent lighting - even though there is a separate fuse marked "lighting", but it did not take out the top overhead light.)
I found a PWM that was a slightly different shape and fit a little better:
NOYITO 30A DC Motor Speed https://www.amazon.com/dp/B07C1XZB5B
I used this power switch:
Leisure LED Modern Single SPST https://www.amazon.com/dp/B0C6YRB492
The new knob was way too small for the existing hole from the original 3 speed knob. The new knob nut would just fall through the existing hole, so instead - where the old one was I made my cutout for my power switch, and I put the new knob and PWM in the remaining unused corner.
My wife made the labels out of vinyl using a cricut, and I applied them with not the greatest alignment in the world but they work ok


1 -
Nicely done! This is still a highly viable mod, which saves power and makes the fan a lot quieter.This must have been the first real "mod" I worked back in 2018.........and, wow, looking at the thread, I sure would have had an easier time with the tools I have now!
2017 Outback
Towed by 2014 Touareg TDi0 -
I did the mod and it failed after a year. Bought a Maxx fan and am happy.
Rich2019 T@b 400
2025 Toyota Highlander 2.4L TurboBellingham WA0 -
I'm installing the fan mod with the pwm controller recommended by @valkraider. It fits great, but it's not giving me variable speed... Either off when the pot is turned off, or full speed when the pot is rotated just a bit. Ideas?
 0
0 -
I have the DV1450 fan and I don't think it's going to be compatible. I think the pwm frequency is too high from this board and it's not adjustable. Even with adding a 100 mfd capacitor in line to buffer the pwm the fan motor is either full on or full off.0
-
IMHO it is more likely the PWM Board or the variable resistor control pot are defective.
Do you have a computer fan or similar item kicking around to test the PWM Board with?
- 801450 and 801250 (older discontinued) fans appear to be identical except for the housings.
- Your PWM board has a frequency of 15KHz and has worked for others, while the model many of us used runs at 16KHz
'18 320 S, pitched axle, 3020HE; PNW basedTV: '17 Colorado V6 Z71 4x4, Tow Package, GM Brake Controller
TV: '25 Canyon AT4
Adventures: 58 Nights: 405 Towing Miles 50,1800 -
I will definitely look at that next weekend. The pot is good (4 to 32K ohms). I'll try the controller with a different fan. Thanks for the input0
-
Well I guess the controller board was bad, or at least somehow incompatible. I put this one in today and it works great. Variable speed at last. Although the quiet reveals a squeak, so that's next on the list.
12V in ➡️ added cutoff switch ➡️pwm controller ➡️reversing rocker switch ➡️ fan motor
HiLetgo 12V~40V 10A PWM DC Motor... https://www.amazon.com/dp/B00QVONO20?ref=ppx_pop_mob_ap_share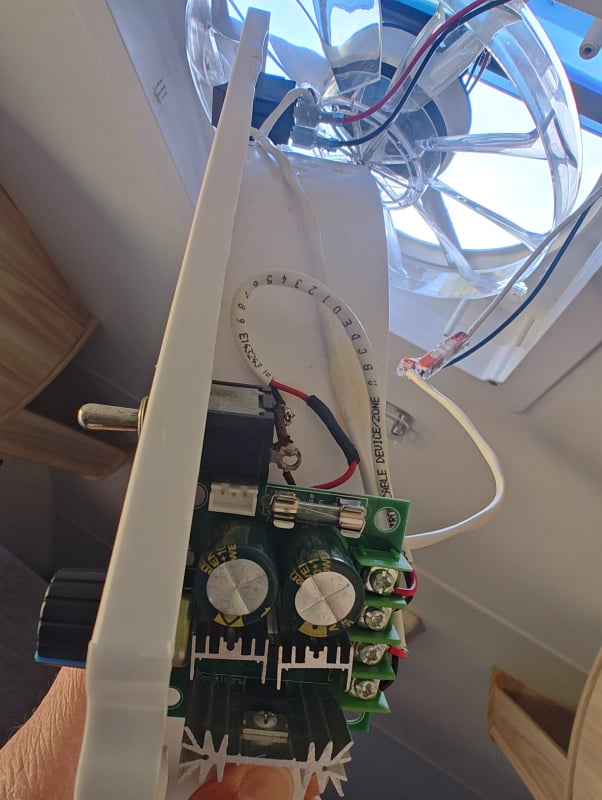
2 -
I used a similar board from Amazon but replaced the potentiometer with an external one that includes a switch. This then replaced the original switch. My installation doesn't look as nice beneath the plastic but it doesn't have the redundant switch positions. It saves a significant amount of power if you run this a long time or just for just a slight draft to remove excess moisture when cooking.Snohomish WA, 2015 Diesel Grand Cherokee
Sm@ll World: 2021 320S Boondock, 6V Pb-acid
Shunt, Roof & Remote solar & 30A DC-DC Chargers
managed by VE Smart Network0 -
The Nucamp Haven removed the Tab’s cabin 10 speed maxifan as an option. Bad move! I ran that thing all day, every day and it used like 1a on low. Kept the environment moisture free. In its place they put two single speed 3851 max fan mini’s in the dry bath. One in shower and one over sink. They run well (200cfm each) but are too loud for my taste at night and they would consume double the amperage or more. They are rated as 2a fans. Exhaust only, as wired.So, as discussed in this thread, I added a PWM controller to make these fans variable speed. Per Nucamp tech, these fans are brushed fans, so affected by PWM controllers. Check! Bought an Amazon 5a, 20khz 3-pack of controllers for $7.99.The controller works great, even has a red led letting you know that the controller is turned on (only possible if the main fan switch is on too).The Haven bath fans have four twist clockwise settings:1 - off2 - fan3 - fan/light4 - lightWith the controller installed, the lights work regardless of controller setting.On the fan settings 2 and 3, the fan won’t run without the controller on too. It’s a little dial knob that also turns clockwise to increase fan speed, from none/off to full speed. I leave the controller part way on so i can know which setting I’m on.I drilled a small hole in the fan faceplate next to the stock 4-position switch for the speed control. It fastens and cinches tight with a nut on the outside.Super quiet 3/4 of the way up to full. Will be a good substitute for the tab 400 maxifan on low.
 Beyond this, you can improve the life of your new controller by adding a fly back diode. If you bought a more expensive one, it might handle voltage surges at power off, but an added diode won’t hurt. 1N5404 is what I used. 3a, 400v. You solder the ends across the fan motor posts. + end of diode to the + end of motor post.Finally, two capacitors soldered the same way as the diode can smooth current (1000uf) and eliminate noise in radios (0.1uf). I didn’t add them, as I’m not hearing any nuisance noises in my radio.2026 Haven2023 Tab 400 - sold
2015 Audi Q7 TDI
Northern Ohio2


 2017 Outback


Categories
- All Categories
- 10 Cirrus Truck Campers
- 122 Dutchman and Vintage TaB Archives
- 3 Forum Rules
- 3 nüCamp & Forum Contacts
- 957 Air Conditioning & Refrigeration
- 2.6K Battery/Electrical & Solar
- 1.2K Camping & Travel
- 142 Events & News
- 219 Factory Comments
- 20 "FOR SALE" - New/Used Trailers
- 13 “FOR SALE" - Camping & Trailer Gear
- 2.4K Heating/Plumbing & Winterizing
- 141 Help - Computer & System
- 922 Introductions
- 408 Looking to purchase a trailer?
- 2.1K Modifications & Upgrades
- 1.4K Products and Accessories
- 411 Service/Maintenance & Recall Notices
- 37 Solo Travelers Hints & Tips
- 1 T@G Forum
- 75 Teardrop Groups & Links
- 78 Testimonials
- 919 Tips & Tricks
- 1.5K Trailer & Towing
- 27 Owners Manuals/PDF Files/Videos & Resources
- 55 üCamp Rally - News & Information