


Variable Speed (PWM) Ceiling Fan Mod == 10 Bucks
Comments
-
Marceline said:Wire (gauge? colors? terminals?)
Any special tools besides screwdrivers & pliers? A Dremel? Hot glue gun?Overall this is a easy modification if you have any prior experience with basic wiring.
Don't believe any of the past install instructions include that level of detail . . . and been far too long since doing the modification to remember a complete list.I'd suggest you plan on two trips to T@B. First to remove fan from ceiling and scope out what you need. Then second, after HW store visit, for the specific terminals/wire/etc you decide is needed.'18 320 S, pitched axle, 3020HE; PNW basedTV: '17 Colorado V6 Z71 4x4, Tow Package, GM Brake Controller
TV: '25 Canyon AT4
Adventures: 58 Nights: 405 Towing Miles 50,1800 -
It might also depend on which method you use to wire it. I didn't need any separate switch, because I wired it through the existing on/off switch, which serves that purpose. You could use 16 or 18 gauge stranded wire ("hookup" wire) and possibly some spade connectors/crimping tool (or soldering gear), plus you'll need a wire cutter/stripper tool and electrical tape. If you want to do a pro job, use some heat shrink tubing instead of electrical tape to cover any exposed wire/connectors (need a butane lighter for that, like you might use to light a stove or grill). The glue gun can be useful to insulate exposed components & also to tack down wires to plastic housing so they don't flop around.
Good luck!-Brian in Chester, Virginia
TV: 2005 Toyota Sienna LE (3.3L V6)
RV: 2018 T@B 320S, >100 mods0 -
I saw this done here, with a warning about now leaving the knob on just enough to draw current but not move the fan. https://youtu.be/MAgk2NCjH_Y
2016 T@B Maxx CS-S following a 2008 4Runner Ltd
Be brave. Take risks. Nothing can substitute experience.-Paulo Coelho0 -
@Marceline,
Below are my photos of the method I used, with the PWM controller mounted in the empty space, speed control knob mounted underneath it, and 3-way switch rewired as on/off switch. (I made these 2 yrs ago, but can't find whether I ever posted them.)
..
I made this composite to identify the existing parts, with notes about how some would be changed, wired, or rewired..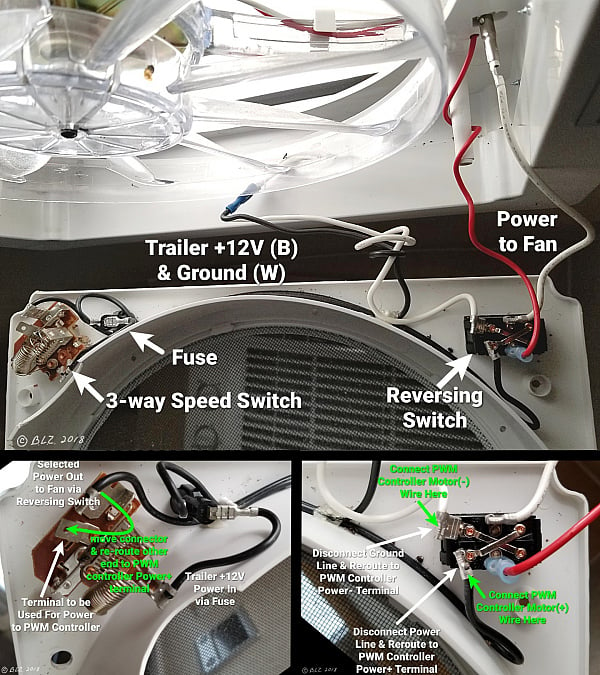
Next shows the rewired components..
The finished arrangement..


The above photo shows the base of the control knob under the PWM control board, and is covered by a wide piece of heat-shrink tubing to prevent shorting out wires on the soldered side of the board.
Next, I used a scrap of pipe insulation plastic foam as a spacer to prop up the board at the right angle..
View from above showing the fit..
Note above (at bottom) where I used heat shrink tubing over the spade connectors where wires are a bit loose, to avoid shorts.
Above are my kits with assorted sizes of heat shrink tubing & connectors, including the flat spade type connectors I used; from amazon..
https://www.amazon.com/dp/B072LTD1LT
https://www.amazon.com/dp/B01335ZEFE
-Brian in Chester, Virginia
TV: 2005 Toyota Sienna LE (3.3L V6)
RV: 2018 T@B 320S, >100 mods2 -
Thanks so much for all the helpful feedback. I'm going to order the parts and give it a try.San Francisco Bay Area
2013 CS-S us@gi
2015 Toyota Tacoma PreRunner Double Cab0 -
You also get to make the choice if you want to get rid of the top lid closed sensor (the white wire on the top right of BrianZ's first photo). If replaced with a solid wire you have a not so effective ceiling fan you can use when the top lid is down. Maxxaire has that "feature", though others on the forum have noted it's not that grand. Slightly moves the air in the cabin though.2021 Jeep Gladiator, 2021 tiny toy hauler, Austin TX
Former steward of a 2017 T@B S Max1 -
Thanks for everyone's advice. I've almost completed this project. I've wired it all up, tested, and it works. Now I just need to re-assemble. One last question. The controller for the PWM has a little tab (see photo - right side). I assume that this is some kind of stop to keep the whole controller from rotating along with the knob. Do I need to drill a little hole for this tab to drop into? Or did you break it off?
@BrianZ
@MuttonChops
@dutsmiller
@Tundra57
San Francisco Bay Area
2013 CS-S us@gi
2015 Toyota Tacoma PreRunner Double Cab0 -
I vaguely remember cutting that off with a pair of diagonal pliers.0
-
Correct, @Marceline, that little tab would fit into a small hole you can drill for the purpose you stated; otherwise, tightening the nut should hold it well enough, or add a lock washer. There's not really enough resistance (mechanical, not electrical) in that little rheostat dial to matter, so either way should work.-Brian in Chester, Virginia
TV: 2005 Toyota Sienna LE (3.3L V6)
RV: 2018 T@B 320S, >100 mods1 -
@Marceline. I know its too late, but i drilled the little hole. Im a bit anal about that stuff. But as others have said it really takes little force to turn the pot. Did you fit a power switch to isolate the speed controller input?
0 -
I used @BrianZ ‘s method and it looks to me like this effectively turns the 3speed dial into an on-off switch. I could be wrong, though, as 12v wiring isn’t my forte.Tundra57 said:@Marceline. I know its too late, but i drilled the little hole. Im a bit anal about that stuff. But as others have said it really takes little force to turn the pot. Did you fit a power switch to isolate the speed controller input?San Francisco Bay Area
2013 CS-S us@gi
2015 Toyota Tacoma PreRunner Double Cab0 -
That is correct, @Marceline.
I verified this, and documented when I installed my Alde kill switch & found zero current on that circuit, which is shared with the ceiling fan..
https://tab-rv.vanillacommunity.com/discussion/6415/phantom-drain/p2
-Brian in Chester, Virginia
TV: 2005 Toyota Sienna LE (3.3L V6)
RV: 2018 T@B 320S, >100 mods1 -
hello. I just talked to Dometic... my 2020 fan is apparently a Dometic 1450, not a Fantastic Fan. Is it pretty much the same thing, and will this PWM uprgrade work? Dometic pretty much told me that the Fantastic Fan upgrade kits would not work on my Dometic fan... I am a bit confused!
Yanni Lazarus 2020 T@B320S, 2018 RAV4 Adventure, Central CT0 -
YanniLazarus said:. . . 2020 fan is apparently a Dometic 1450, not a Fantastic Fan. Is it pretty much the same thing, and will this PWM upgrade work?I have no direct experience with the Dom-1450.
That said; it's description is 100% the same as the earlier T@B model years 3-speed Fantastic Fan. Just seems to have different plastic styling.
The on-line Dom-1450 Owners Manual includes an internal wiring diagram. This wiring is the same as the Fantastic Fan. So PWM Modification should be doable. IMHO
'18 320 S, pitched axle, 3020HE; PNW basedTV: '17 Colorado V6 Z71 4x4, Tow Package, GM Brake Controller
TV: '25 Canyon AT4
Adventures: 58 Nights: 405 Towing Miles 50,1800 -
so, cold feet on my part with my Dometic 3-speed fan. I liked the simpler installation of the rheostat previously suggested, but noted that the wattage was probably too low for the application. I could live with a only a slight improvement in power consumption, and a quieter fan -- and an idiot proof installation.
does this look like it would work -- and would fit? It looks like it is 2.5" in diameter.uxcell 50W 1K Ohm Wirewound Ceramic Potentiometer Variable Rheostat Resistor with Knob
this has been a very entertaining thread.
Yanni Lazarus 2020 T@B320S, 2018 RAV4 Adventure, Central CT0 -
I received my PWM control board today after a 3 week wait (came direct from China). I have a Dometic 1450 in my 2021 T@B 320S and have looked at the schematic @MuttonChops posted a picture of above. My plan is to use the existing on/off-3 speed switch as on/off, wire in the PWM board after this, feed the output to the polarity reversing switch, then connect to the fan. It 'should' work the same however unknowns can always crop up. I'll report back after I've had a chance to test the PWM with the fan.2021 T@B 320S Boondock - 2018 Toyota 4Runner3
-
The rheostat does work and is much easier to install. This one is cheaper and the 25w 50ohm specs work just fine. I installed it in place of the 3 way switch and it works great. I did have to enlarge the hole just a bit.
https://www.amazon.com/YXQ-Resistor-Rheostat-Porcelain-Resistors/dp/B081JZGJJH?pd_rd_w=yer1e&pf_rd_p=cb335323-1c34-41e9-9be4-1577c64bd1ea&pf_rd_r=VF04VX8YSNCNC5MGBF3A&pd_rd_r=011f2268-8cb2-4d4c-99b1-567897c98c84&pd_rd_wg=brQ58&pd_rd_i=B081JZGJJH&ref_=pd_bap_d_rp_1_47_t
2020 T@B 400 w/ factory solar
2015 Nissan Frontier SV, 4WD Crew Cab
Manson, IA0 -
After performing the mod described above, I find that my fan will start to stutter (like a power fluctuation) after leaving it on for extended periods. However if I leave it off for a while it works fine. I assume it might be a heat problemGerri (Gary) Ewing
Montgomery TX (Birthplace of the Texas Flag)
2018 320 S - "No Agenda Hacienda"
Tow Vehicle 2023 Honda Pilot AWD0 -
I just finished this mod in my 2021 320S BD and it worked perfectly the first try. I replaced the 3-speed switch with a PWM controller and pot, and installed a rotary on/off switch in the unpopulated fuseholder spot, so no new holes were drilled.I’m super happy with the way the fan operates now. Thanks to everyone who contributed here previously!
2021 T@B 320S Boondock | 2019 BMW X3 M40i1 -
If I were you, I'd be annoyed by my approach-avoidance to doing this mod -- but here it goes!!! I now own
 Dometic's 1450 general info calls for installer supplied minimum 16-gauge stranded copper wire. Am I ok with 18 gauge?And the Dometic 1450 fan does not have a built-in surface access fuse the way the fantastic fans do. No big deal, I assume -- just use the main fan fuse and ignore the difference.Go for it, right?
Yanni Lazarus 2020 T@B320S, 2018 RAV4 Adventure, Central CT0 -
If 16AWG gauge wire is called for, that is the minimum size you should use, you can go larger, 14AWG, but not smaller 18AWG stranded wire.
cheers2018 TaB400 Custom Boondock, Jeep Gladiator truck, Northern California Coast.0 -
So, the wizard of oz scarecrow installed a pwm! I just couldn't stand the noise, and we boondock all the time, so the power use bugged me as well.good news:everything worked while wired on the table, and just before installing the screws. So sweet. before not.further good news:i took the pwm out and got it to work again -- as a 3 speed, without changing the revised wiring so that I can try to fix this later!bad news:stopped working after full install.so -- I confirmed I am getting current at the pwm andwhen I take the pwm out of the circuit entirely by connecting the 4 wires that go to the pwm, the fan works as a 3 speed.Interesting to me... when the pwm was working, the three speed switch still worked as a three speed switch. No problem, I guess, but I assume thatIf i get this to work again I should run the fan with the pwm and the switch set to high (#3) speed so the resistors are not activated. I would have the same two "off" methods as before -- at the fan direction switch and at the 3 way switch. Is that why some posted pictures show the resistors removed? ...not sure what that would do or how to do it.So I checked for loose crimps, and found some... and now think a loose wire damaged some pwm component by bending it when I was tightening the screws... hope so, cause I've ordered a new one.I did install the pwm in a relatively novel way -- someone else on this thread said they put the pwm above... picture attached. Just too big to fit any other way in my Dometic 1450 fan. The green board corner of the pwm is just just visible above the housing when installed, and the attached black washer and blocking hold the pwm in place during assembly.the saga continues... meanwhile, I can't wait to do the kitchen trap mod. Plumbing I understand.suggestions always welcome.warmest regards.
Edited for photo size. Yanni Lazarus 2020 T@B320S, 2018 RAV4 Adventure, Central CT0
 -
@YanniLazarus ; Electronics confuse me no end. But I took out the 3way switch completely when I put in the PWM. 12v power that used to go to the fuse or 3way goes to the PWM instead. Output from PWM goes to the intake / exhaust switch or the fan depending on where you want to wire in the reverse / off / forward switch. Best prior to juice going to the PWM.
Regardless, if you still have the 3 way switch wired in with three different resistors it includes, could it possibly be that you no longer have 12V at the PWM board, and thus it cannot work in any kind of pulse modulated format?
2021 Jeep Gladiator, 2021 tiny toy hauler, Austin TX
Former steward of a 2017 T@B S Max0 -
That would be my guess, you need to bypass the three way resistor switch, or leave it on high when using the fan.
cheers2018 TaB400 Custom Boondock, Jeep Gladiator truck, Northern California Coast.0 -
Just a note to let those of you losing sleep worrying about newbie mod-man and his fan rewire... success! Thanks to all for your patience and help. I love the change...Yanni Lazarus 2020 T@B320S, 2018 RAV4 Adventure, Central CT2
-
Has anybody tried to put a speed controller on the bathroom fan? I use it after a shower to dry the bath and curtain. It would be nice to quiet it down a little.2019 T@B 400 BDL 2017 F150 3.5L Ecoboost
Jeff & AmyNow in Manistee, MI0 -
I completed my mod this morning, thanks for all the information!
I started this in July but I grew frustrated when it wouldn’t work, after I reversed my original install it still was dead. I then discovered my lid was down killing the power. 😂 rookie mistake. It was hot, I had a cast on my arm and I needed a break.2 and a half months later it was cool out, no cast and I was I a good frame of mind. Worked first time!
I did reuse the original knob so it looks 100% stock.2 -
This post reminded me that I don't think I reported on this adaption. I replaced the included speed potentiometer with the same value but with a rotary switch attached. I then replaced the 3 speed switch with this pot, and the switched power to the pot's switch. This allows me to use the same knob and dial as the original without drilling a new hole or leaving the old speed switch on the plastic. The "0" is still OFF but the speed control continues from minimum speed to maximum as I twist the knob. This seems an obvious modification but I hadn't seen it in the posts. I had the "JST XH" style wire crimps and created a longer cable between the pot and the controller. I picked up the pot/switch from Digi-key.Snohomish WA, 2015 Diesel Grand Cherokee
Sm@ll World: 2021 320S Boondock, 6V Pb-acid
Shunt, Roof & Remote solar & 30A DC-DC Chargers
managed by VE Smart Network1 -


Categories
- All Categories
- 10 Cirrus Truck Campers
- 122 Dutchman and Vintage TaB Archives
- 3 Forum Rules
- 3 nüCamp & Forum Contacts
- 956 Air Conditioning & Refrigeration
- 2.6K Battery/Electrical & Solar
- 1.2K Camping & Travel
- 142 Events & News
- 219 Factory Comments
- 21 "FOR SALE" - New/Used Trailers
- 14 “FOR SALE" - Camping & Trailer Gear
- 2.4K Heating/Plumbing & Winterizing
- 140 Help - Computer & System
- 920 Introductions
- 408 Looking to purchase a trailer?
- 2.1K Modifications & Upgrades
- 1.4K Products and Accessories
- 409 Service/Maintenance & Recall Notices
- 37 Solo Travelers Hints & Tips
- 1 T@G Forum
- 75 Teardrop Groups & Links
- 78 Testimonials
- 918 Tips & Tricks
- 1.5K Trailer & Towing
- 27 Owners Manuals/PDF Files/Videos & Resources
- 55 üCamp Rally - News & Information