"Permanent" Screens for Exterior Vents (Mud daubers and other insects)

BrianZ
Member Posts: 1,770
(Title altered for search purposes.)
I also realized that pest screens are the perfect solution for permanent protection for frig & plumbing vents too. So I ordered a couple of these too..

Camco 42156 Flying Insect Screen for Norcold Refrigerator Vent
https://www.amazon.com/dp/B01J6DMJ0U
I couldn't find any to fit our approx 5x13" frig vents, but I was able to cut these down to fit..
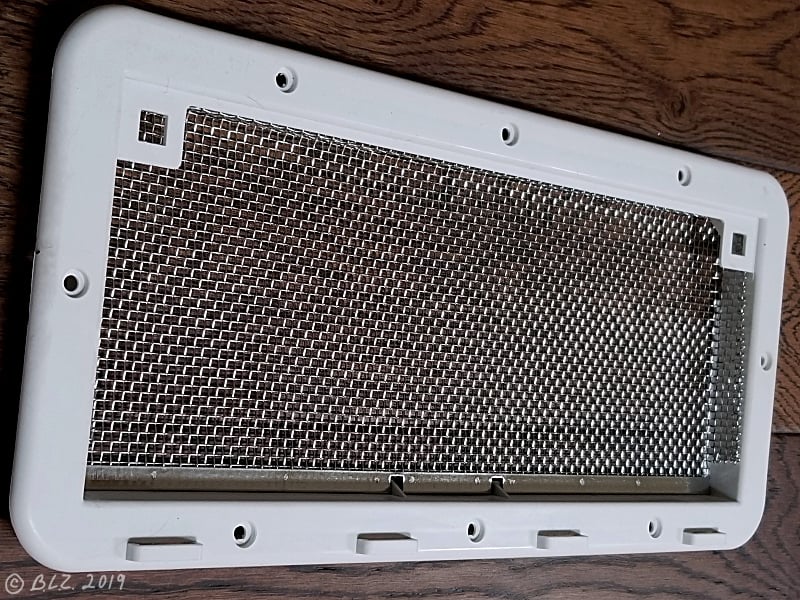
I cut them to this shape, so I could fold in the sides & top (at right) along the black lines to fit the opening..

Arrows indicate slots that fit around support tabs in the plastic housing. I took extra care to fold each cut wire over so the screen would not come apart & to make it a bit less dangerous. Gloves were needed, as the wire is very stiff & metal edges can be sharp as well.
 Here you can see where the pre-cut slots fit around the plastic tabs.
This shows how the finished screen slides up into the top of the vent frame. Note that the inside edge of the frame has a lip around the sides & bottom which supports the folded corner of the screen on the sides & metal edge at bottom and prevents the screen from falling through the opening. So, it is important to get the right width for a snug fit.
I had enough screen material left over from the frig vent to cover the plumbing vent pipe..

Easy to remove the 3 screws & vent cover to expose the end of the pipe.

I first drew a circle on the screen with a marker to match the outer edge of the pipe.

I used needle nose pliers to bend each wire over to prevent unraveling the small piece of screen.

I used a scrap of PVC pipe of the same diameter (1.5" I believe) so I could test fit the screen as I worked on it indoors. Final step was to bend the screen slightly into a concave shape to fit snugly.

The finished job before replacing the plumbing vent cover. This was much easier than the frig vent screens, because the wires are quite stiff, so bending takes time when there are a lot of wires.
Glad that we now have permanent year-round wire screen covers for all of our exterior vents - a few less things to remember for winter storage, plus protection during camping season when the mud daubers are active during summer.
-Brian in Chester, Virginia
TV: 2005 Toyota Sienna LE (3.3L V6)
RV: 2018 T@B 320S, >100 mods
TV: 2005 Toyota Sienna LE (3.3L V6)
RV: 2018 T@B 320S, >100 mods
6
Comments
-
Looks GREAT @BrianZ!2019 T@B 320 S Boondock Lite; 2025 Toyota Tundra CrewMax 4x4
(Alde: 3020; Refrig: Isotherm Cruise 65 Eleg; Battery: BB 100Ah LiFePO4; Solar: Renogy 220W Portable Suitcase w/ Victron SmartSolar MPPT 75/15 Controller; Victron BMV-712 Battery Monitor w/ Shunt; Pwr Cntr: PD-4135KW2B; EMS: PI-HW30C)
Greg & Marlene (Tucson, AZ)0 -
Thanks, @Bayliss.
Just to be clear, I only removed one of the inner frames/housing so that I could easily handle it for fabricating & test fitting the new screens inside of it. Now that it is reinstalled, it is not necessary to remove it in order to remove the screen. I can simply turn the two black release clips on the cover 90° to remove the cover, then pull the screen out from the inner frame.
@lkc001, no, I didn't, but probably will - I've been waiting for warmer weather, but thank you for the reminder - it's on my "to do" list. I just carefully ran the tip of a sharp box cutter knife all around into the middle of the bead of caulk to release it. It was a very tiny bead, so I may just clean it with alcohol & caulk over it, or carefully scrape it out if not in good shape & well adhered.
I'll probably use the same caulk I did around the A/C cover when I repaired that screen & added super magnets for a vent cover (documented somewhere). I like the DAP caulks that allow using a wet finger/rag for cleanup. I think I used the following caulk, because I still have some on hand, and it seems to have worked well..
https://m.lowes.com/pd/DAP-Alex-Flex-10-1-oz-Antique-White-Paintable-Latex-Caulk/1000364645
-Brian in Chester, Virginia
TV: 2005 Toyota Sienna LE (3.3L V6)
RV: 2018 T@B 320S, >100 mods0 -
I performed this mod to the fridge vents, but just used some stainless steel screening I had left over form a screen door repair. Cut to fit and epoxied to the back of the vent covers.TV- '16 Chevy Colorado LT Crew Cab-DuraMax
2018 320S Outback0 -
Thanks @BrianZ for the clarification on how you installed the screen and that it is easily removable. Knowing that, and looking closer at your photos, I am going to reconsider using your idea. It is very clean and I like the stronger screen.2019 T@B 320 S Boondock Lite; 2025 Toyota Tundra CrewMax 4x4
(Alde: 3020; Refrig: Isotherm Cruise 65 Eleg; Battery: BB 100Ah LiFePO4; Solar: Renogy 220W Portable Suitcase w/ Victron SmartSolar MPPT 75/15 Controller; Victron BMV-712 Battery Monitor w/ Shunt; Pwr Cntr: PD-4135KW2B; EMS: PI-HW30C)
Greg & Marlene (Tucson, AZ)0 -
Yes the stiffness of this screen material is what supports it snugly against the sides, and making sharp corners at the bends on the sides helps make it rest against the small plastic ledge that sticks out from each side of the inner frame, to prevent it from falling through. It is easily removable, but otherwise stays in place. Admittedly, the stiffness makes it harder to work with so you can't be in a hurry, but if you are, then a thinner material & some glue may be a better solution for you.
-Brian in Chester, Virginia
TV: 2005 Toyota Sienna LE (3.3L V6)
RV: 2018 T@B 320S, >100 mods0 -
@TabulaRasa If you search for @ChanW’s thread referenced in the first post, the same vent cover he used for the Alde will fit over the tank vent on the driver’s side if you want a quick and easy option. As he did, I used a single screw on the Alde vent to hold the screen in place; same setup works for the tank vent.TabulaRasa said:2019 320s BD Lite, white with blue (“Haven”)
2015 Subaru Outback 3.6r (unsafe 200lb tongue weight limit until 2020 models)
2020 Subaru Outback XT
Pacific NW0 -
Great job, @TabulaRasa, and I like how you were able to make use of the foil tape; although, if you ever needed access, wouldn't you then need to remove the inner frame & recaulk?
Just to clarify what I did, and although it doesn't show well in my finished photos, I never removed the sheet metal frame at the top. I just folded it over to fit, so it could continue to provide extra rigidity to prevent it from bending & falling inside.-Brian in Chester, Virginia
TV: 2005 Toyota Sienna LE (3.3L V6)
RV: 2018 T@B 320S, >100 mods0 -
I took your idea for the fridge vents and made something similar (but a bit less pretty) out of a section of gutter guard.. that stuff was $2.50 for a 3' section.. enough to let me to do the fridge vents.
I got the metal stuff and used tin snips to cut it to size.
Instead of folding I just cut so they kind of wedged in there and stuck two small screws at the top to keep it from pushing inward. Worked fine
going to see about the other vents.. I know the bathroom one has a screen (I was looking at it for a possible place to run a wire).. the round vent.. that was the water tank escape?
~Tananda
2019 T@B 320 S Boondock Edge named "Binky" | TV: 2016 Chevy Colorado Z71 with full tow package and a Leer Cap for lots of storage
I'm New to nuCamp and TearDrops but have owned a Class A in the past0 -
Great idea, @DigitalSorceress. Cheaper is nice & it doesn't need to be pretty, just small enough holes to keep the wasps out. A photo would be interesting to see.
The round vent I showed is the plumbing vent that vents from the gray & black water drains/tanks. Ours did not have any screen. Interesting idea though, to use it for running a cable, which sounds like an original idea. I've never seen or heard of it before, but it seems entirely possible that one could drill a hole into the top of the pipe to run a cable from inside to outside. You'd need an appropriately sized rubber grommet (or caulk) for a tight fit to keep sewer gases out of the cabin. There is potential for running a cell booster antenna above the roof or other type of cable through the trim to the tub, etc.
-Brian in Chester, Virginia
TV: 2005 Toyota Sienna LE (3.3L V6)
RV: 2018 T@B 320S, >100 mods0 -
EDITED FOR PHOTO SIZE - Sharon
I had posted under a separate post, DH’s black/gray flush for the 320. In my version I drilled vent holes in the cover, and epoxied aluminum window screen behind the lid. This hack suits 2 purposes: 1) allows you to fill & flush you G &B tanks with a hose at the dump station & 2) maintains the vent & protects from bug intrusion...

TV- '16 Chevy Colorado LT Crew Cab-DuraMax
2018 320S Outback1 -
Thanks for this reminder, @4ncar. I had seen this great @Dalehelman mod a long time ago, but had forgotten about what a great idea it is. I assume this cover is one that's normally used to cover an outdoor electrical outlet or switch of some kind.
Nice that it allows for screening, and for flushing tanks it would sure save time & effort at the dump station compared to what we are currently doing. (We put water in a 5 Gal jug before leaving the campsite, then after draining tanks at dump station, we pour the water into sink & toilet to flush tanks.)
Maybe will have to add this to my already long list of Helman mods, as it is a great one.
For anyone wondering how flushing works, see this photo by Cincykid which shows the black plumbing vent pipe. I've added arrows to indicate where the pipe forks & connects to pipes coming from gray & black tanks.. I'm not sure how much water would go to the gray versus black tank, but maybe it depends on the force of the stream of water going in. Any opinions on that?
-Brian in Chester, Virginia
TV: 2005 Toyota Sienna LE (3.3L V6)
RV: 2018 T@B 320S, >100 mods0 -
@BrianZ, thanks for adding the arrows to the photo. It really makes it stand out how the venting is connected. I agree that the amount of water pressure will determine how much goes to the gray vs. black tank. It seems to me that flushing the black tank using the vent tube would be fairly ineffective, unless the goal is to merely fill the black tank with water and then drain the full tank to help flush it out. I use a flexible "swivel stick" to clean out my tank (see link below.) Although it can't always be used at a dump station (due to the lack of a good water hose to connect it to), I have found it to be effective and easy to use, especially on the small 320S holding tank. Regardless, the modification is a unique idea and does have some value.
https://www.amazon.com/PS-Camco-Flexible-Swivel-Stick-Holding/dp/B0754JCX3T/ref=sr_1_15?crid=B1FTXBKDSELR&keywords=camco+holding+tank+rinser&qid=1560354916&s=gateway&sprefix=camco+holding+tank%2Caps%2C199&sr=8-15
2019 T@B 320 S Boondock Lite; 2025 Toyota Tundra CrewMax 4x4
(Alde: 3020; Refrig: Isotherm Cruise 65 Eleg; Battery: BB 100Ah LiFePO4; Solar: Renogy 220W Portable Suitcase w/ Victron SmartSolar MPPT 75/15 Controller; Victron BMV-712 Battery Monitor w/ Shunt; Pwr Cntr: PD-4135KW2B; EMS: PI-HW30C)
Greg & Marlene (Tucson, AZ)1 -
@BrianZ yes, water pressure determines which tank gets water. @Bayliss the effectiveness is what you make of it. If you can’t get to use your wand, then this is very effective. This method allows you to: use the hose at the dump station without putting it through the window of the tab(and subsequently into the head, flush black & grey simultaneously. It’s a great mod, I’ve been using it for two years, and have had zero issues with either tank, or sensors. I refill the tanks 2 times, rock the trailer & dump. Easy pereza, lemon squeezy! Besides...who wants a wand floating around the tab or TV...?TV- '16 Chevy Colorado LT Crew Cab-DuraMax
2018 320S Outback2 -
I wouldn't haul that wand any where, It would stay in the garage and get used to loosen up the "Stuff" pretrip and get dumped when I pass the station.
Relax, don't over think it.2009 GMC Canyon, 3.7 liter
2020 320s Boondock lite, With Lots of mods1 -
Thanks again, @4ncar. I looked at a couple of outlet covers for the vent pipe mod, which didn't fit well, before I found Dale Helman's original cover at Lowes..


So, I got it installed yesterday, and I'm happy with the result. I had looked at smaller covers first, but they were not as flexible with limited space for positioning over the pipe, or else the hinge was on the wrong side to function properly. So, I ended up with the same plastic one Dale used. If I had done this a few months ago, I probably would have placed our recently added Peaks Of Otter ("POO") sticker next to this door.
The location of our pipe still required a bit of trimming of the base plate to fit the pipe far enough in the corner to avoid interference with other structures. That Dremel tool comes in handy for so many things.
I removed the old silicone caulk that was under the old cap using a plastic scraper, then wiped off the residue with a rag dampened with paint thinner. I filled the old screw holes with white caulk, and put some on the screw threads, which I reused in the two newly drilled holes, though they are on the inside/dry side of the preinstalled waterproof black foam gasket on the back of the base which seals it all around the edges.
I drilled 1/8" holes along the bottom edge of the base, which should be enough for ventilation while still keeping the mud wasps out.
-Brian in Chester, Virginia
TV: 2005 Toyota Sienna LE (3.3L V6)
RV: 2018 T@B 320S, >100 mods1 -
I'm now wondering if I could have used one of these for a more compact job..
Leisure RV 125V 30 AMP Power Plug Twist Lock Inlet with 3 Stainless Steel Pins, White https://www.amazon.com/dp/B077ZDMY46
It appears that the guts can be removed & one could just use the cover parts & cut away some of the inner round lip at the bottom for ventilation & drill holes on the bottom of the door.
Costs more though.-Brian in Chester, Virginia
TV: 2005 Toyota Sienna LE (3.3L V6)
RV: 2018 T@B 320S, >100 mods0 -
Well, after returning from our last camping trip, we found this at our tank-flushing vent access cover..

The plastic door got ripped off, and the four hinges on the base at right were completely snapped off. We had not been using any sort of lock or clip through the provided lock holes at the bottom left corner, just relying on the built-in plastic tab to hold it shut. It must have gotten worn and vibrated loose, or else we forgot to close it completely. The door can only open to 90 degrees, so at 60+ mph there must have been enough force to snap it right off.
I would have mounted it with the door hinge at left, but there was not enough room. So, now I have fashioned a stiff piece of plastic-coated aluminum wire to fit through the locking holes for extra protection to keep the door shut.
-Brian in Chester, Virginia
TV: 2005 Toyota Sienna LE (3.3L V6)
RV: 2018 T@B 320S, >100 mods0 -
I used those same Camco screens for the fridge vents and using the diagram above cut them down to fit. Now those darn wasps can’t try to make a home in there anymoreNorth Texas
2020 T@B 320 S Boondock Lite, 2020 Chevy Colorado Z71 4wd, V6, Crew Cab, tow package1 -
Another spring project done…cut Camco Flying Insect Screens to fit and tie wrapped to intake and exhaust vents. Come on Mud Daubers…I dare you to try and get in now. 😎 Camco 42148 Flying Insect Screen... https://www.amazon.com/dp/B00192HPOC?ref=ppx_pop_mob_ap_share
2018 TAB 320S
2020 Honda Ridgeline RTL
North Texas
Trips - 50 Mileage - @67k
"Our favorite trip will always be our next one"0 -
I found another spot they seem to like.
 2020 TAB 320 U
TV 2025 Telluride X Type0 -
Wow!
2018 TAB 320S
2020 Honda Ridgeline RTL
North Texas
Trips - 50 Mileage - @67k
"Our favorite trip will always be our next one"0


Categories
- All Categories
- 10 Cirrus Truck Campers
- 121 Dutchman and Vintage TaB Archives
- 3 Forum Rules
- 3 nüCamp & Forum Contacts
- 954 Air Conditioning & Refrigeration
- 2.6K Battery/Electrical & Solar
- 1.2K Camping & Travel
- 142 Events & News
- 219 Factory Comments
- 20 "FOR SALE" - New/Used Trailers
- 14 “FOR SALE" - Camping & Trailer Gear
- 2.4K Heating/Plumbing & Winterizing
- 140 Help - Computer & System
- 920 Introductions
- 407 Looking to purchase a trailer?
- 2.1K Modifications & Upgrades
- 1.4K Products and Accessories
- 408 Service/Maintenance & Recall Notices
- 37 Solo Travelers Hints & Tips
- 1 T@G Forum
- 75 Teardrop Groups & Links
- 77 Testimonials
- 916 Tips & Tricks
- 1.5K Trailer & Towing
- 27 Owners Manuals/PDF Files/Videos & Resources
- 54 üCamp Rally - News & Information