
Categories
- All Categories
- 8 Cirrus Truck Campers
- 116 Dutchman and Vintage TaB Archives
- 3 Forum Rules
- 3 nüCamp & Forum Contacts
- 942 Air Conditioning & Refrigeration
- 2.6K Battery/Electrical & Solar
- 1.2K Camping & Travel
- 142 Events & News
- 219 Factory Comments
- 17 "FOR SALE" - New/Used Trailers
- 14 “FOR SALE" - Camping & Trailer Gear
- 2.3K Heating/Plumbing & Winterizing
- 133 Help - Computer & System
- 914 Introductions
- 407 Looking to purchase a trailer?
- 2.1K Modifications & Upgrades
- 1.4K Products and Accessories
- 395 Service/Maintenance & Recall Notices
- 37 Solo Travelers Hints & Tips
- 1 T@G Forum
- 72 Teardrop Groups & Links
- 77 Testimonials
- 911 Tips & Tricks
- 1.5K Trailer & Towing
- 27 Owners Manuals/PDF Files/Videos & Resources
- 62 üCamp Rally - News & Information
Double-Hinged Seat Back Storage Access Mod
 BrianZ
Member Posts: 1,769
BrianZ
Member Posts: 1,769
Well, I have wanted to do this for a long time, but the examples I had seen were either for a different seat hinge, or the method looked questionable to me or short on details. There have been at least a couple of discussions here..
Then I saw this video by an engineer, Mark, whose design looked pretty solid to me. It required welding, but I was willing to pay a shop to do that..
 https://youtu.be/Tc3e7318hw0
So, I just finished, and here is my result - easy access to that rear storage area - just grab under the middle of the seat back & pull up!..

The seat back raises up from the 40° position to as far as the cabinets above permit, which is enough to rotate our table underneath to hold it up. Our hinged wire shelves over the floor storage bins can still be raised, either before or after lifting the seat back.
Below is the sheet I printed & gave to a local welding shop showing the parts & how they were to be assembled.

I bought two 3-ft flat 3/16 x 1-1/4" steel bars at Lowes, plus two 3" hinges (~$25); and cut them with a hack saw to make two 15-1/2" plus two 7" long pieces, as specified in the video. I used a 1/4" drill bit for steel to make the 6 screw holes in the short pieces, lining up 3 of them with those in the hinges.
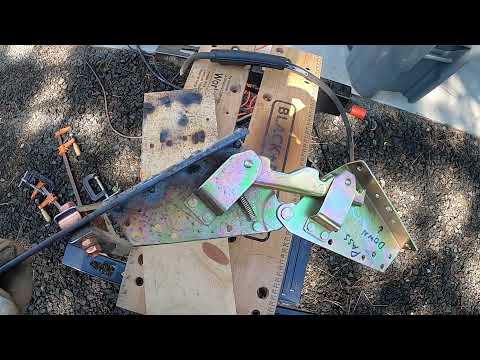
Here is the completed welding job with right & left hinge assemblies, which I spray-painted with a metallic silver rustoleum..

I think they did a great job - ready the same day and took 1-1/2 hrs, for which I paid $80 (more than I expected, but worth the cost IMO).
Here's a closer view of the nice welding job they did..

The only thing they could have done better was lining up the holes with those in the hinges, but close enough - only had to redrill a couple of them just to enlarge a bit.
I was all set to install them, but next was the only "gotcha" that I hadn't expected - the same hinges wouldn't fit back into the same space where they were previously mounted, because the new angle of approach was going to be 90 degrees to the old mounting and there was a wood ledge on the frame in the way, which needed to be removed. See the before & after below..

This became the most time consuming part, because I had to remove many staples from the entire side of the frame in order to retract the upholstery enough to cut the wood. See below..

Before & after trimming wood to leave a notch at the corner of the frame. I used a plunge-cut oscillating multitool to make cuts without damaging upholstery, but one could use a small hand saw, dremel tool, or chisel, and drill out the corner first.
Below shows how the fastened new hinge assembly fits into the newly notched corner of the passenger side seat back after the upholstery had been replaced..

I was also able to use the original screw holes to remount the hinges into the T@B.
Below is the remounted new double hinge in action..

The seat back is only attached at the top. It works great, and is quite solid.
This view shows more what the view is like while actually using it. Easy access now - Hallelujah!

The last time that I looked everywhere else for something that I eventually found in here, it was because this was the last place that I wanted to even try to look. Now, there's nothing stopping me. ")
Below are some of the special tools that were either necessary or handy to make the job easier..
Below are some of the special tools that were either necessary or handy to make the job easier..

The 3" wire wheel brush used on the electric drill was handy for cleaning up the steel bars prior to welding & painting. I forget if that screw-driver looking tool with a claw at the end has a name, but it's very handy for pulling up staples. (staple remover thingy?)
[Edit: Home depot calls it a "Tack Puller".]
I also gave a couple of taps with a hammer to each of the new 3/8" stainless staples after shooting them in. You may also need to have either a vice or pair of screw clamps & work bench to hold the steel bars while cutting, filing, & drilling. Cutting & drilling was easier than I expected, but you need a drill bit made for steel.
I recall reading Dale Helman's ratings of this project's difficulty three different times as either 3, 4, or 5 out of 5. If you're handy with tools, have the patience, and don't mind the cost or can weld it yourself, then I expect this mod will be well worth the effort. I just wish I could have done it sooner.
-Brian in Chester, Virginia
TV: 2005 Toyota Sienna LE (3.3L V6)
RV: 2018 T@B 320S, >100 mods
TV: 2005 Toyota Sienna LE (3.3L V6)
RV: 2018 T@B 320S, >100 mods
Comments
I bought an electric stapler for this job. Totally worth it!
TV: 2005 Toyota Sienna LE (3.3L V6)
RV: 2018 T@B 320S, >100 mods
TV: 2005 Toyota Sienna LE (3.3L V6)
RV: 2018 T@B 320S, >100 mods
Amazon.com: Lheng A Pair Color Zinc Sofa Bed Bedding Furniture Adjustable 3-Position Angle Mechanism Hinge Hardware : Everything Else
These hinges were used for the middle of each back cushion half. They are a lower profile than the 2018 320S hinges so don't poke up as high as the side hinges. Note: the split back cushions as well as the adjoining seat bottoms like over the Alde also need to be modified for clearance of all four hinges. Hundreds and hundreds of staples need to be removed. That is eight places where the upholstery is unstapled and wood removed for hinge clearance. An electric stapler is your friend. I also bought upholstery and backing from Dan - Weaver Upholstery - (name on cushion tag). Dan contacted NuCamp for fabric color match, before shipping. Splitting/sawing the back cushion in two required adding an additional board to the cushion frame with Krieg screws and glue. Extra fabric is required to wrap around the second back for stapling. Plan ahead - measure twice cut once! A @Dalehelman 5 project rating, and more than an all day job. I am not sure the split back was worth the effort. This is why I did not post the split seatback mod.
But the double hinged single back seat is a great mod for access to the abyss. Maybe leave the split back for NuCamp or they make both mods as a standard feature.
Again @BrianZ a great mod and write up. Well done!
Congrats to you though - that is a lot of work. But if you enjoy the satisfaction of figuring it all out, the challenge of doing the work, and get good use out of it, then maybe it is worth doing. Thanks again, and for the new photo too.
PS: "the Abyss", haha, that's a good one!
TV: 2005 Toyota Sienna LE (3.3L V6)
RV: 2018 T@B 320S, >100 mods
TV 2025 Telluride X Type
2023 T@B 320 S Boondock
For your consideration...I did the mod on a split seat w/o doing any welding or notching the seat. Took only a few hours. Works real well and a great mod.
You can see it at the link below about 5 posts back and the attached short video.
What do you consider to be your "Most Valuable" trailer mod? - Page 5 (vanillacommunity.com)
2021 TAB 320 BD (w/new owner having fun)
2021 Jeep Grand Cherokee
Southern Maryland
I'll consider tee-nuts or perhaps rivets depending on how big a project the welding looks to be. I have some other welding projects I'd like to do, so picking up a cheap MIG welder is an option on the table. Looking at Black Friday deals.
I was wondering about the wire shelving I saw in one of the retrofits. It looks like an interesting way to segregate the storage below from the space behind the seatbacks. But I'm not sure if that's something we'll need. Bedding and our awning are what we're putting there now.
2023 T@B 320 S Boondock
2017 F-150
Coeur d'Alene, Idaho
2023 T@B 320 S Boondock
"The only place where you start at the top is when you dig a hole"
You were wondering about the wire shelving installed behind/below the rear seat back. I first learned of it in 2018 where multiple people before me had done this mod, and I subsequently documented all my details, based on the method of @Hymie for the hinges. See here..
https://tab-rv.vanillacommunity.com/discussion/comment/94576/#Comment_94576
These shelves work great along with the double hinged seat back, as we normally roll up our bedding, lift up the seat back from the bottom & just roll it back there on top of the wire shelving. That keeps it separate from the various things we store under there (which tend to be things we don't use as often).
TV: 2005 Toyota Sienna LE (3.3L V6)
RV: 2018 T@B 320S, >100 mods
2023 T@B 320 S Boondock
Ken / 2023 Tab 400 “La Bolita” (31,000+ miles) / 2024 Toyota Sequoia
2020 nuCamp T@B 320S * Jeep Wrangler
60,865 camping miles through the end of 2025
Ken / 2023 Tab 400 “La Bolita” (31,000+ miles) / 2024 Toyota Sequoia
2020 nuCamp T@B 320S * Jeep Wrangler
60,865 camping miles through the end of 2025
2020 V6 Chevy Colorado