Replacing "Board" on Alde 3010

The people at Blue Compass informed me that I need a new board to repair my Alde 3010 but that those boards are no longer available because my T@b is "so" old—2015. To me, 11 years does not seem that old, though I confess I drove a 1929 Model A to high school in the early seventies. Are the boards available somewhere—new or used? Can the average person do it themselves?
Comments
-
Alde replaced the 3010 with the 3020 a couple of years later so it's not really the age of the trailer. In any case have a look at this, you might not need a new PCB:
1 -
Have you contacted Truma in Elkhart, Indiana?
They have a website with an email option to contact them:
or by telephone at 1-855-558-7862, Ext. 1
Scott / 2019 T@B 400 / 2023 Grand Cherokee L Summit / Northern Illinois
1 -
The differences in the boards are probably fairly minor. Skip "blue compass" and talk to Alde directly, or ask someone like Missouri Teardrops to get you a straight answer.
2017 Outback
Towed by 2014 Touareg TDi2 -
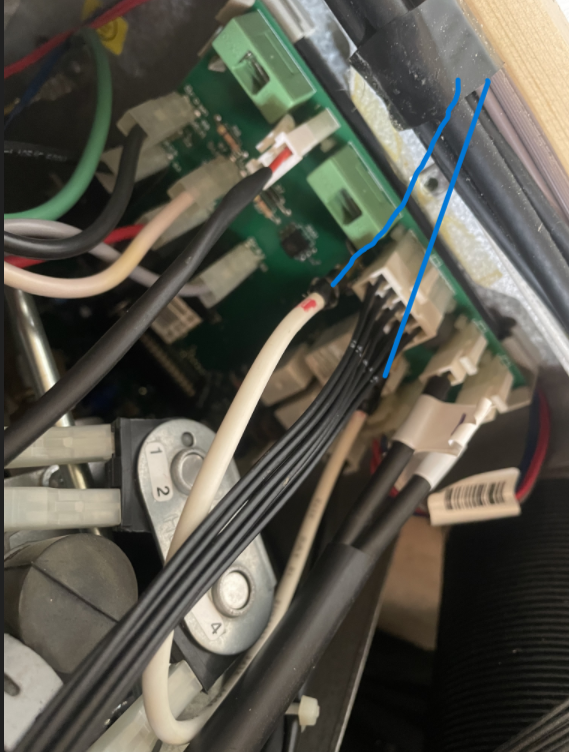
I just did a "Failed Circuit board" repair. It was the thermal fuse. The first thing is to confirm the (replaceable) fuses are good and then check the thermal fuse. do this by putting a temporary jumper from one side of the thermal fuse to the other. an Alligator clip jumper works great just so you can allow the 12v to get from one side of the fuse to the other. If you install the jumper and the unit fires up, you found your culprit. As this fuse is a safety device, remember jumpering is only a troubleshooting step, not a permanent solution. (in the below photo, The jumper is the white wire loop with the 2 light blue mark-up lines coming off it) To further my repair, I actually mounted Circuit board mount style screw terminals in the place where the old fuse was, and connected the thermal fuse to the screw terminals. I did this for 2 reasons. Soldering a thermal fuse is hard….the heat from the soldering iron can ruin the fuse, and like some had said, if I'm camping, not likely to have a soldering iron in my tool kit (I do carry the alligator jumper though) in the future, as others have stated, make sure the ALDE is not getting power hits as the camper is plugged in to the Tow Vehicle, Shore Power etc. The way I look at it is every time the 12v converter comes on line, it has the potential to send a surge to downstream components. I took the 12v line going to the ALDE and installed a 2 pole switch in the cabin. The ALDE is switched off until power is stable and I am ready to energize it.
 2
2 -
@RollinWithShirley While looking for the several discussions on the "thermal fuse", I found a long thread about that subject, which also happens to have some good instructions for removing and replacing the board, if that is what you need to do.
Alde Thermal Fuse Replacement and Board Removal, etc
@madisontadpole In that thread above, there are several approaches about making a "better" fuse setup without having to solder to the board. Can you tell us more about the screw terminals you used? I would like to add that info to the above thread. Thanks for the good info!
Towed by 2014 Touareg TDi0 -
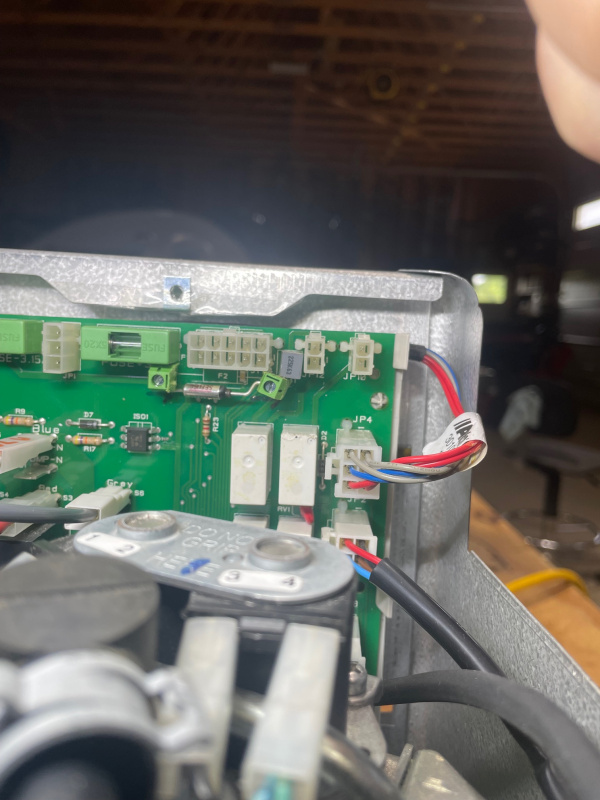
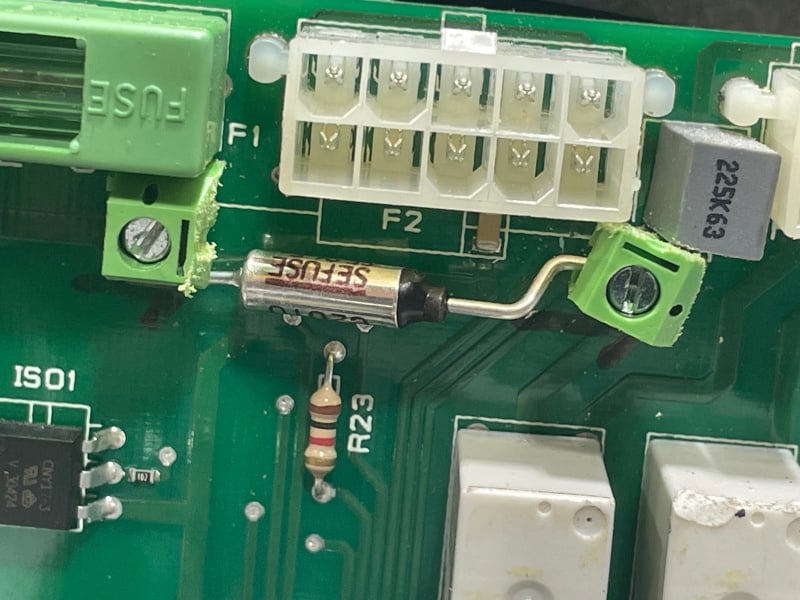
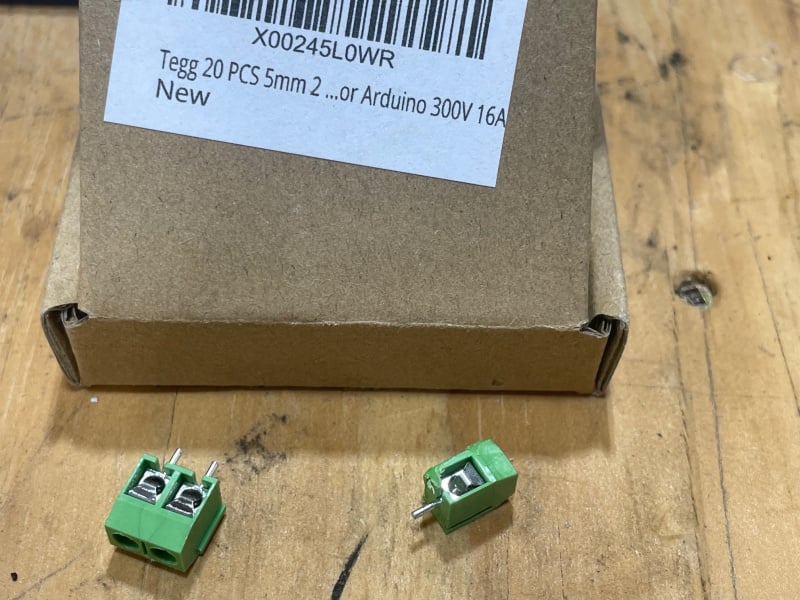
Below is what I ended up doing. It was a one time solder to install the terminals, but once done, future replacements will be solder free. For anyone attempting this you will need a good soldering iron, good electronics solder, and a "solder sucker" for disassembly. Some of the things used were based on what I could find conveniently (amazon) knowing I had the tools and skills to modify. The first 2 photo's show the new thermal fuse screw terminals installed. The 3rd photo show the components used, and the last photo is what I found most frustrating about the whole project…In The steps were to remove the PCP, unsolder the bad thermal fuse and use the solder sucker to remove remaining solder from the PCB. In photo 3 you will see the screw terminals I bought from Amazon. it was a 2 pole terminal block that I took to the benchtop sander and sanded off 1/2 of it to leave a single pole terminal. The photo shows as it came, the box label, and the modified unit. To mount the left side terminal, there was plenty of room and an easy drop in replacement. On the right side, I ended up extending the leg of of the terminal about 1/2" (by soldering a piece of wire to it) to allow a little wiggle room to reach the contact hole and avoid the adjacent components. Both left and right were through-hole soldered from the back side of the PCB. Please note that the left terminal faces down, and the right terminal faces inward. this allowed for a "Z" shape in the leads of the fuse legs to be "stretched" and placed into the position with a needle nose pliers, but primarily, on the right side, that is the orientation that fit best. it was a tight fit with the gray component directly above.
So a quick note, the worst part of the job for me was getting the PCB removed. Photo 4 shows a hex bolt on the far left side of the PCB. it is used to mechanically hold-down the PCB to the case and would assume ground contact as well. The original fastener was a recessed allen head screw that was an absolute pain to get out with standard hand tools. I could get one in there, but the handle had to be the absolute correct length, or you could only loosen a fraction of turn at a time. A quick trip to ACE, for a metric hex bolt matching length and thread, and threw that allen head away. Now with standard metric socket and extensions it is much easier…
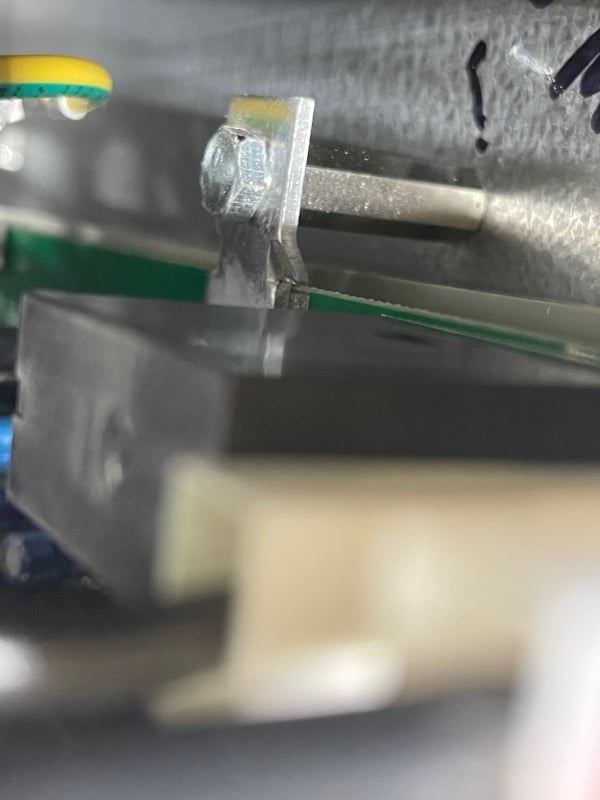 1
1 -
I have not had to try this “bush fix” but someone on this forum made a temporary “jumper by pass” for their thermal fuse that burned out while on vacation. They said it worked fine while camping and was able to make a permanent fix when returned home. I have this one made up just in case I need it while camping.
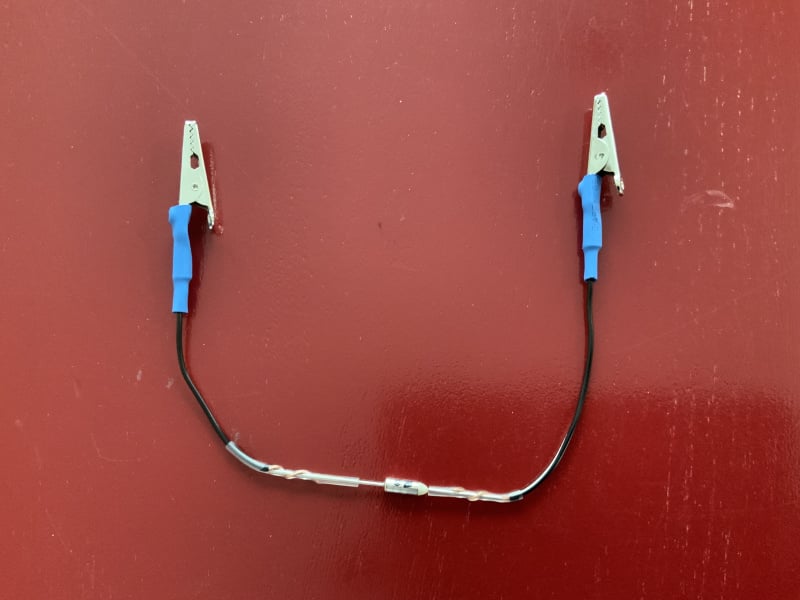 2020 TAB 320 U
TV 2025 Telluride X Type0 -
I ordered and received the thermo fuses from digikey. I am nervous about soldering them onto the control board and don't know how to find someone that might do that for me. But I wondered if I might solder one of the fuses to alligator clips on either end and bypass my current fuse following the jumper bypass example in this post.
0 -
I'm gonna probably give more questions than answers. Thing #1 …have you confirmed the ALDE works when you use a simple temporary jumper around the thermal fuse? if you have proved the thermal fuse is faulty: You are right to be concerned with soldering a thermal fuse…It's very nature is to "blow" when it gets hot. Soldering as a process uses extreme heat. As I was messing around with my fix, I tired soldering a thermal fuse "just for fun" and triggered it. That is one of the reasons I went to the screw terminal. Here is the big question. (hopefully big brain folks can chime in) What is the thermal fuse designed to protect in everyday operation, does it trip because the ambient temperature of the PCB exceeds the set level, or does it trip because the current/resistance through the thermal fuse cause the component to trip. If the safety trip is for ambient temperature, I would be concerned that the bush fix is not a good long term solution as the dangling wires get the thermal fuse too far away and not in direct contact with the PCB to accurately monitor PCB temperature. If it's protection is supposed to trip due to current/resistance, I would feel a little better about the bush fix. If you look at the bush fix device, it appears no soldering has taken place, it looks like the wire from the alligator clip was wrapped around the legs of the thermal fuse and clear heat shrink holds it in place. If I were you, I would look for PCB repair services in your local area. (google PCB repair near me) Take them the board and the fuses from digitikey and have them do it. Here is one close to me in Greenville, SC. https://circuitboardmedics.com/ hopefully you can find similar.
0 -
I
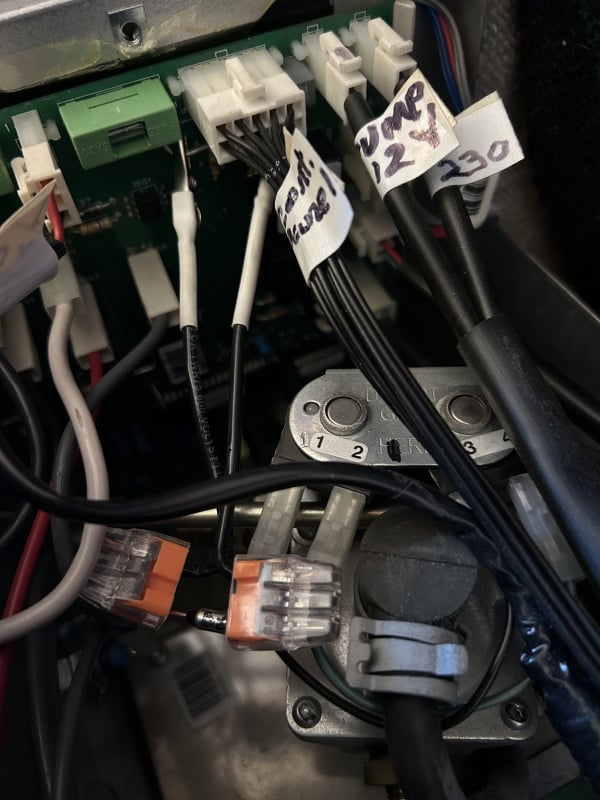
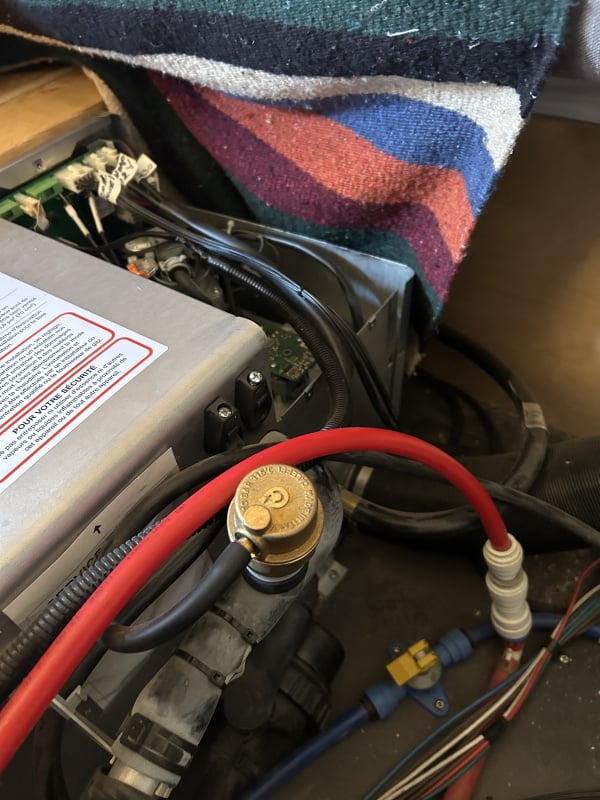
Happy Father's Day everyone. I rigged up a jumper to see if it would get the Alde going. After leaving it overnight still no heat is circulating. None of the rubber tubes coming out of the heater have warmed up, but the brass piece showed in the photo is hot. So it seems that the heater is going but not pumping. Does that mean that the jumper bypass is doing the job and the thermo fuse was bad? Is there some other obvious reason that the pump is not going?
0 -
The brass fitting is the "Auto Air Bleed Valve". If that is hot, then yes, the Alde is working. We haven't asked what year your trailer is: but, if you have the touchscreen Alde panel, you can find the "Service Menu" and it will tell you the glycol temperature, which will give even more proof.
The glycol pump starts when the Alde thermostat "calls for heat". The "requested temperature" you ask for has to be higher than the temp inside the trailer, and the Alde thermostat's opinion of the temperature inside the trailer can be quite a bit off. So, try increasing the requested temperature and see if that starts the pump going.
On my trailer in a warm state, to test my Alde pump, etc in the summer I use an ice pack on the shower wall behind the Alde screen to trick the thermostat. (The thermostat is a tiny part on the control panel board).
Towed by 2014 Touareg TDi0 -
That is encouraging! My T@b is a 2015 so I have don't have a touch screencontrol. I have the dial turned all the way up. Any idea where I would have to put the icepack on an older model? My next trip is to the high country, so I might just install the jumper bypass when I get there and see if the heater pump will come on when the temperature drops at night.
0 -
The low temperature in Colorado Springs last night was 57 degrees.
0 -
Show us your manual panel settings. If the Auto Air Bleed Valve is warm, that means the Alde is working. On my 2017, the control panel is on the wall behind the shower. I placed the ice pack on the wall in the shower. I would suppose if you had a good way to make sure no moisture managed to get to the panel, it would work on the panel itself, also.
Towed by 2014 Touareg TDi0 -
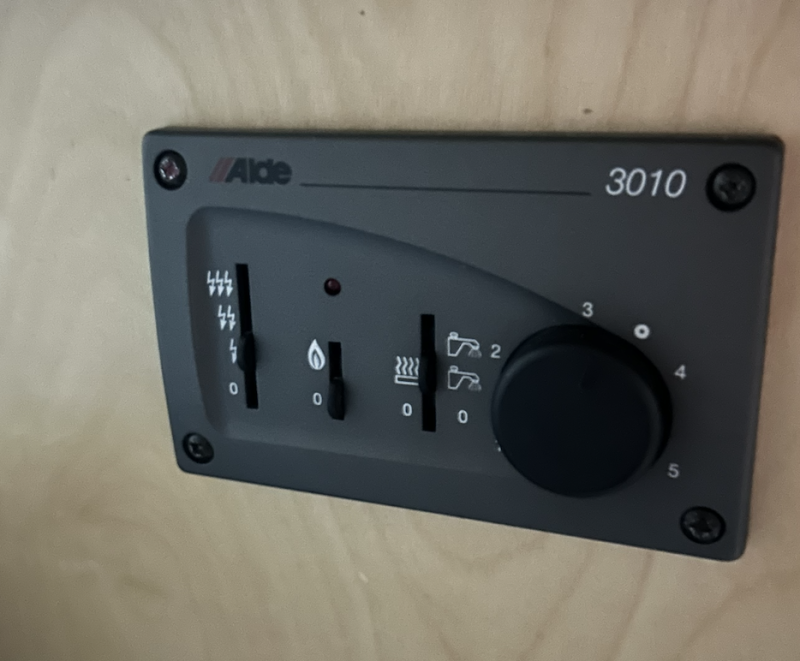
This is my control panel. It seems that the temperature sensor may be behind the temperature dial.
0 -
I have the same panel and I believe you are correct. I had to trick mine into starting once by blowing cold air over it.
2015 T@B Max S (320)
2015 Nissan Frontier SV V6 4x40


 2017 Outback
Categories
- All Categories
- 11 Cirrus Truck Campers
- 128 Dutchman and Vintage TaB Archives
- 3 Forum Rules
- 3 nüCamp & Forum Contacts
- 969 Air Conditioning & Refrigeration
- 2.7K Battery/Electrical & Solar
- 1.2K Camping & Travel
- 145 Events & News
- 220 Factory Comments
- 26 "FOR SALE" - New/Used Trailers
- 15 “FOR SALE" - Camping & Trailer Gear
- 2.4K Heating/Plumbing & Winterizing
- 138 Help - Computer & System
- 925 Introductions
- 408 Looking to purchase a trailer?
- 2.2K Modifications & Upgrades
- 1.4K Products and Accessories
- 421 Service/Maintenance & Recall Notices
- 37 Solo Travelers Hints & Tips
- 1 T@G Forum
- 78 Teardrop Groups & Links
- 78 Testimonials
- 922 Tips & Tricks
- 1.5K Trailer & Towing
- 27 Owners Manuals/PDF Files/Videos & Resources
- 56 üCamp Rally - News & Information