New T@B 320s Fuse Issue on Circuit 4 (10A versus 7.5A)

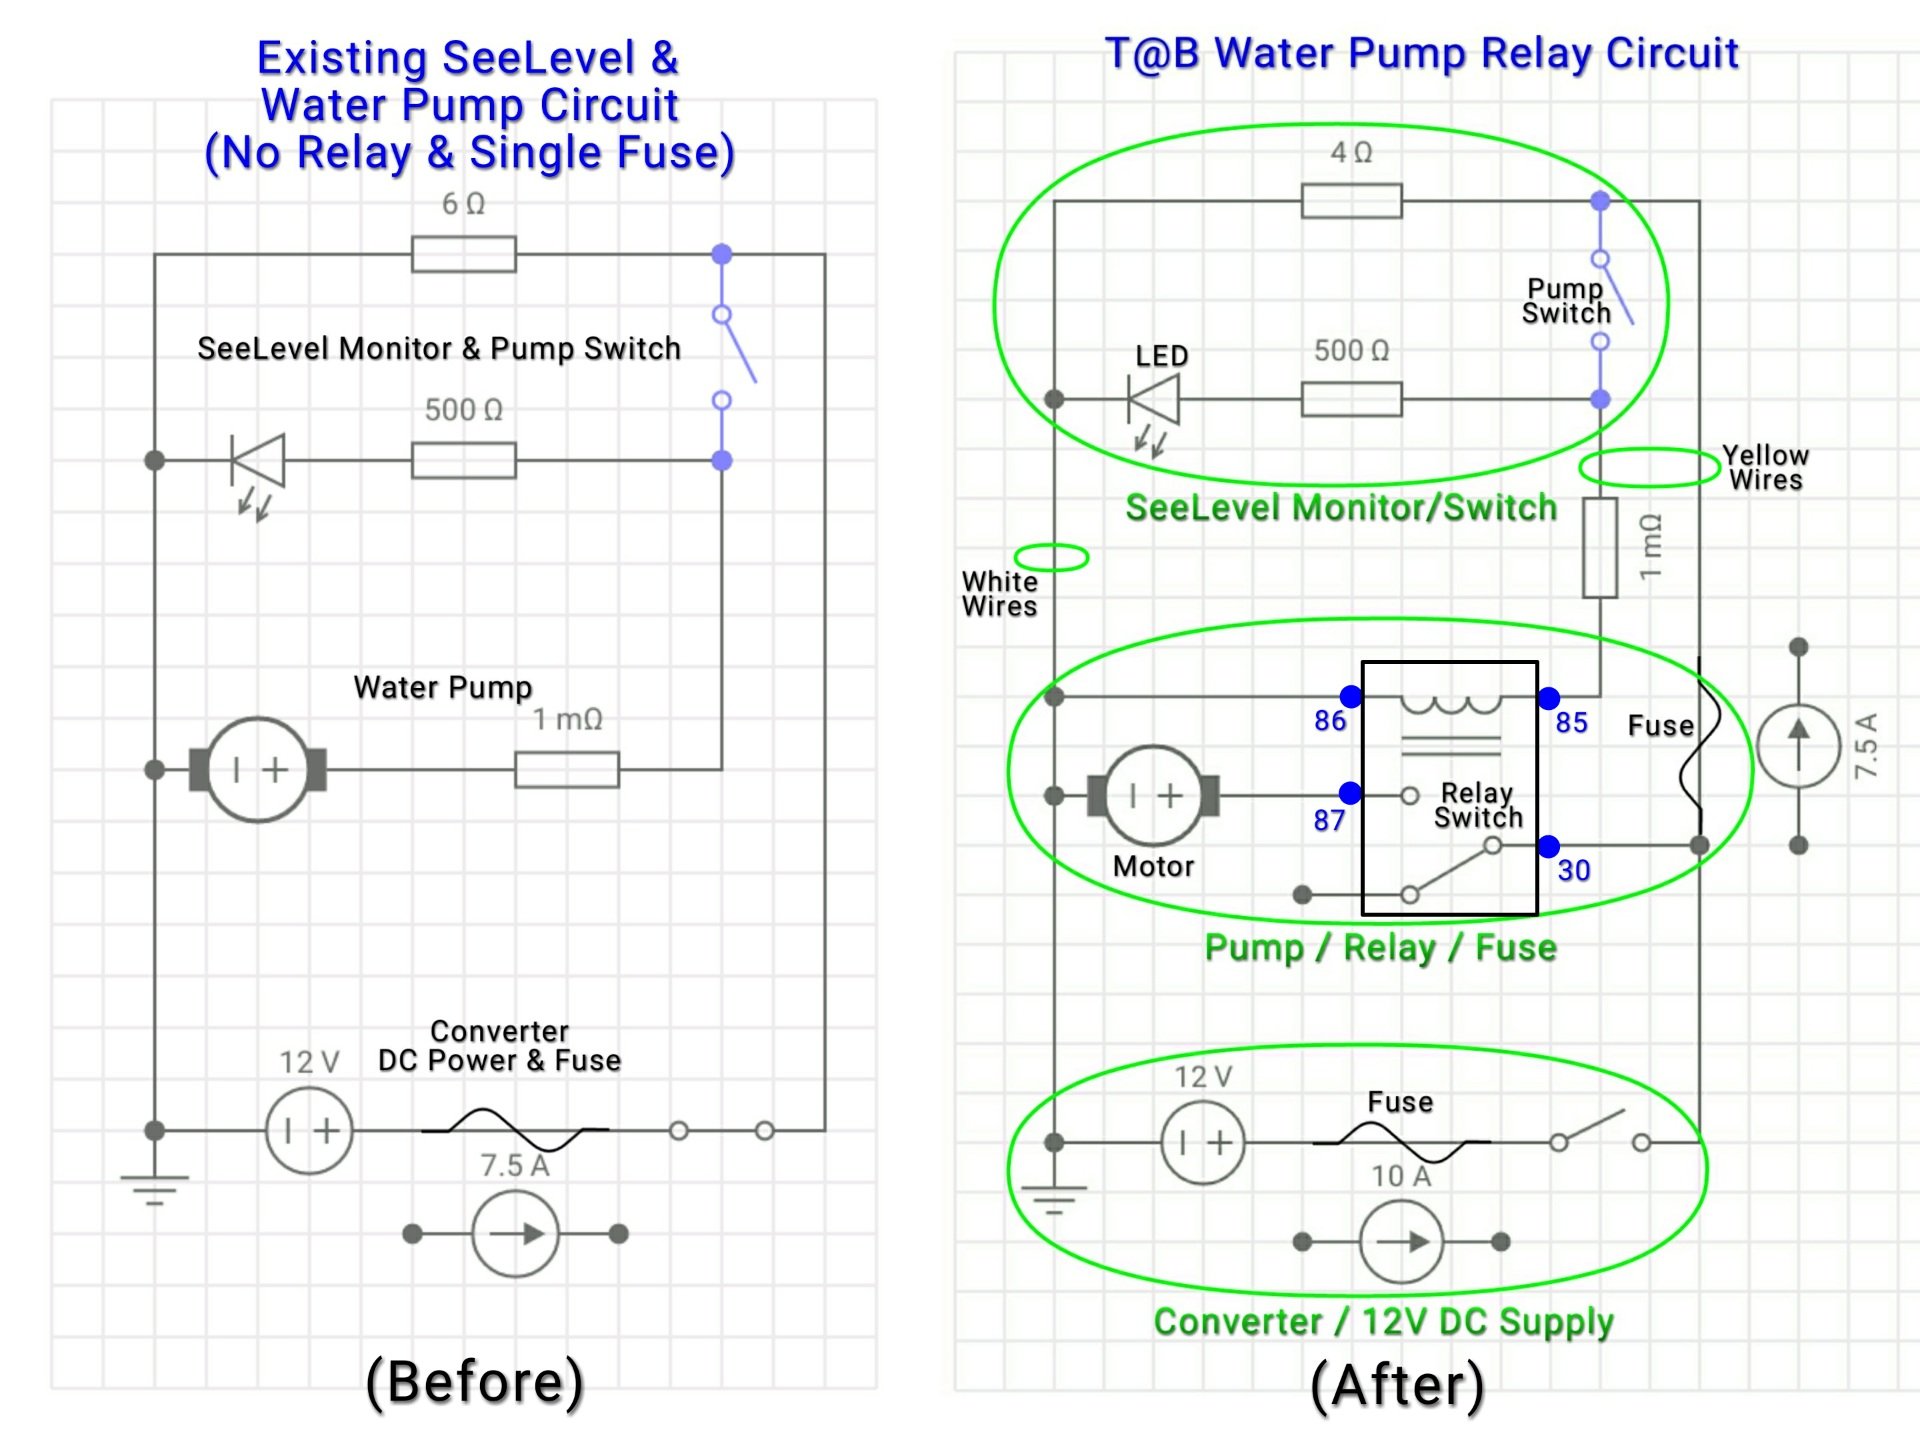
We & our cousins each recently bought the exact same 2018 T@B at the same time from the same dealer.  We're very happy campers so far, but we noticed that ours has a 10A fuse in circuit 4, while theirs came with a 7.5A fuse.  Since this circuit supplies both the SeeLevel monitor and the water pump, I referred to the literature for each (see photo of those pages attached).  Both state that since the water pump requires 10 Amps minimum while the SeeLevel pump switch is limited to 7.5 Amps, this situation requires the installer to use a relay switch to handle the pump's higher current & to protect the SeeLevel display from permanent damage.

When I contacted NuCamp RV about this, I was told that they had recently switched from installing 10A fuses to 7.5A, and that ours must have been built before the change.  While that may be the safest route to avoid damage to the components as installed, it does not appear to be the proper fix to resolve the problem, since the water pump literature recommends a 15A switch & a 10A fuse at minimum. It seems clear that the proper solution would be to install the required relay.  Not doing so would invite problems with the water pump blowing 7.5A fuses.  Moreover, our display has already been running with a 10A fuse, so what if our display starts having problems?

In any case, since we were not notified about this, I'm posting here to let others know, and I'm curious what others think should be done to resolve the situation.  I have seen 12V/20A relays available for less than $10, and with an added inline fuse plus the relay to protect the SeeLevel switch/display, this could be readily corrected at minimal cost.  It seems to me that a product recall notice should be issued & covered under warranty, but if NuCamp won't do it, then what good is the warranty?  I could do it myself.


-Brian in Chester, Virginia
TV: 2005 Toyota Sienna LE (3.3L V6)
RV: 2018 T@B 320S, >100 mods 

Comments

  • BrianZBrianZ Member Posts: 1,763
    PS:  Interesting that the pump label states 7.5A max, yet lists a 10A fuse; but the literature requires a 10A circuit.  I believe the T@B manual says the pump uses 7.5 Amps when flowing freely, so maybe the "Max" means at max flow?  Maybe the pump uses more current when there is greater resistance to flow.


    -Brian in Chester, Virginia
    TV: 2005 Toyota Sienna LE (3.3L V6)
    RV: 2018 T@B 320S, >100 mods 
  • rfuss928rfuss928 Member Posts: 909
    You would not want the fuse to blow just because the pump was running at its rated max.  10A sounds about right for reacting to an apparent problem clearly outside intended operating parameters.
     
    I do not know about the SeeLevel but understand it is a tank level monitor.  I don't think it is controlling the pump??


  • BrianZBrianZ Member Posts: 1,763
    Thanks, Bob, I agree 10A seems appropriate for the pump, but not for the switch.  As noted in the SeeLevel II manual page I posted, it does include a pump switch.  Here's what it looks like..
    -Brian in Chester, Virginia
    TV: 2005 Toyota Sienna LE (3.3L V6)
    RV: 2018 T@B 320S, >100 mods 
  • Michigan_MikeMichigan_Mike Member Posts: 2,861
    edited October 2017
    I agree with RFuss and believe that the 10A fuse should suffice for the pump and my SLll system has a separate fuse to protect it too.  I installed the SL ll system in my 2015 T@B Max S, have been using it for about a year now ( we use the shower frequently, pump water, etc.) and have not experienced any operating issues or blown fuses.  

    And as noted, the tank monitor system is just monitoring the fluid level in the B/G 7 FW tanks and it's done via the 3 computer circuit boards ( one board per tank) and there really isn't any load or stress on that system.  If your set-up has a 7.5 A fuse installed, should a short-circuit situation or loading problem arise the fuse is going to blow quicker than the 10 A fuse, so you should be fine.  

    I don't personally see this as a recall issue (I'm certain nuCamp would act accordingly if it were an issue) and if there were operational problems or glaring or inherent defects via faulty workmanship, circuit overloads, etc. this would have surfaced by now as the SL ll system has been in use for over two years now.   I have seen a few bad circuit boards over the last few years and the factory did replace them, but can't say authoritatively that this is linked to the fusing issue you discuss above.  
    Mike - Elmira, Mi / 2019 T@B 400 / 2021 Chevy Silverado LTZ
  • BrianZBrianZ Member Posts: 1,763
    Disagree, Michigan_Mike - a 10A fuse is what the pump requires, but the SL-II specifically requires an inline 7.5A fuse and a relay to allow the pump to still use the 10A fuse.  Not only does the SL-II manual warn about damage to the display, but NuCamp switched to installing 7.5A fuses on the circuit.  See here what the SL-II manual says.  It's pretty clear that the proper solution is installing a relay with an inline 7.5A fuse on the pump switch to activate the relay, with a 10A fuse on the circuit.  That's the only solution that satisfies both manufacturers requirements.  


    -Brian in Chester, Virginia
    TV: 2005 Toyota Sienna LE (3.3L V6)
    RV: 2018 T@B 320S, >100 mods 
  • ScottGScottG Administrator Posts: 5,395
    There's no danger in protecting a heavier circuit with a smaller fuse, it just means you won't be able to utilize that circuit to its maximum capacity.

    In this case, it's only a problem if the pump actually draws more that the 7.5A max that it is rated for. While a 10A supply would provide a bit of wiggle room, for all practical purposes it may not be necessary. If the installed pump works fine and doesn't blow 7.5A fuses, than all is well.

    The opposite is not true. Putting a larger fuse on a lighter circuit risks overheating the wires and damaging sensitive components. Presumably, this is why nuCamp made the switch to the the lighter fuse required to protect the pump switch and SE II display. Presumably, they also tested the pump thoroughly to ensure that the 7.5A feed would be adequate.

    I'm not saying that simply swapping out the fuse was the most thorough solution, but it may be perfectly adequate in this situation. Ultimately nuCamp will make that decision once more evidence is available.  
    2015 T@B S
  • BrianZBrianZ Member Posts: 1,763
    I think you summed things up pretty well, ScottG.  Using a 7.5A fuse would avoid safety concerns from a fire protection standpoint, but I would expect it raises the likelihood of having the pump blow fuses.  This may not be a problem for many, and I suspect most people use pressurized water hookups anyway. 

    However, those who received their T@B with a 10A fuse installed, like we did, could have an overheating issue according to the SeeLevel II manufacturer when using the SL-II pump switch.  And the pump manufacturer also states "minimum power requirement is a 10 Amp circuit", and "A 15-Amp switch is recommended".  So that still seems to present a dilemma.

    I have already replaced my 10A fuse in the converter circuit #4 with a 7.5A one for safety, but personally I would prefer to be thorough, so at some point I would like to install the relay switch that both manufacturers seem to require.  I hope Nucamp decides to implement a relay fix themselves, but even if they don't think it's necessary, it would be nice to receive their blessing to do the modification myself.

    It would be interesting to hear whether any other T@B owners have a 10A fuse in circuit #4, or if anyone who frequently uses the water tank & pump with a 7.5A fuse in circuit #4 have had any pproblems with fuses blowing.

    -Brian in Chester, Virginia
    TV: 2005 Toyota Sienna LE (3.3L V6)
    RV: 2018 T@B 320S, >100 mods 
  • ScottGScottG Administrator Posts: 5,395
    Yep, this is certainly the place to compare note with others. I'm not sure how many 2018s are in circulation at this point, nor am I sure if that particular SE II/pump configuration was used in earlier models with tank monitors. There might still be a limited number of owners for whom this is relevant.

    Mine is a 2015 and I check the water level by looking underneath with a flashlight.  :-)
    2015 T@B S
  • BrianZBrianZ Member Posts: 1,763
    Sure glad we don't have to crawl underneath to check levels!  Good point that there may be a limited number with this configuration, but hope to hear from some..

    After looking more closely at wiring to the water pump, I used a photo of the wires & a relay switch available from Amazon to sketch this plan for how the relay could be wired in, along with an inline fuse holder to accomplish what the SeeLevel & pump manufacturers recommend.

    This looks a bit busy, but there were basically two yellow supply wires I found, one going up to the SL & another returning from the SL switch going to the pump.  A fuse holder with 7.5A fuse would be wired into the supply wire to protect the SL, and spliced in before that a new wire would be added for supplying 10A pump power via the relay switch (with 10A fuse in circuit #4 at the converter).  The wire coming from the pump switch would be used to activate the relay coil to let power flow through its contacts to the pump.  The coil would only draw about 100 milliamps through the SL switch, so no more problem with high current there.


    -Brian in Chester, Virginia
    TV: 2005 Toyota Sienna LE (3.3L V6)
    RV: 2018 T@B 320S, >100 mods 
  • Sharon_is_SAMSharon_is_SAM Administrator Posts: 9,460
    Our 2017 CSS also has a 10 Amp fuse in circuit 4.
    Sharon / 2017 T@B CSS / 2015 Toyota Sienna Minivan / Westlake, Ohio
  • BrianZBrianZ Member Posts: 1,763
    Thanks for sharing that, SAM.  Good to know we were not the only ones, but thinking you should probably change it to a 7.5A, or ask NuCamp what they recommend.
    -Brian in Chester, Virginia
    TV: 2005 Toyota Sienna LE (3.3L V6)
    RV: 2018 T@B 320S, >100 mods 
  • BrianZBrianZ Member Posts: 1,763
    edited November 2017
    Ok, so I went ahead & installed the relay switch (in center of photo) as described in my previous post.  Works great!  And by that, I mean the pump works the same as before, from the SeeLevel switch, but now there is a 7.5 Amp fuse holder (in large red wire at right) protecting the SeeLevel display, and circuit #4 now has a 10 Amp fuse in the power converter, so the pump can operate up to 10A & the SeeLevel up to 7.5A, so both manufacturer's requirements are satisfied.  And so am I.   :)

    The relay is water-resistant, and the spade connectors crimped on the ends of wires attached to the relay & other junctions are all protected by heat-shrink tubing.  I used a zip-tie to secure the fuse holder to the drain pipe where it would be convenient to access.  This relay switch arrangement was not my idea, but is recommended/required by both the SeeLevel & the Shurflo pump manufacturers.


    PS:
    The relay works by receiving a voltage signal on the yellow wire coming from the SeeLevel pump switch whenever it's turned on, and passes only a small current (~100 milliamps) through that half of its circuit & out the white ground wire.  This current activates a relay coil that closes a switch between the second pair of terminals, thereby connecting the two red wires supplying power to the pump.  The red wire coming from the converter supplies current up to the 10A converter fuse limit, which then flows through the pump & out it's black/white ground wire.  

    Thus, the coil isolates the lower current in the SeeLevel by creating a separate branch circuit from that of the pump's higher current branch, while still being able to control the pump branch.  So, you have a switch controlling a second switch, hence a "relay".  The main contacts on this particular relay switch are rated for up to 30-40 amps.  One must choose a relay rated for the proper DC voltage & current.  The relay switch is operating in the "normally open" mode, and there is a 5th unused terminal in the center which is provided for use in other circuits where the controlled circuit is "normally closed" (turned on).

    The two ground wires (black from pump & white from relay) are spliced together for return to the power supply ground.  The 10A red power wire at the relay is spliced into the yellow 10A circuit #4 wire (not shown) coming from the converter which also supplies the red line to the 7.5A fuse holder going to the SeeLevel monitor/switch.

    -Brian in Chester, Virginia
    TV: 2005 Toyota Sienna LE (3.3L V6)
    RV: 2018 T@B 320S, >100 mods 
  • BrianZBrianZ Member Posts: 1,763
    Forgot to add that I recently came across this spec sheet on the water pump manufacturer's site...

    http://shurflo.com/images/files/RV_Product_Data_Sheets/Fresh_Water_Pumps/pds-4008-101-X65.pdf

    There is a graph there on the second page which shows the pump draws a peak of 6.8 Amps of current at 50 psi.  I was a little surprised to see it was that low, but I can now understand why NuCamp may have decided to simply change from using a 10A to a 7.5A fuse on circuit #4, rather than adopt the added expense of installing a relay. 

    I think a relay is ideal in this situation, as the difference of only 0.7 amps is not much of a buffer zone.  However, if  testing were to show that the pump rarely reaches 7.5 amps, then maybe that is the most economical, if not practical solution for the majority.  However, given that anything over 7.5A could damage the SeeLevel display, some required protection would have be missing in those cases where 10A fuses were installed for the circuit.

    -Brian in Chester, Virginia
    TV: 2005 Toyota Sienna LE (3.3L V6)
    RV: 2018 T@B 320S, >100 mods 
  • BrianZBrianZ Member Posts: 1,763
    edited January 2018
    Because my wiring photo/sketch above is very busy looking, I wanted to provide a circuit diagram for this mod to clarify exactly how things are connected.  I used a circuit simulator app on my phone to create the following "Before & After" diagrams which show the existing wiring compared with the wiring after adding a relay switch and secondary fuse & holder.  Also, the animated circuit diagrams below show the flow of electrical current to illustrate what's happens in each case when the SeeLevel pump switch is turned on.


    Below is the existing circuit flow, with the SeeLevel switch providing power directly to the pump from circuit #4, with a 7.5A fuse in the converter.  Note that the total current flow is below the 7.5A fuse limit, because I set the component parameters to limit current, where normally the pump would use more current at full water pressure (and possibly less in the SeeLevel).


    And below is a simulation of the current flow in the modified circuit with the relay switch.  Note that the line from the SeeLevel switch that previously fed power to drive the pump motor now only passes a small current (about a tenth of an Amp) to turn on the relay switch.  The pump motor now receives full power directly from the converter power line & fuse, for up to a total of 10 Amps of current on the circuit.  Thus, the higher pump current is isolated from the more sensitive SeeLevel electronics. 
    The higher pump current in this simulation also would have blown the old 7.5A fuse in the converter, but since it's been replaced by a 10A fuse, there is no problem.

    I hope these new diagrams will make all the connections clear for those who might want to do this mod, or even if you just want to visualize the purpose of adding the relay.
    -Brian in Chester, Virginia
    TV: 2005 Toyota Sienna LE (3.3L V6)
    RV: 2018 T@B 320S, >100 mods 
  • BeenieBeenie Member Posts: 21
    Hi All! 

    I have a 2018 320-S-CS and just this weekend noted two things: the pipe next to the water pump hand come loose and the shoreline power was tripping. That’s as far as I got before coming home. Taking a look at it today.

    Beenie
  • BeenieBeenie Member Posts: 21
    Brian Z

    where did you get the relay?

    Beenie
  • BrianZBrianZ Member Posts: 1,763
    edited October 2021
    Well, @Beenie, that was 4 years ago, but I looked up my order on Amazon..

    Unfortunately, this exact part doesn't show now, but the link leads to a bunch of similar relay switches..
    Nilight 50003R Automotive Set 5-Pin 30/40A 12V SPDT with Interlocking Relay Socket and Wiring Harness-5 Pack, 2 Years Warranty https://www.amazon.com/dp/B0748F1JK4
    Another waterproof one is listed, and I wanted that since I mounted it near plumbing parts.
    Imagine that - you managed to find my very first mod out of over 90 that I've made to our T@B!  I guess I got a little carried away with my circuit diagrams, but it was fun.
    Did you think the problems you reported here were somehow related to this topic?  If not, and you need help, then you may want to start a new topic about your issue with more details to get more advice. 
    Good luck & let me know if you have any more questions about the relay.
    -Brian in Chester, Virginia
    TV: 2005 Toyota Sienna LE (3.3L V6)
    RV: 2018 T@B 320S, >100 mods 
  • MarkAlMarkAl Member Posts: 455
    I love this thread, the switch rating is generally only an issue if the current is greater when the switch is opened or closed (arcing) rarely for constant current so the motor must be overloaded but the fuse didn't blow.  So I suggest 30 angels on the head of this pin.... But the analysis is very insightful, my thought is practically the relay fix is not needed but is better for design rigor.  Having added a headlight relay for a similar need on my old Jeep to eliminate the panel switch resistance from arcing and wiring length I can appreciate this discussion.
    Snohomish WA, 2015 Diesel Grand Cherokee
    Sm@ll World: 2021 320S Boondock, 6V Pb-acid
    Shunt, Roof & Remote solar & 30A DC-DC Chargers
    managed by VE Smart Network
  • BrianZBrianZ Member Posts: 1,763
    edited October 2021
    I'd like to add that we've never had any issues for 4 years now with this relay circuit for either the pump or the SeeLevel pump switch/display, and have never had to replace either fuse; though I acknowledge that there may be plenty of others without a relay switch who can say the same.  An ounce of prevention is always nice, but a pound works too.  ;)
    -Brian in Chester, Virginia
    TV: 2005 Toyota Sienna LE (3.3L V6)
    RV: 2018 T@B 320S, >100 mods 
  • ChanWChanW Member Posts: 3,158
    @BrianZ, I missed this 4 years ago. Nice work.

    That's the best use of animated gif I've seen! Pretty slick.
    Thanks for putting it together for us.
    Chan  -  near Buffalo NY
    2014 S Maxx
    2011 Tacoma 4cyl ... edit: 2022 Tacoma 6cyl - oh yeah! 

     A_Little_T@b'll_Do_Ya
Sign In or Register to comment.