Water damage in Alde compartment

Over the last several weeks, we've had some seriously heavy wind and rain storms moving through, today was the first time I've gotten back to our camper to check on it since the storms. The interior of the camper felt "dry," although the DampRid bucket on the floor in the bath is ready for replacement.
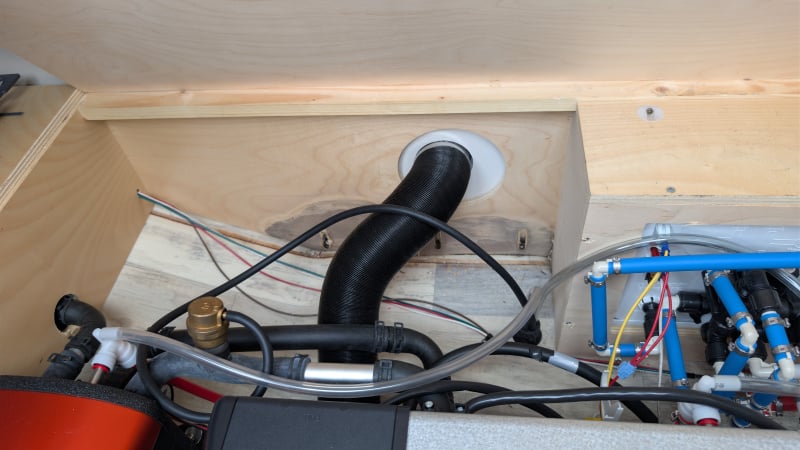
I also checked the Alde compartment and saw water damage on the lower edge of the plywood under the furnace / hot ware vent. I did check it, the plywood is dry (now,) but you can feel how several layers of the plywood have separated.
My questions are:
- How much trouble are we in with this damage? The outside of the camper felt "solid" and there's still "solid" plywood behind the damage (it did NOT feel completely "spongy" or soft, push in about 1/8" or so and it felt solid)
- What's the best way to go about repairing this damage?
- Any suggestions on preventing such incursion in the future? Or would we be better off leaving the cover off the Alde compartment when it's in storage so air circulates through it?
Jay and Kat
Tow vehicle: 2022 Jeep Gladiator Sport S + tow package
Camper: 2022 T@B 400 Boondock w/Norcold 3-way fridge
Comments
-
@Jay_and_Kat , if you have not already done it, it might be worth checking the condition of the caulking/sealant on the exterior of the camper in that area (around the Alde blower vent, the Nautilus compartment, and along the trim below those areas). It is possible the water is entering higher back (toward the rear of the camper) along the trim and flowing to the location of the leak. Also, check that the screws in those areas are all seated properly.
2019 T@B 320 S Boondock Lite ~ 2025 Toyota Tundra CrewMax 4x4
Greg & Marlene (Tucson, AZ)1 -
@Bayliss I'm wishing I'd thought to get a picture of the vent, because I'm thinking maybe it was missing any caulk around it (which, obviously, would be bad.)
Would I be correct in presuming that to inspect the caulk / seals along the trim, the trim is going to have to be removed? Which looks like it involves removing the screws from the keder rail to release the trim pieces, correct?
----------------------------------------------------------
Jay and Kat
Tow vehicle: 2022 Jeep Gladiator Sport S + tow package
Camper: 2022 T@B 400 Boondock w/Norcold 3-way fridge0 -
@Jay_and_Kat , it really will depend upon how the condition of the caulk/sealant visually appears. It may be very obvious that some is damaged/missing, so you might get by with cleaning that specific area and resealing it. I don't have my camper at my house, so I do not recall how the Alde vent cover is sealed. nuCamp may have originally sealed it with Butyl tape, which is easy to work with.
It is hard to determine from your photo the most likely source of the water intrusion. I do not recall any prior posts similar to the specific water staining/leak you have inquired about. Many times in the past, water leaks have been noted in the rear of the trailer, with the source being around the tail lights or nearby trim. Finding the source of the leak you located will take a bit of investigation. Hopefully, it will be readily apparent, but do take a look in and around the Nautilus compartment since that is a likely source.
If you do have to loosen or pull away part of the keder rail (or remove the Alde vent cap) to fully inspect and/or reseal those areas (which should be a relatively simple task), it is a good idea to put a light dab of sealant on the screw threads before re-installing them. A good sealant would be Geocell ProFlexRV (readily available from RV supply stores). nuCamp uses Geocel 2300 MHRV, but I am not sure if it is easily obtainable by a consumer, as opposed to a dealer/manufacturer. Regardless, they have the same formulation, so either will work well. Don't use silicone on the exterior of the trailer. It does not adhere well to fiberglass and will degrade over time.
I am not sure what the thick white exterior sealant is that is used by the factory to seal the trim areas (maybe a white (as opposed to clear) version of the Geocell ProFlex RV sealant, or a "Dicor" product?).
Hopefully, someone who has done some re-sealing in those particular areas will chime in and provide some additional insight to assist you.
2019 T@B 320 S Boondock Lite ~ 2025 Toyota Tundra CrewMax 4x4
Greg & Marlene (Tucson, AZ)1 -
Looks like a trip to the local RV store is in my future. I've got the self-leveling sealant, needed that a year or so back to replace a busted vent cap, but that's not gonna do the job on the side of the camper LoL.
One of these years, I really ought to see about getting one of those nuCamp factory tours, so I can get a better idea what's hiding behind the walls. Granted, I'm sure there's been changes since the 2022 model year, but it's better than the current guesswork…
----------------------------------------------------------
Jay and Kat
Tow vehicle: 2022 Jeep Gladiator Sport S + tow package
Camper: 2022 T@B 400 Boondock w/Norcold 3-way fridge0 -
I second what @Bayliss said about checking the tail area and the Nautilus compartment. These areas have been implicated in leaks causing floor damage in the past.
You might also check out this post. NuCamp advises checking caulking around the wheel wells on a regular basis. I haven't heard many reports of leaks from this area, but probably worth a look.
2015 T@B Max S (320)
2015 Nissan Frontier SV V6 4x41 -
For what it is worth, the nautilus compartment on our '23 Tab 400 leaked like a sieve. The corners were not properly caulked, nor was the hose pass-through. I didn't realize the hose was dripping ever so slightly when connected to the nautilus and the bottom of the compartment filled slightly and water was weeping in like crazy. Once I properly sealed everything up it has been good.
_____________________________________________________
Ken / 2023 Tab 400 “La Bolita” (39,000+ miles) / 2024 Toyota Sequoia1 -
So if the problem looks to be in the Nautilus compartment, could I temporarily fix it by putting some self leveling caulk in the corners and around the bottom of the compartment?
----------------------------------------------------------
Jay and Kat
Tow vehicle: 2022 Jeep Gladiator Sport S + tow package
Camper: 2022 T@B 400 Boondock w/Norcold 3-way fridge0 -
I used a marine grade caulk.
_____________________________________________________
Ken / 2023 Tab 400 “La Bolita” (39,000+ miles) / 2024 Toyota Sequoia1 -
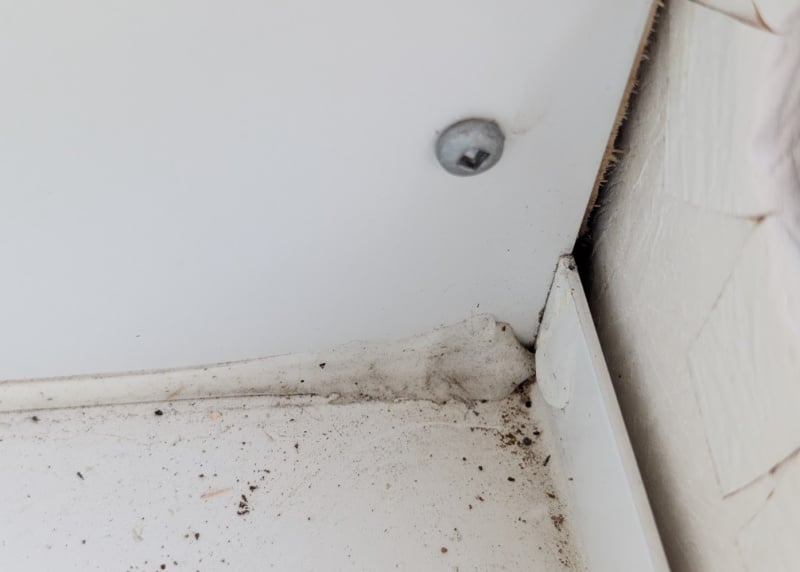
So I think I found the culprit for our water intrusion and it's inside the Nautilus box. I've got a tube of Geocell coming today, tomorrow when it's not raining I'll be going to the camper to caulk the location in question (photo below)
I'm debating between removing the old caulk with a plastic scraper, or just cleaning the area and putting a bead of caulk over the old caulk (which seems to be in good shape otherwise,) making sure to get the spot where it looks like the water's coming in.
As this isn't a "must look nice" like on the outside of the camper, if there's no real downsides to having a double-bead of caulk I'll probably take the lazy way out and just clean up the area.
 ----------------------------------------------------------
Jay and Kat
Tow vehicle: 2022 Jeep Gladiator Sport S + tow package
Camper: 2022 T@B 400 Boondock w/Norcold 3-way fridge0 -
@Jay_and_Kat, the photo is very helpful, so thanks for posting it.
Personally, I don't see a problem with leaving the old caulk in place, but it would be best to cut out the portion closer to the corner of the pan where they ended (poorly) the application of the caulk. Maybe cut out the portion from where the caulk line is nice and straight. My impression is that as long as you slightly overlap the area where you have cut away and cleaned the old caulk, it should be fine and provide a good seal.
I do not have a Nautilus in my camper. Therefore, I am curious about the open/exposed area above the pan and what type of material is adjacent to that (specifically, the right side of the photo). It seems that is another spot for water intrusion, but maybe that is not an issue (maybe there is no risk of overflowing there, or it is intentional for drainage). Or, maybe the pan at the base of the compartment has some sort of built in drainage system I am not aware of? If others with the Nautilus can chime in with their thoughts, that would be helpful.
Just curious…….how did the caulk/sealant outside the trailer, including the Alde blower vent, appear?
2019 T@B 320 S Boondock Lite ~ 2025 Toyota Tundra CrewMax 4x4
Greg & Marlene (Tucson, AZ)0 -
@Bayliss Starting with the outside, the caulk around the Alde vent looked fine, I'm going to double check it, but it looks like it was a VERY thin bead of caulk.
The base of the Nautilus pan does have a "hatch" to run your water hose and cable TV lines in, so there is drainage there, but with the camper in storage and slightly nose-high, I suspect water slipped in around the hatch over the compartment (as said, we had some CRAZY hard rain,) and then pooled in the corner in the photo, working through the gaps in caulk and into the wood and furnace / hot water compartment.
Just to the right of the photo, the area with the obvious gap, is the opening for the hatch to access the compartment. I suspect, but didn't try to look, that there's a plastic wrap / cover / something over the exposed Azdel / etc there. I might bring along a brighter flashlight and possibly a borescope-style camera to stick in the gap (if it fits) to get a better view of what's in there.
As for the poor caulk job, with the space to work in there, I'm not too shocked the caulk ends in a "blob" rather than a nice, neat corner finish. Presuming the guy doing the job was using a caulk gun, there's NO room to get a good angle on that corner.
----------------------------------------------------------
Jay and Kat
Tow vehicle: 2022 Jeep Gladiator Sport S + tow package
Camper: 2022 T@B 400 Boondock w/Norcold 3-way fridge1 -
@Jay_and_Kat, I did a quick search and found some Forum discussions on this topic that may be of interest to you; maybe on a "rainy" day 🤣:
2019 T@B 320 S Boondock Lite ~ 2025 Toyota Tundra CrewMax 4x4
Greg & Marlene (Tucson, AZ)1 -
Seeing those posts, I find myself wondering why nuCamp doesn't have the Nautilus boxes molded as a single piece, to eliminate the gaps needing caulk at the bottom. Granted, there might be some "flaps" that would prevent molding it that way, but maybe with a bit of a redesign of how the compartment is done might work around that.
Ah well, that's for the nuCamp team to work out, cost always being an object to factor in and maybe the boxes they're using are something they can get "off the shelf" for the Nautilus, rather than something custom-designed to their exact specs.
----------------------------------------------------------
Jay and Kat
Tow vehicle: 2022 Jeep Gladiator Sport S + tow package
Camper: 2022 T@B 400 Boondock w/Norcold 3-way fridge0 -
Exactly my thoughts. A one piece box would be infinitely better and would probably save some pennies.
_____________________________________________________
Ken / 2023 Tab 400 “La Bolita” (39,000+ miles) / 2024 Toyota Sequoia0 -
So re-starting this discussion with one last question:
The replacement of the caulk along the rear side of the Nautilus compartment seems to have helped, or the crazy storms we had go through the last week didn't get water into the compartment (honestly? A confirmed EF-2 20 miles away from the camper? Geez) BUT when I went out to do some winterizing I re-checked the Alde compartment and…
The outside wall plywood is dry as a bone, but the corner formed by the Nautilus box, floor, and sidewall was still a bit moist. So for now I've got the cover off the compartment, sitting on the bed, to get more airflow through the compartment to try to dry things out (we've got a DampRid bucket in the bath and the door to the bath propped open,) is this a good idea?
----------------------------------------------------------
Jay and Kat
Tow vehicle: 2022 Jeep Gladiator Sport S + tow package
Camper: 2022 T@B 400 Boondock w/Norcold 3-way fridge0 -
A good test would be to get a fan in that area and get it all completely dried out. Then fill up the bottom of the Nautilus compartment and see if you have any wet spots forming.
_____________________________________________________
Ken / 2023 Tab 400 “La Bolita” (39,000+ miles) / 2024 Toyota Sequoia0 -
Not a bad idea, although when I was out at the camper, I noticed the caulk on the FRONT side of the Nautilus feels like it has similar issues as the rear side, so this test will have to wait until I get back out with the geocell…
I'm not quite as concerned with the front caulk, only because we've got the camper stored a little nose-high, so any water (short of a serious puddle) will be up against the rear.
----------------------------------------------------------
Jay and Kat
Tow vehicle: 2022 Jeep Gladiator Sport S + tow package
Camper: 2022 T@B 400 Boondock w/Norcold 3-way fridge0


Categories
- All Categories
- 12 Cirrus Truck Campers
- 128 Dutchman and Vintage TaB Archives
- 3 Forum Rules
- 3 nüCamp & Forum Contacts
- 969 Air Conditioning & Refrigeration
- 2.7K Battery/Electrical & Solar
- 1.2K Camping & Travel
- 145 Events & News
- 220 Factory Comments
- 28 "FOR SALE" - New/Used Trailers
- 15 “FOR SALE" - Camping & Trailer Gear
- 2.4K Heating/Plumbing & Winterizing
- 138 Help - Computer & System
- 925 Introductions
- 408 Looking to purchase a trailer?
- 2.2K Modifications & Upgrades
- 1.4K Products and Accessories
- 425 Service/Maintenance & Recall Notices
- 37 Solo Travelers Hints & Tips
- 1 T@G Forum
- 78 Teardrop Groups & Links
- 78 Testimonials
- 922 Tips & Tricks
- 1.5K Trailer & Towing
- 27 Owners Manuals/PDF Files/Videos & Resources
- 56 üCamp Rally - News & Information