Our portable solar suitcase setup

elbereth
Member Posts: 105
Hi all -
I spent hours reading EVERY solar post on this forum, and @jkjenn ‘s blog, and Handy Bob’s page, and have come up with a good portable system that let us boondock as long as we want. If helpful for anyone else, I will show in detail what I did here. I am not so handy with the electricity or the tools") so if I can do it, anyone can!
so if I can do it, anyone can!
We did the 2 Golf Cart Battery setup that I mentioned another thread. We bought the Renogy 100W solar suitcase as the power for our system, and the Victron Smart Solar MPPT 75/15 charge controller.
The Victron needs to be mounted vertically, and I could not find room in my tub to do so. So I decided to use a modification on the “lunch box” idea that others have used, and make it easy to connect and disconnect for travel.
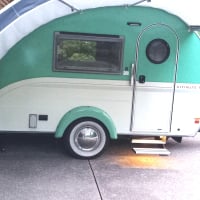
Step 1 - battery connection to Charge Controller: I bought this tray cable pair to connect to the batteries. Using a cable crimper/cutter, I lopped about a foot off the end of each cable, so I had about 7’ of 10AWG cable with ring terminals on one end, and about 1’ that was just cut on each end. I bought an Anderson SB50 quick disconnect, and soldered one pair of the cables to the end of the long cables, and one to one end of the short cables (you can also crimp rather than solder). I used red and white colored electrical cable to mark each end for positive and negative. I attached the ring terminal of the positive end to the battery first, then the ring terminal of the negative end. You can see it in the pic below - my cables are the ones with the white and red tape coming off the battery terminals, and the Anderson connector is looped near the propane tank.

Step 2 - create a waterproof connection box for the charge controller: I found the perfect watertight box in the camping/canoeing section at Menards. I drilled 4 holes in the “bottom” of the box to run cables through. I ran the free end of the short cables with the SB50 connector through one pair of holes and into the battery terminals on the Victron. I ran the free ends of this connection kit with MC4 connectors on one end to connect the panels to the charge controller. Double check your polarity with these. Finally, I used some leftover 1” nylon webbing and a buckle to make a strap to connect the box.


Now, the Renogy suitcase and the “lunchbox” travel in the T@B under the bed/between the benches. When we get to camp, first I buckle the box to the trailer tongue, then connect it to the SB50 connector to the battery.

Finally, we’ve kept a 30’ 10AWG extension cables connected to the solar suitcase, so we just unfold the panels in the sun, plug in the cables to the MC4 connectors on the box, and voila, 90W of power in sunny spots here in MN.
It takes all of 90 seconds to get the whole system set up and about the same to break down for travel. We are not skimping on amenities, and with our usage including using the 2-way fridge in the CS-S on DC the whole time, we managed 4 days (including one rainy day) with the battery voltage consistently above 12.5V. Very pleased.
Hope this might help others looking to do something similar.
I spent hours reading EVERY solar post on this forum, and @jkjenn ‘s blog, and Handy Bob’s page, and have come up with a good portable system that let us boondock as long as we want. If helpful for anyone else, I will show in detail what I did here. I am not so handy with the electricity or the tools
so if I can do it, anyone can!We did the 2 Golf Cart Battery setup that I mentioned another thread. We bought the Renogy 100W solar suitcase as the power for our system, and the Victron Smart Solar MPPT 75/15 charge controller.
The Victron needs to be mounted vertically, and I could not find room in my tub to do so. So I decided to use a modification on the “lunch box” idea that others have used, and make it easy to connect and disconnect for travel.
Step 1 - battery connection to Charge Controller: I bought this tray cable pair to connect to the batteries. Using a cable crimper/cutter, I lopped about a foot off the end of each cable, so I had about 7’ of 10AWG cable with ring terminals on one end, and about 1’ that was just cut on each end. I bought an Anderson SB50 quick disconnect, and soldered one pair of the cables to the end of the long cables, and one to one end of the short cables (you can also crimp rather than solder). I used red and white colored electrical cable to mark each end for positive and negative. I attached the ring terminal of the positive end to the battery first, then the ring terminal of the negative end. You can see it in the pic below - my cables are the ones with the white and red tape coming off the battery terminals, and the Anderson connector is looped near the propane tank.
Step 2 - create a waterproof connection box for the charge controller: I found the perfect watertight box in the camping/canoeing section at Menards. I drilled 4 holes in the “bottom” of the box to run cables through. I ran the free end of the short cables with the SB50 connector through one pair of holes and into the battery terminals on the Victron. I ran the free ends of this connection kit with MC4 connectors on one end to connect the panels to the charge controller. Double check your polarity with these. Finally, I used some leftover 1” nylon webbing and a buckle to make a strap to connect the box.
Now, the Renogy suitcase and the “lunchbox” travel in the T@B under the bed/between the benches. When we get to camp, first I buckle the box to the trailer tongue, then connect it to the SB50 connector to the battery.
Finally, we’ve kept a 30’ 10AWG extension cables connected to the solar suitcase, so we just unfold the panels in the sun, plug in the cables to the MC4 connectors on the box, and voila, 90W of power in sunny spots here in MN.
It takes all of 90 seconds to get the whole system set up and about the same to break down for travel. We are not skimping on amenities, and with our usage including using the 2-way fridge in the CS-S on DC the whole time, we managed 4 days (including one rainy day) with the battery voltage consistently above 12.5V. Very pleased.
Hope this might help others looking to do something similar.
2018 T@B CS-S Towed by 2015 Subaru Outback 2.5i in the wilds of Minnesota
12
Comments
-
This is a beautiful solution and I might have to borrow it. Very well done. I do not like my solar controller exposed to the elements.)
2021 T@b 320 Boondock "Mattie Ross" | 2021 T@b Nights: 239 | Total nights in a T@b 455 | 2022 Jeep Grand Cherokee L Overland | T@b owner since 2014
0 -
Very neat installation.2016 Outback.....North East N.C...... Former 2012 Silver Shadow0
-
I used the same setup, except I put the Victron controller with bluetooth inside a solar system lunchbox lol,2017 820R Retro Toy Hauler from 2015 Tabitha T@B from 2009 Reverse LG Teardrop (but a T@Bluver at heart)0
-
I like your controller waterproofing solution.On a recent trip, my controller got rained on when a non-forecasted storm rolled through. I need to verify that it still actually works. Then I should probably implement a solution similar to yours.2016 T@b 320 CS-S - 2018 GMC Sierra - St. Catharines, Ontario, Canada0
-
When in use, I place my (non-waterproof) quick disconnect lunchbox in the tub on top of the battery box. It stays there full time while in camp and has stayed high and dry through some major downpours.I do like your use of the Pelican(?) case and the single quick disconnect. Nice work!2015 T@B Max S (320)
2015 Nissan Frontier SV V6 4x40 -
Nice set-up, well thought out!2016 T@B MAX S-aka: WolfT@B
TV: 2006 Chevy Avalanche LT Z71 aka: WhiteWolf, or 1972 Chevy Custom10 P/U aka: SnarlingWolf
Spokane, Wa.
Eric aka: Lone Wolf0 -
How much heat does the controller give off? That would be my only concern with enclosing it in a box. I know some have mounted it under the inside bench, but that has more air flow. We started out keeping ours in a lunchbox under the Tub lid and have graduated to using industrial strength velcro to mount it on the inside of the lid. We remove it to travel.Sharon / 2017 T@B CSS / 2015 Toyota Sienna Minivan / Westlake, Ohio2
-
@Sharon_is_SAM I dont thini tge MPPT controllers give off much heat, at all, compared to the PMW controllers. I seem to remember my Renogy controller getting quite hot but I have not noticed my Victron controller getting hot.
Industrial strength velcro is a very good idea. Do you Anderson or some other type of quick disconnect for the battery?2021 T@b 320 Boondock "Mattie Ross" | 2021 T@b Nights: 239 | Total nights in a T@b 455 | 2022 Jeep Grand Cherokee L Overland | T@b owner since 2014
0 -
Curious why you are not using the 20A Voyager Charge Controller that comes with the panel.Mickey & Terri
2016 Max S
Kalamazoo Michigan0 -
@jkjenn , we have pigtails with MC4 connectors that we leave connected to the battery (+) terminal, post shunt (-) at the junction box and coming from the rearranged solar port on the tub for the panels. We kept the solar port SAE to plug in the panels.
Regarding the heat production, that is very possible. I know our PWM has a heat sink for that reason. I went searching for an answer and ended up reading the Victron white paper. Now I have a headache😜.
Here is a link that may yield an answer. If I had to go through the attached calculation, I would just leave the bottom of the box open and let the heat escape!
https://2n1s7w3qw84d2ysnx3ia2bct-wpengine.netdna-ssl.com/wp-content/uploads/2014/02/TechTip-EnclosureHeatDissipation.pdf
Sharon / 2017 T@B CSS / 2015 Toyota Sienna Minivan / Westlake, Ohio1 -
I used the Victron 30A MPPT controller in case I wanted to expand past 400W in the future. It also had the bluetooth connector This puts off a LOT of heat. It has a huge heat since behind it. I had to cut out the back of the lunchbox and put waterproof "Rescue Tape" around it. Works perfectly. I connected it very close to the battery.
I used the exact same battery disconnects as well. IPX7 waterproof. The big controller is fairly waterproof, but the bluetooth isn't. I just shoved the bluetooth and its wire into the lunchbox. It works when I'm close to it, but aluminum interferes with bluetooth. I figured the aluminum siding on the toy hauler wouldn't be any better than the dry lunchbox. I could drill a small hole and put the bluetooth in the storage bay or something. Meh. Maybe one day.2017 820R Retro Toy Hauler from 2015 Tabitha T@B from 2009 Reverse LG Teardrop (but a T@Bluver at heart)0 -
MPPT controllers are much less electrically efficient compared to PWM and one of the primary reasons MPPT is not necessarily the best choice for these small, portable solar panels. This is easily seen in comparing equivalent rated PWM and MPPT controlers from the same manufacturer. The MPPT has a much larger heat sink. This is to manage the additional wasted wattage (heat) from the DC to DC conversion necessary to match the panel voltage to the required charging voltage. This conversion is always in circuit even when the panel voltage is at or below battery charging voltage and makes the controller less efficient. Still an advantage when power production is near maximum but a measurable parasitic loss at all other conditions. The MPPT process is only an advantage when the panels are producing excess voltage compared to charging requirements. These controllers can not boost voltage when insolation conditions are much less than optimum. Our small systems are rarely at optimum conditions!jkjenn said:@Sharon_is_SAM I dont thini tge MPPT controllers give off much heat, at all, compared to the PMW controllers. I seem to remember my Renogy controller getting quite hot but I have not noticed my Victron controller getting hot.
 1
1 -
@rfuss928 You raise a good point, that is why it makes sense to get a smart MPPT controller that allows for maximum performance in sub-par condittions. The Victron MPPT controllers are really well designed, offering a variety of configurations. With about three months of complete solar, 200w of of solar panels, and 2 golf cart batteries, I was able to achieve 100% charge, every day, even when having to check out of campsites before lunch on cloudy days. This was using flexible solar panels, which are known to not be as efficient as rigid panels.
2021 T@b 320 Boondock "Mattie Ross" | 2021 T@b Nights: 239 | Total nights in a T@b 455 | 2022 Jeep Grand Cherokee L Overland | T@b owner since 2014
1 -
@mandt we bought the panel alone without the charge controller. I saw various ideas about the MPPT vs PWM that seemed to come down to, the incremental cost of the MPPT wasn’t worth it for small systems. But the Victron controller + panel was cheaper than the kit from Renogy, and has the Bluetooth monitoring which I liked.
@Sharon_is_SAM I don’t find that the controller gives off much heat. Seems to do fine in the plastic box - but @Ratkity ‘s solar system lunch box definitely wins the style points! The controller would have fit perfectly in the lid of the tub, but I was nervous about the instructions to mount it vertically - I’m a rule follower!
2018 T@B CS-S Towed by 2015 Subaru Outback 2.5i in the wilds of Minnesota4 -
I appreciate rule followers. If it said to mount it vertically, that is what you do. Uh oh...this is how we were supposed to mount our Renogy Wanderer:
“Choose Mounting Location—place the controller on a vertical surface protected from direct sunlight, high temperatures, and water. Make sure there is good ventilation.” We got 3 out of 4 so I’m calling that good. Besides, when you open our tub lid, the controller is vertical😁Sharon / 2017 T@B CSS / 2015 Toyota Sienna Minivan / Westlake, Ohio2 -
So what happens if you don't mount the controller vertically?By virtue of my particular "lunchbox" setup, my controller lies flat on its back. Oddly enough, my battery is still nicely charged at the end of the day. Is it all just a dream? :-)2015 T@B Max S (320)
2015 Nissan Frontier SV V6 4x40 -
Vertical mounting is to facilitate convective air flow across the heat sink. Over temperature is a significant cause of electronics failures. A small enclosed box is probably a poor choice.
1 -
Ahhh, makes sense.FWIW, mine is mounted in such a way that there is air space on all sides of the controller, and the lunchbox lid remains partly open when the controller is attached. This was more by accident than any good planning on my part. Maybe at some point I'll monitor the temp in the box to see if it's significantly above ambient.2015 T@B Max S (320)
2015 Nissan Frontier SV V6 4x40 -
DH just reported there are channels along the back of the Wanderer that promote air passage. If a lot of ventilation/cooling is required, you would think that you should not mount the heat sink up against anything. How else would you mount it?Sharon / 2017 T@B CSS / 2015 Toyota Sienna Minivan / Westlake, Ohio1
-
In a lunchbox!!! hehe. And then attach it to somewhere on the tongue. Mine is squished close to the battery box, but the heat sink has room for dissipation.
Right now, I only have 1 suitcase of VERY heavy 100W panels. It can't handle all the phantom power in the toy hauler (but it's not in total optimal sun). I keep the panels clean. Makes a big difference. They are also locked to the iron rail of the porch. The bigger MPPT is for expansion and I'm looking forward to more efficient panels in the future!
The lunchbox was so cheap, you could experiment with several until you get it they way you want. Either that or just get a plug and pray, er play system just to learn your power needs.


2017 820R Retro Toy Hauler from 2015 Tabitha T@B from 2009 Reverse LG Teardrop (but a T@Bluver at heart)5 -
Great work @elbereth! And thank you for the thorough description with photos & links to parts - I am pretty much following your solar setup, so you saved me a lot of work. It looks like you mounted the controller with some kind of standoffs & small bolts through the back of the box?I'm thinking of mounting the box inside the tub though, for use with a roof-mounted panel. I also got two sets of panel cables - 40' 8G for tilt stand on ground plus 15' 10G for a TV roof mount ala Dale Helman style with rubber feet. The 100W Renogy Eclipse panel should fit crosswise inside our Sienna's roof rack, with room left for a second one if needed, but I still have to figure out the mounting details, and fabricate some kind of tilt stand legs for ground use.By the way, any ideas what can be used to temporarily secure cables to the outside surface of a vehicle when routing from battery via tongue & up to a roof-mounted solar panel?What do people do with two cables? Do you put them together in a flexible conduit of some sort, or just run them separately? Why are those WindyNation cables so stinky? My wife made me put them out on the porch.
@Ratkity, your "Our Solar System" lunchbox is hilarious! Funny & functional!-Brian in Chester, Virginia
TV: 2005 Toyota Sienna LE (3.3L V6)
RV: 2018 T@B 320S, >100 mods0 -
I used electrical tape to hold the two cables together. Pro tip: zip ties will hold them nicely, but make them impossible to handle. The little "nubs" left behind after trimming the ties just won't slip through your hands. Removing them was hard, too!
2017 Outback
Towed by 2014 Touareg TDi1 -
@Brianz, we consolidated our 2 long panel cables with plastic loom. Keeps things tidy and much easier to roll up.Sharon / 2017 T@B CSS / 2015 Toyota Sienna Minivan / Westlake, Ohio1
-
Separate wires would drive me bonkers. For those who haven't already pulled the trigger and are able to attach their own MC4 connectors, a length of heavy duty power cord (SJOOW cable) works great.It's abrasion, oil, and water resistant, and super flexible. It is pricey (so are T@Bs...) and you will probably have to order configurations like 10-2 online, but they are available.2015 T@B Max S (320)
2015 Nissan Frontier SV V6 4x40 -
Great suggestions, @pthomas745 & @Sharon_is_SAM, and I'll use both. Didn't know that stuff had a name ("loom"), but found a bargain price..
100 FT 1/2" INCH Split Loom Tubing Wire Conduit Hose Cover Auto Home Marine Black https://www.amazon.com/dp/B00KW9H1TW
Probably have a bunch of other wires where we could use some too.
I also found a spot for the SCC controller box inside the tub next to the gas tank.
The box comes with a hanging strap-loop (gray in photo) which I plan to attach with a caribiner clip (green) fastened with wire (red) to the nearby steel framing post for a secure quick release. It sits snugly in this position, with the wires hanging down from the bottom (front) of the box. I could just unclip the caribiner to lift it up when connecting cables. Being inside a box in the tub should provide similar conditions as the battery, since the controller says that is needed for proper temperature compensation.*
*UPDATE, 10/28/18:
I later added Victron's battery monitor with a temperature sensor on the battery terminal, and it automatically sends temp (& voltage) readings via wireless bluetooth network to the charge controller so it can compensate charge settings for actual battery temp. It's only necessary to assign both devices to the same bluetooth network in each device's app settings.
I still keep the SCC in the tub for convenience and security, as well as proximity to the battery monitor. While it's best to keep the SCC close to the battery to minimize "IR drop" by using a short cable so both devices see the same voltage; the battery monitor also reports voltage readings to the SCC, so this requirement is less important with both devices working together. However, this location also puts the SCC close to the kitchen wall where our monitor is located, so bluetooth communication between the two devices is more reliable.-Brian in Chester, Virginia
TV: 2005 Toyota Sienna LE (3.3L V6)
RV: 2018 T@B 320S, >100 mods0 -
Make sure the box is vented a little. A few small holes in the lid may work. You want water resistance, but not to fry the little sucker. 2017 820R Retro Toy Hauler from 2015 Tabitha T@B from 2009 Reverse LG Teardrop (but a T@Bluver at heart)1
-
Thanks, @Ratkity, for another good suggestion, which you can see I implemented in this photo..

Note five 1/8" holes drilled near top of box to let any heat escape.
And four more holes on the opposite side (also at "top", but bottom of photo). Also wanted to show cables hanging out from bottom of the "lunch box", where I used rubber grommets to protect the cables from getting frayed. Hardware is stainless, and standoffs are 1-inch pieces of 1/4" Pex tubing from Lowes, leftover from another project.
Also got those Windy Nation cables wrapped in the "split loom" conduit. (Thanks again for that suggestion, @Sharon_is_SAM ) Shown are two sets of panel cables, the short one for use with a TV roof-mounted panel, and the longer one for reaching out of a shaded site to either a panel mounted on the roof or on the ground. And together we'd have over 50 feet. Battery cable will go in the tub with the lunchboxed charge controller.
Already got the rubber suction cup feet on the Renogy Eclipse panel for mounting on our Sienna van, but still working on some additional custom fasteners for security that would still allow easy removal for ground use.
Also would like to find a fastener solution for attaching a pv cable to the outside rear of the van for possible use while traveling.-Brian in Chester, Virginia
TV: 2005 Toyota Sienna LE (3.3L V6)
RV: 2018 T@B 320S, >100 mods2 -
Nice job!Sharon / 2017 T@B CSS / 2015 Toyota Sienna Minivan / Westlake, Ohio1
-
Thanks, @Sharon_is_SAM. And again, many thanks to @elbereth for all the setup details for this project, including the warning about double checking the +/- panel cable connections at the controller, because it's easy to get switched if you don't follow them starting at the actual panel.
So, I finally got a chance to hook everything up for a brief test of the electronics & bluetooth connection using the phone app..
And thanks to @jkjenn's suggestion about using 000000 as the default pin (manual says to try 1234 or 0000, neither of which worked), I was able to get connected.
As you can see, it was late in the afternoon with sun getting low, plus partial shade, so not a lot of watts, plus the battery was also well charged, though I had some things running in the t@b - ceiling fan on low power, testing frig on propane, etc.
I added some baby bumper stick-on furniture pads to the sharp corners of the panel. BTW, this photo demonstrates a well-known optical illusion created by this Renogy Eclipse panel design, where the large white spots appear to contain black dots when you are not looking directly at them but looking around.
This Renogy illustration shows what I wanted to be able to do next - set our panel on the ground at an appropriate angle with some legs. Most commercial tilt kits seem to be made for permanent mounting or are pricey, so I thought I'd look for another alternative, or fabricate something myself from aluminum framing material.
Instead, I found this solution using an inexpensive pair of selfie sticks. They are surprisingly sturdy & well made considering their $10 price, and easily adjustable to any angle and lengths between 12-40 inches where they can be locked into place. I'll need to field test this, but if stability becomes an issue I could add a pair of tent pegs & cord to each one.
I simply drilled a hole in the frame and added a 1/4x20 wing nut to the standard tripod style mounting screw platform that comes with it, to bolt it onto the panel frame. Then you simply twist the telescoping handle to loosen or lock at desired length. Angle is locked using the knob that sticks out to the side.
This is fully retracted to the 12" length. There's also a screw socket in the base of the handle which might be handy for adding a bolt for sticking into the ground for added stability. I plan to give it a try. Might also come in handy as a monopod for some interesting camera angles.
-Brian in Chester, Virginia
TV: 2005 Toyota Sienna LE (3.3L V6)
RV: 2018 T@B 320S, >100 mods3 -
Very creative upcycling of the selfie sticks!Sharon / 2017 T@B CSS / 2015 Toyota Sienna Minivan / Westlake, Ohio0


Categories
- All Categories
- 10 Cirrus Truck Campers
- 122 Dutchman and Vintage TaB Archives
- 3 Forum Rules
- 3 nüCamp & Forum Contacts
- 954 Air Conditioning & Refrigeration
- 2.6K Battery/Electrical & Solar
- 1.2K Camping & Travel
- 142 Events & News
- 219 Factory Comments
- 21 "FOR SALE" - New/Used Trailers
- 13 “FOR SALE" - Camping & Trailer Gear
- 2.4K Heating/Plumbing & Winterizing
- 140 Help - Computer & System
- 920 Introductions
- 408 Looking to purchase a trailer?
- 2.1K Modifications & Upgrades
- 1.4K Products and Accessories
- 409 Service/Maintenance & Recall Notices
- 37 Solo Travelers Hints & Tips
- 1 T@G Forum
- 75 Teardrop Groups & Links
- 78 Testimonials
- 918 Tips & Tricks
- 1.5K Trailer & Towing
- 27 Owners Manuals/PDF Files/Videos & Resources
- 55 üCamp Rally - News & Information