Best Of
Arvika Bike Racks no longer in business?
Just got an email that stated Arvika Bike Racks are stopping production and orders will no longer be filled: arvikabikerack.com
Too bad as these were great for the T@Bs.

Re: Battery Dead?
When you get the new battery, be sure to adjust the settings in your VIctron solar controller for a lithium battery. The solar controller will bring the battery up to a full charge.
Depending on the vintage of your trailer (always good to provide complete info when asking a question) the WFCO converter in your camper may not be lithium compatible and will not bring the battery up to a full charge. I've been living with this situation for 6 years and it's not a big deal. For me it just hasn't been worth it to swap out the converter since I can get a full charge from the solar.

Re: Best product to lubricate tow hitch mechanism
I use white lithium, just a small amount to prevent galling. Been doing it for years, no issues. Definitely need to clean [anything] you use off as soon as unhitched, invariably DW will walk past and clean it off inadvertently lol.

Re: Refusal for T@B 400 to stay at RV Resort Sea Perch RV Yachats, Oregon
In some cases, these types of restrictions may be tied to various municipal zoning codes.

Re: Towing issues
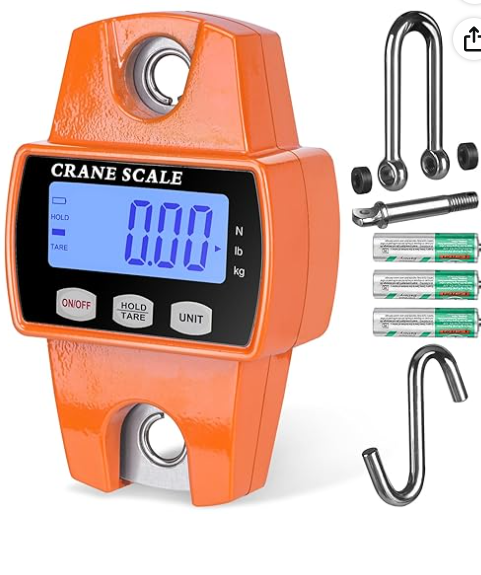
I use a mini crane scale bought on amazon to check tongue weight…https://www.amazon.com/dp/B08669YYV7?ref=ppx_pop_dt_b_product_details&th=1
initially bought it for a work thing, but works great around the shop (and camper).
Re: Towing issues
I have no idea why you are experiencing what you are. My next step in diagnosing the problem would be to try towing your T@b with a different tow vehicle. It might be some weird anomaly of your specific Pathfinder and your specific 2014 T@b. See if you can borrow a full-size pickup and if the towing experience with that is the same as your Pathfinder. It might at least help narrow the issue down to your TV or your trailer.

Re: Towing issues
Does the speed you are towing make any difference? Do you have your rig properly leveled?
The shock kit should not be necessary. Very few t@b owners have these installed and most t@b owners do not have towing issues.
Re: Towing issues
Hitch height can have a negative effect while towing. Target a level trailer with a Tongue weight that’s 10-15% of the placarded GVWR. Run recommended tire pressures for both the tow vehicle and the trailer (each have a placard that applies to their stock size tires.) If these are all good, the next culprit could be the suspension. It’s designed to work with weights up to the GVWR of the trailer however, an unloaded or light trailer can lead to increased bouncing especially if the suspension is wearing out.
Re: low pressure campstove
Retired engineer here, who recently went down this rabbit hole. Quick answers are, Blackstone (all), Weber traveler RV (hard to store) and Weber Q1200 (with this conversation kit). Amazon has gas hose options for these choices; keep the hose length on the short side (8-14') as pressure drops for total length of pipe/hose from LP tank, affecting grill performance. You can always remove the LP regulator off a grill or stove, but this is not a sure thing, depending on the grill - I chose not to go there.
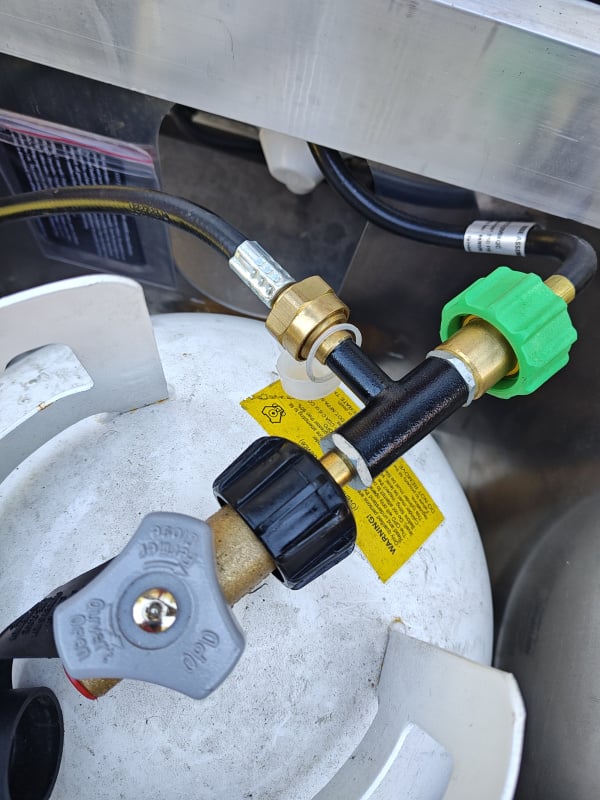
Plan B: Install a "Y" or "T" on the outlet of the 20 pound LP cylinder as Gomers2 pictured. This will allow you to use any grill/stove…and a longer hose too. You will be "somewhat" limited to grill/stove location.
My choice? My end game for my camper is for my wife and I is to travel 3-4 weeks at a time, touring national parks. Being limited to griddle only, or grill only, meals is not an option. We ended up buying a Camp Chef Everest X2 camp stove, Lodge cast iron reversible griddle plate and a 5 lb LP grower kit. I may install a tee at my 20 lb tank as well, as Gomers2 pictured; Nice to have options.
Re: low pressure campstove
See your other post re tanks. I looked at a lot of low pressure stoves and none really fit the bill. Wound up with a Camp Chef that has been fantastic. It's high pressure though, and is split off the tank before the regulator. Had
wanted to use that quick connect, but it's just not as easy as you'd think it would be.