Best Of
For Sale 2008 Dutchman T@b TQ16 $8,500
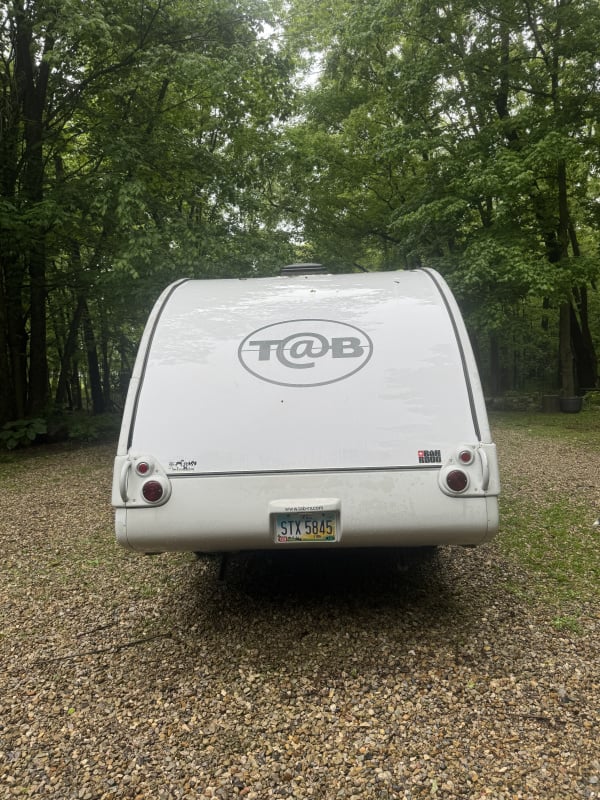
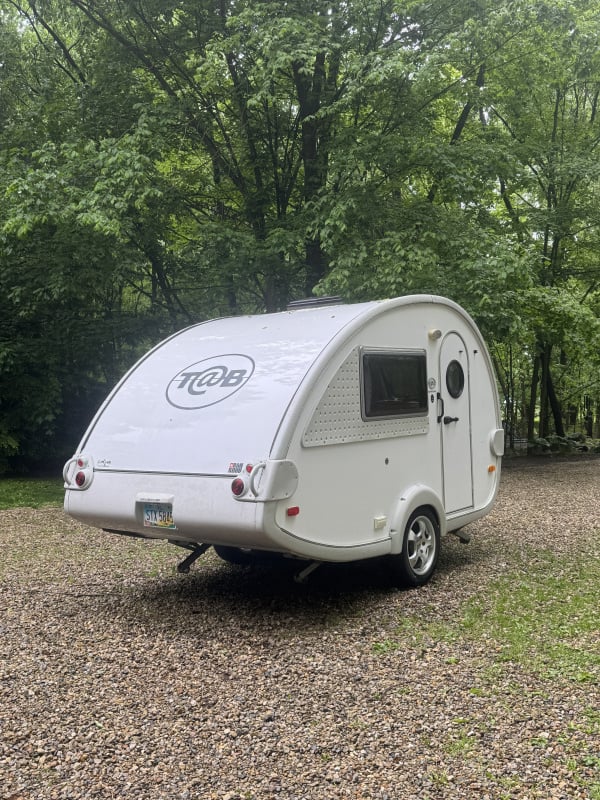
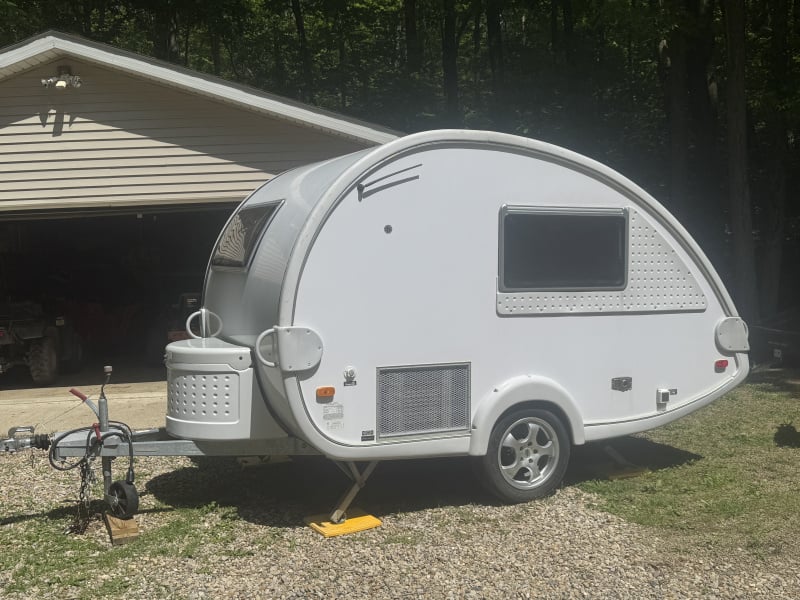
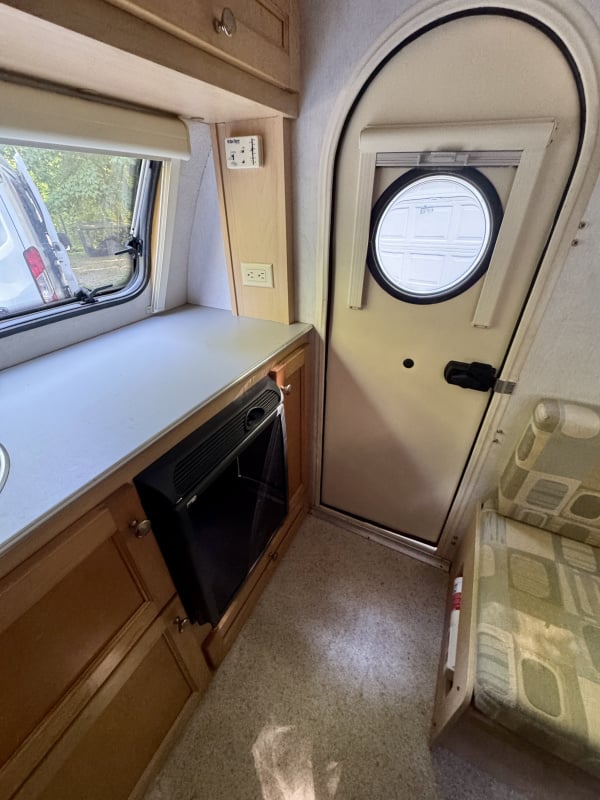
2008 Dutchmen T@b for sale in Marengo, Ohio (30 minutes north of Columbus, OH). This T@b has A/C, propane furnace, an inside galley (2-burner gas cooktop, sink, 3-way fridge), tv/dvd, water pump, 5 gallon fresh water tank, and a rear seating area with table that drops down to convert into a bed. No leaks, floor is solid. Self-contained mechanical surge brakes (no electric brake controller required in tow vehicle). Comes with a gray awning for a small overhang and also a red awning that is larger and goes to the ground. Also includes the original Therma-Rest tent add-a-room which attaches directly to the trailer and adds a LOT of extra space. Weighing roughly 1,600 lbs, it is easily towed by most SUVs. It has been used very little and is in very good condition. $8,500. Contact Becky at ohiok9sar@gmail.com


 Rgray15
Re: Northeast Canada Travel Plans
I have driven the Labrador Highway several times. It is now all paved (unlike my first trip) all the way to Blanc Sablon, PQ. You could do it in reverse from St. Barbe NL. Great trip, lots of boondocking spots - and do visit Red Bay. The weather was fine both times we did it.
BillCB
Re: Anyone doing BLM / dispersed camping with 400?
Re: Screen door 'string' broken - door is taped in open position - what are our options?
It probably broke due to wear.
Horigan
Re: Northeast Canada Travel Plans
Hi @AnOldUR
Hi Just to highlight one place we stopped for whale watching in NS that might be of interest. Besides taking a boat tour for up close views, this campground is high on a bluff, and you can watch whales from your site. Small, boondocking and very clean bathrooms, etc. We also saw many puffins while on the whale boat cruise.
Re: Ultimate Toys--Camper
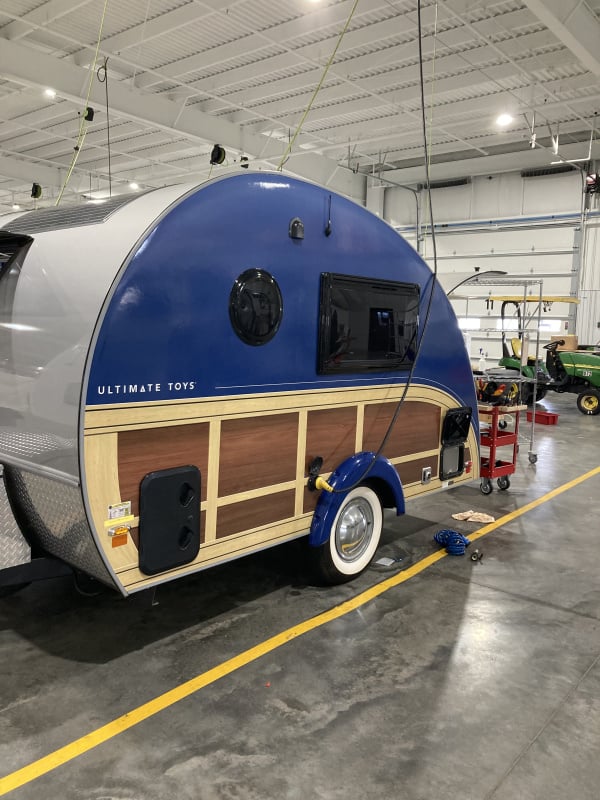
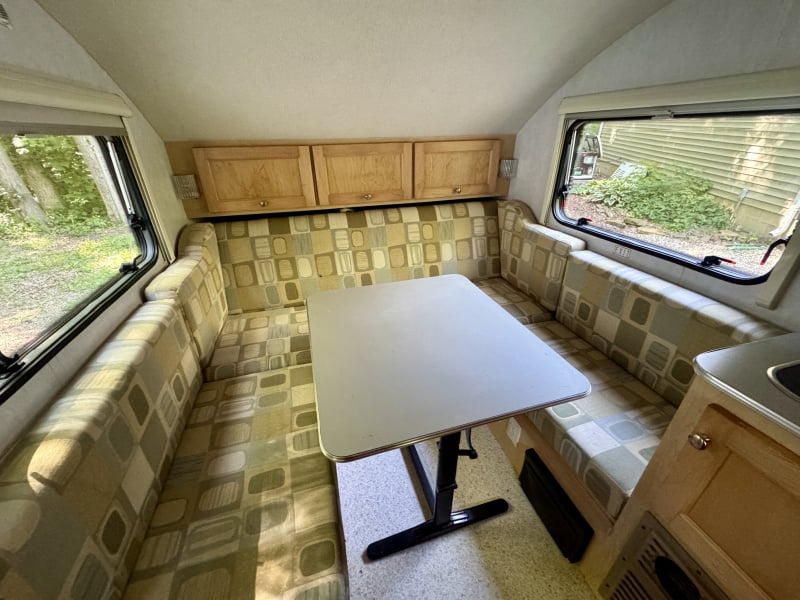
We are a new UT owner in January 2026. We just got back from a NuCamp check up and upgrade from our prior 2016 TAG.
New tinted windows and screens. Moved our 200 Battleborns inside with smart shunt from prior camper. Extra table mount placed near door. We are so excited join the club and not have to upgrade our vehicle due to camper weight. We took the UT name off the clam door.
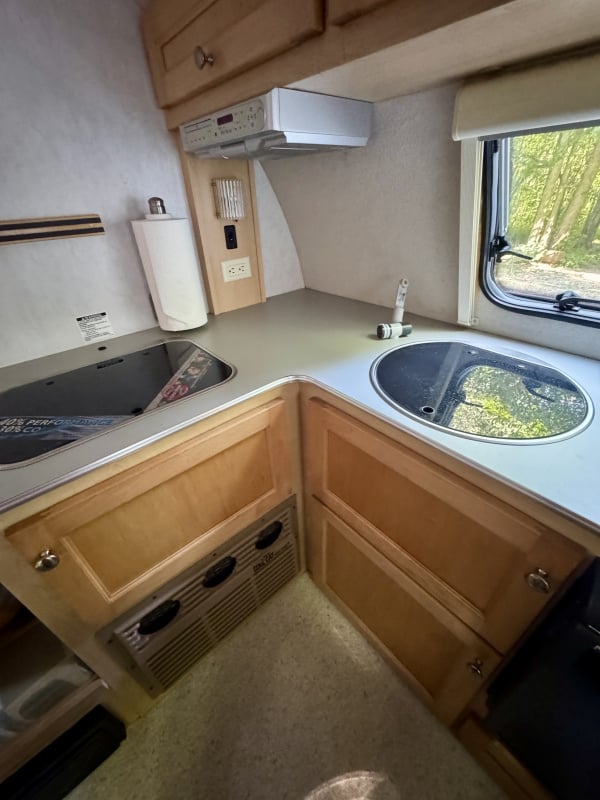
Please give us information of problems to look for. The prior owner really didn’t maintain the camper like we would.
Bambi
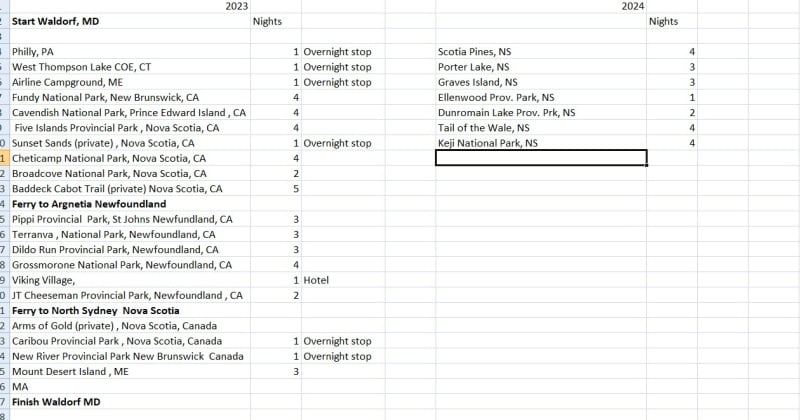
Re: Northeast Canada Travel Plans
Hi, We did Newfoundland a few years ago from MD Here was our stops..maybe it will help. We planned on doing more of Nova Scotia that year after Newfoundland but got chased away by Hurricane Lee (things closed)….Happy Travels
Re: I might get a new tow vehicle....
I have a 2024 frontier lwb, 2wd ,SV with tech. and convenience pkg towing tab 400. Truck has exceeded my expectations. Drives well, comfortable, wife enjoys her seat. Performance wise no issues. However, had to add brake controller, not happy with tekhonsha, very hard to set. Should have gone better model
Okpete
Re: Reinforced toilet flange
Can do!
A quick note however, I would imagine this fix is not manufacturer approved, and it also involves modifying purchased fittings. Thus, if the project gets sideways, you won't be able to return the parts to the store, and if you further damage the trailer in the process of repair, of course NuBrite likely won't cover it via warranty.
For me the project was a complete success, however it is understood that you do this at your own risk. I resisted sharing my procedure as I figured it was one of those things that might make some people cringe… lol. What can I say… I'm an old Appalachian hillbilly at heart. We have a knack for rigging just about anything. 😏
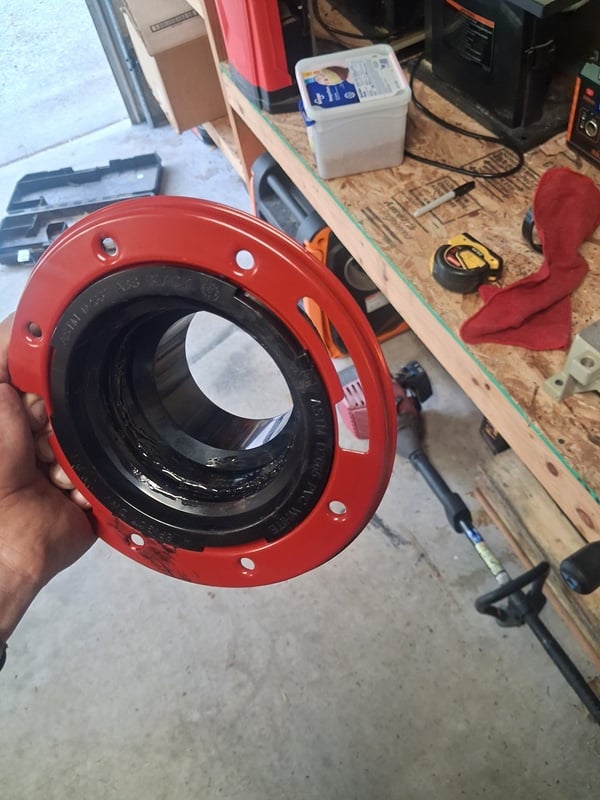
Now that the lawyerly stuff is out of the way… he's what I did: (photos are below)
I went to the Home Depot (the Bellingham Washington location had what I needed, though I imagine stock is similar in other stores… FYI, Lowes didn't have what I was looking for).
I purchased a red metal reinforced 4" toilet flange.
I also purchased a 3" threaded ABS adapter coupling.
Also a can of ABS cement. I already had teflon tape.
***
- Test fit the parts in the store before purchase. The threaded adapter should fit neatly into the female end of the toilet flange. NOTE: These parts are NOT made to be joined in this manner. They just so happened to fit just right. There was a SMALL amount of play in the fitting (about the thickness of a sheet of paper)** I'll cover what to do about this shortly.
- As it is, if you assemble the pieces as they are purchased you will find that the finished part is way too long. You will need to take careful measurements and cut the female part of the flange as well as the threaded fitting (where they glue together). I found it to be about half of the length glued male/female parts on both pieces. Measure several times and endeavor to leave as much surface as possible for the best possible weld. I cut the threaded coupler with an electric chop (miter) saw. I cut the flange by carefully clamping the metal flange part in a vice and carefully cutting the pipe part with a sawsall.
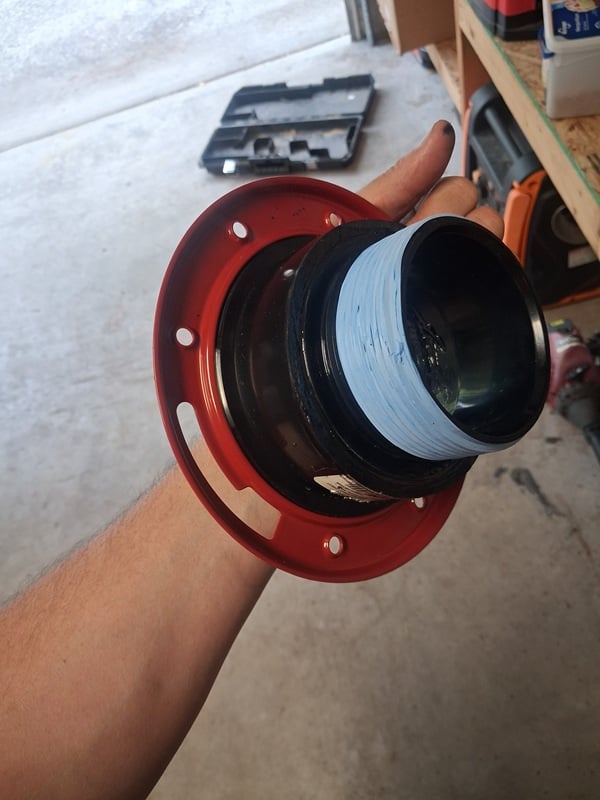
- Prior to gluing the pieces together, you may want to test fit it in the RV itself. Once you're satisfied of the fit, glue the two pieces together. Use a VERY liberal amount of glue. (this will help bind the two pieces together better.) I let my fitting sit for a few days prior to installing it.
- Back in the camper, the hole in the plywood base was slightly off center to the threaded opening in the black tank. A small jig saw was employed to saw out the excess to make a proper hole to accommodate the new fitting.
- Apply Teflon tape to the threads, I found that I had to thread the fitting very far down into the tank, the threads were generally easy, however I put most of my Teflon towards the back part of the threads to help get it down further.
- Now the tricky (unexpected part). Because the red metal ring spins freely on the flange, it has the advantage of being able to be adjusted for the desired alignment of the toilet flange, however the disadvantage of not having a practical means of grabbing this thing with a tool to help thread it into the black tank tightly. Whereas a punch or something similar might have been used to help thread in a solid flange piece, this wasn't an option with a moveable ring. The solution turned out to be a pair of good work gloves and as tight of a grip as you can muster, with your hand down in the hole, turning it in with all your might. Once the red ring is seated to the base you're almost done.
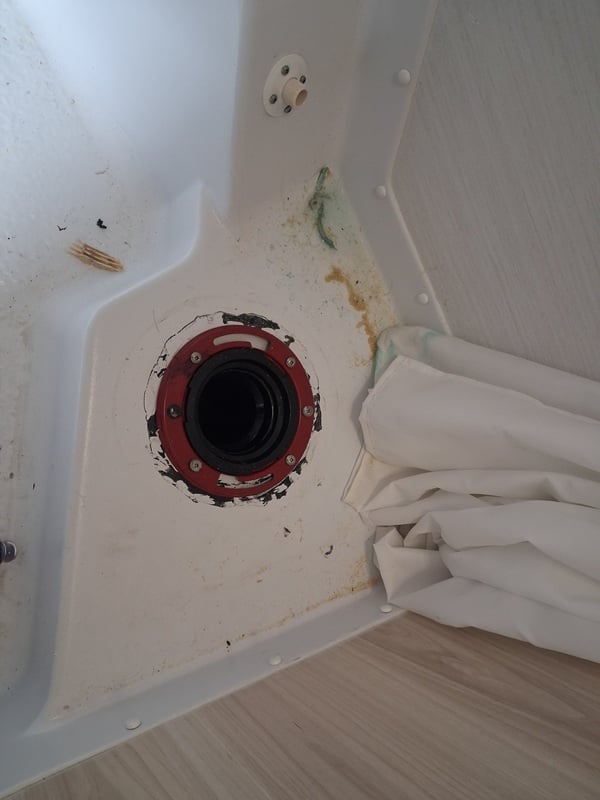
- Line up the six screw holes and fasten the flange in the same manner as the old one.
- Apply silicone as desired, install the rubber sealant for the toilet, and mount the toilet on the flange.
- NOTE: The right side of the toilet (where the flusher pedal is at) I found to be very difficult to start the nut. You literally can't see it, and have to "see with your fingers". Patience is a requirement.
- Since this is a wet bath, I applied a bead of silicone around the base of the toilet to help keep any stray water out from under the unit.
And there you have it… this was probably not a project for a beginner. It required some creative thinking as the project progressed, and was met with various challenges. I doubt you'd ever get a professional to do this… this is strictly DIY. But when we sit on the toilet now, it feels VERY solid and doesn't budge a lick. I've been banging around old houses for 30 years and work as commercial service technician by trade, so I'm somewhat accustomed to "making things work".
Is it overkill? Probably. But I estimate the work should last the lifetime of the trailer.
Re: should a Tab 360 have a refrigerator fan
Well in general we are very happy with the performance. Others feel it's too big and takes up counter space but we love not having to deal with ice, the fact that you can bring what you want including frozen food, and reach inside for a truly cold beer or a scoop of ice cream. Luxury camping. Our biggest issues have been related to airflow inside the unit when we overfill it. I've played with the small air vents underneath the cooling coils to find the right airflow and we are thoughtful about where we place items at the top so the opening doesn't get blocked. Obviously that closed drawer at the bottom is going to be the warmest spot but our Target temperature is 40 and we don't have a problem achieving that at setting two or three for the most part. I will say we are not hot weather campers, and we don't live in the desert. The biggest performance issue we've had is one time after 10 days in a humid environment we did get ice buildup on the coils. When we got to shore power I did a quick defrost. I think that's going to happen with any non frost-free refrigerator. So what is your non fan solution?
Gomers2