Best Of
Re: NEW FORMATTING FOR THE FORUM IS LIVE!

This is an heic image that gave an error initially and now seems to have loaded, but only shows when on the mobile site

Re: NEW FORMATTING FOR THE FORUM IS LIVE!
New format does not support HEIC photo uploads that MAC users sometimes have . The old version used to support this, now I can not upload photos any longer . HEIC is a pretty modern photo image format , surprised the new updated forum does not support it ? Just an FYI .

Re: Alde 3030+
@pthomas745 said: disconnect from shore power (if applicable) and turn off the battery disconnect switch
@gkreitzburg said: Unfortunately it does not. I tried that first.
Just Some Rambling Thoughts.
Perhaps gkreirzburg did not wait long enough for the 3030 Control Board and Control Panel to fully power-off. That is fully discharge all voltages stored in the various circuits of the PCBs.
The ADLE only uses 12VDC to power the PCBs; no shore power = no converter output, battery switch off = no 12V to trailer. That's 100% the same for the ALDE as having the 12VDC Connector unplugged and reinstalled.
So more wait time is needed or nüCamp connected the Alde directly to the battery (unlikely).
As said rambling/thinking out loud.

Re: Reinforced toilet flange
Can do!
A quick note however, I would imagine this fix is not manufacturer approved, and it also involves modifying purchased fittings. Thus, if the project gets sideways, you won't be able to return the parts to the store, and if you further damage the trailer in the process of repair, of course NuBrite likely won't cover it via warranty.
For me the project was a complete success, however it is understood that you do this at your own risk. I resisted sharing my procedure as I figured it was one of those things that might make some people cringe… lol. What can I say… I'm an old Appalachian hillbilly at heart. We have a knack for rigging just about anything. 😏
Now that the lawyerly stuff is out of the way… he's what I did: (photos are below)
I went to the Home Depot (the Bellingham Washington location had what I needed, though I imagine stock is similar in other stores… FYI, Lowes didn't have what I was looking for).
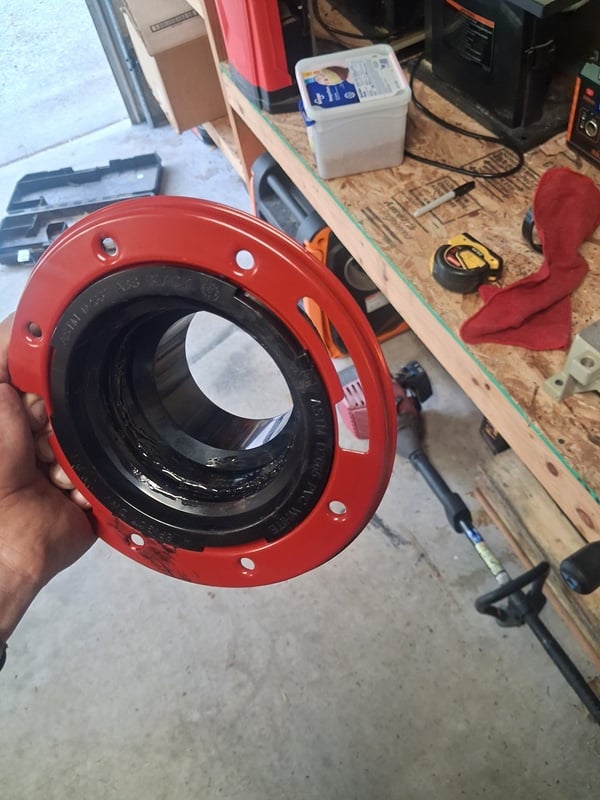
I purchased a red metal reinforced 4" toilet flange.
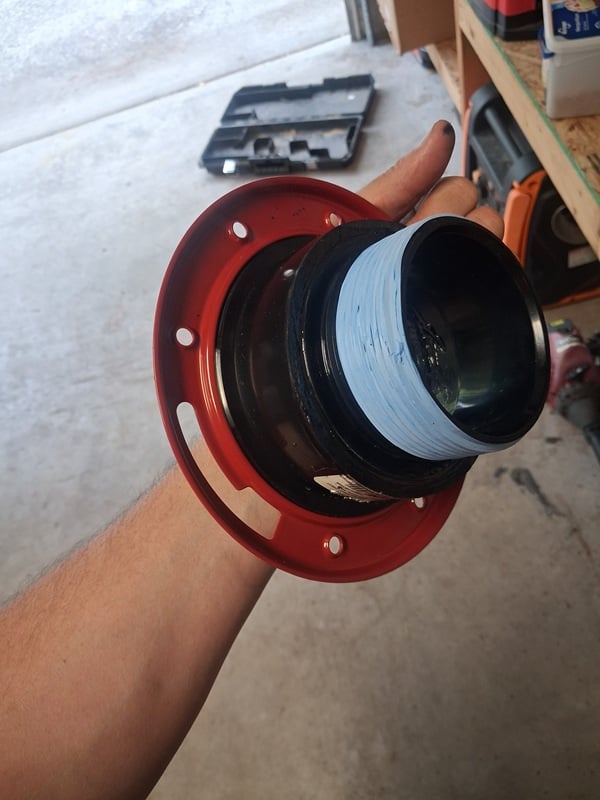
I also purchased a 3" threaded ABS adapter coupling.
Also a can of ABS cement. I already had teflon tape.
***
- Test fit the parts in the store before purchase. The threaded adapter should fit neatly into the female end of the toilet flange. NOTE: These parts are NOT made to be joined in this manner. They just so happened to fit just right. There was a SMALL amount of play in the fitting (about the thickness of a sheet of paper)** I'll cover what to do about this shortly.
- As it is, if you assemble the pieces as they are purchased you will find that the finished part is way too long. You will need to take careful measurements and cut the female part of the flange as well as the threaded fitting (where they glue together). I found it to be about half of the length glued male/female parts on both pieces. Measure several times and endeavor to leave as much surface as possible for the best possible weld. I cut the threaded coupler with an electric chop (miter) saw. I cut the flange by carefully clamping the metal flange part in a vice and carefully cutting the pipe part with a sawsall.
- Prior to gluing the pieces together, you may want to test fit it in the RV itself. Once you're satisfied of the fit, glue the two pieces together. Use a VERY liberal amount of glue. (this will help bind the two pieces together better.) I let my fitting sit for a few days prior to installing it.
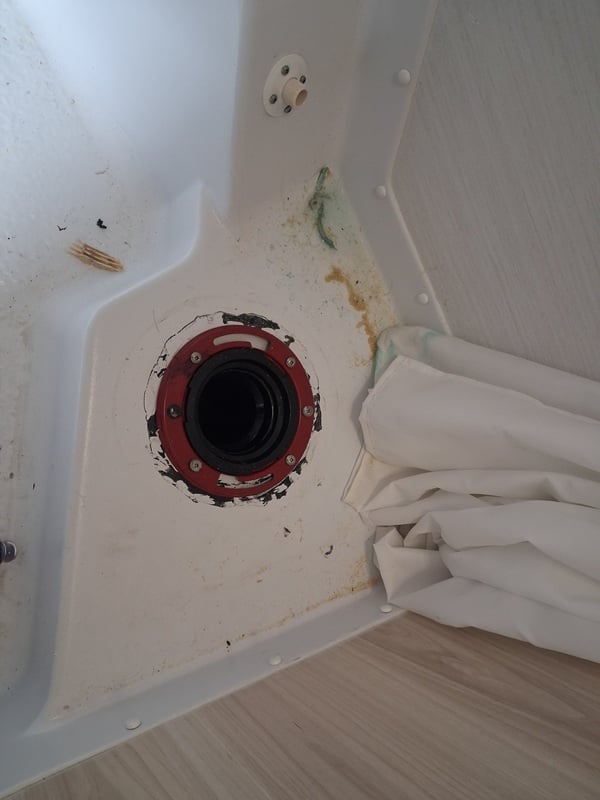
- Back in the camper, the hole in the plywood base was slightly off center to the threaded opening in the black tank. A small jig saw was employed to saw out the excess to make a proper hole to accommodate the new fitting.
- Apply Teflon tape to the threads, I found that I had to thread the fitting very far down into the tank, the threads were generally easy, however I put most of my Teflon towards the back part of the threads to help get it down further.
- Now the tricky (unexpected part). Because the red metal ring spins freely on the flange, it has the advantage of being able to be adjusted for the desired alignment of the toilet flange, however the disadvantage of not having a practical means of grabbing this thing with a tool to help thread it into the black tank tightly. Whereas a punch or something similar might have been used to help thread in a solid flange piece, this wasn't an option with a moveable ring. The solution turned out to be a pair of good work gloves and as tight of a grip as you can muster, with your hand down in the hole, turning it in with all your might. Once the red ring is seated to the base you're almost done.
- Line up the six screw holes and fasten the flange in the same manner as the old one.
- Apply silicone as desired, install the rubber sealant for the toilet, and mount the toilet on the flange.
- NOTE: The right side of the toilet (where the flusher pedal is at) I found to be very difficult to start the nut. You literally can't see it, and have to "see with your fingers". Patience is a requirement.
- Since this is a wet bath, I applied a bead of silicone around the base of the toilet to help keep any stray water out from under the unit.
And there you have it… this was probably not a project for a beginner. It required some creative thinking as the project progressed, and was met with various challenges. I doubt you'd ever get a professional to do this… this is strictly DIY. But when we sit on the toilet now, it feels VERY solid and doesn't budge a lick. I've been banging around old houses for 30 years and work as commercial service technician by trade, so I'm somewhat accustomed to "making things work".
Is it overkill? Probably. But I estimate the work should last the lifetime of the trailer.

Re: Best product to lubricate tow hitch mechanism
For the latch mechanism I use Boeshield T-9. It's a good lubricant for exposure to outside as it leaves a waxy film.

Re: Mat Outside your Tab

Re: 2024 TAB 320-S Black Canyon Factory Solar: Best Yield and Configuration?
@bobctwin said, "The TAB 320-S available roof area may not support the 400's 310W panels. It would be great if it did."
It does …..

Re: 2025 Tab 360 w-Lithium Upgrade
Just catching up on this set of comments. We have one of the first 360s to have been built - Black Canyon edition. Our first off grid experience last year was not good - the BB100Ah battery lasted only 26 hours in 90 degree heat with the trailer in mostly shade. And that's with the fridge on a low setting and the economy features enabled. Had to use the fridge as an icebox/cooler. Had to charge phones in the car. Needless to say, this is not what we expected. We seldom camp more than four-five days, but I wanted to be comfortable doing this without having to settle for sites with power. Here's what we did:
- Installed a 300 Ah Renogy Mini. It is a tight fit, but does go in. It was far cheaper to replace the BB than to add a second BB and only get 200Ah. Plus there is more air space for cooling. You will have to rearrange the hold down loops and get some new webbing. Only downside is that the battery does not have internal heating, but that is not an issue as we don't winter camp and I pull the battery at the end of the season. I was contemplating a separate hatch so I don't have to remove the whole seat every time - I was thinking hinge, but the Velcro idea above is great !
- Had the dealer retrofit the fridge cooling fan under warranty. Newer 360s have a small computer fan behind the fridge, wired to activate when the fridge is on. Before the fan was installed, the cabinet above the fridge got extremely hot, and we had to watch what food we stored in there. But the big issue was how hard the fridge had to run because the heat around the coils wasn't escaping. Fridge was running about 50% of the time, so that's 60 Ah in a 24 hour period.
- Installed a kill switch for the radio. The parasitic demand on the battery in our trailer was almost a full amp. Almost half of that was the radio (i.e. 12Ah in 24 hours). The TV, on the other hand, is almost nothing. You still have the CO2 detector and the power supply, but this was a significant reduction.
- Invested in a 220 watt Renogy external solar suitcase and MPPT controller. In full sun, this unit can crank out 8 or 9 amps and basically run the trailer by itself, even if the roof panels are in shade. I have 30' of cables to let me get to sunny spots on the campsite.
- Rewired the connections to the shunt. NuCamp tech says the only wire on the negative terminal of the battery should be the ground. My external solar bypassed the shunt, and there were some other issues. My Victron will now give an accurate reading on battery status.
My first test this spring was a couple of 65 degree days with full sun in my driveway. The fridge on setting 2 ran two full days (along with the ceiling fan running most of the time drawing 1-2 amps), and I only used 34% of a fully charged battery. The roof panels were more effective than I have ever seen camping, so that helped, but I did not use the external solar suitcase. Much happier and more confident now. Looking forward to a full trial in the field to confirm.
Re: Warped Floor Defective or Damaged?
Pictures and more details on defect location(s) could be helpful.
There has been No Wood in TAB floors for many years so 'they don't warp like plywood'.
Some owners have reported issues with poor vinyl floor covering backside adhesive failing that can cause bubbles and bumps. Others have noted high traffic area soft spots . . . this is most comment on the earlier no wood composite floors due to the internal foam getting compressed.
Additionally, with the earlier composite floors, no data on the newest model years, water can get into the foam itself due to seams leaking {newer models eliminated several seams}. When the foam gets water soaked "it gets very heavy" and the typical failure is for the floor to drop/break along the center seam (above axle), the heavy floor then rests on the axle. Well tanks bolted to floor bottom rest on the axle. Once the water soaked foam is dried out all-is-well except the floor has dropped some half-inch along the axle.
Re: TAB 360 Solar is Weak
My fridge ran on battery for a week while sitting at home recently in full hot sun. With partial shade at Yellowstine last year. I spent a long weekend and had plenty of battery left, too.Trailpixie said:So it sounds like the TAB 360 isn't self-sustaining with its solar panels and refrigerator while boondocking. It may ran two or four days, but depending on the heat and sun and other energy use, you will run out if you only have on-board solar.
For me, spending lots of time in partial shade, I am definitely out of luck. With my TAB 320 and top-mounted parallel wired solar, I seemed to do better.
I am wondering if you are leaving your inverter on all of the time and that is leading to faster battery drain?
